
16 August 2000
Ben Dragon
is a self-described "Part-time Networking Translator." When he's not explaining
to the world how networking works, he's busy configuring his computers to do common
household chores....
If you have a comment about the content
of this article, please feel free to vent in the OS/2 eZine discussion
forums.
|
Previous Article |
|
Next Article |
OS/2 and Home Networking, Part IV
Greetings;I am assuming at this point that you have a fully functional Internet connection and a properly installed, connected, configured and working networking card on OS/2.
There are some pitfalls, tricks and
traps to watch out for if you decide to hookup Windows machines on your LAN with
have a full Internet access. I will endeavour to lead you around the bigger pitfalls
and pull you through the tricks and traps.
We are nearing the end of this article
and this, Part IV, will be the last.
Since OS/2 is now fine and ready
we can move onto Windows.
Windows Networking Installation
and Configuration:
For the purposes of dealing with
Windows I have taken the images from Windows 98 SE, (Sorry Excuse), however, NT,
(and 2k), is very similar and easily converted and users of NT and 2k should have
no trouble finding their way using this guide.
Once you have the card installed
and Windows restarted right click on the "Network Neighbourhood" icon
and select properties. There are several protocols that you must have installed;
IPX/SPX-compatible Protocol and TCP/IP. You can install more depending on what purposes
you want and need, however, these two are enough to give you all the functionality
that I have. Something to keep in mind; The more protocols you have installed on
Windows the more precarious the house of cards will become... just food for thought.
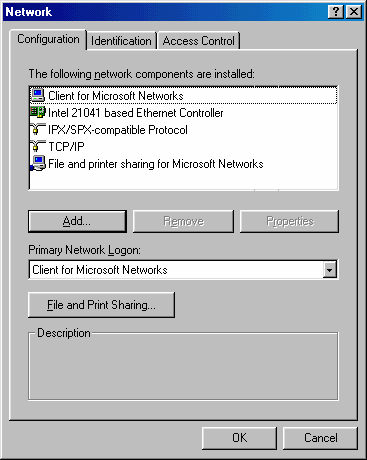
There are many options here to configure.
I will cover only the ones that need to be adjusted the rest can stay as is unless
you are told otherwise or are using a very different configuration and/or different
protocols.
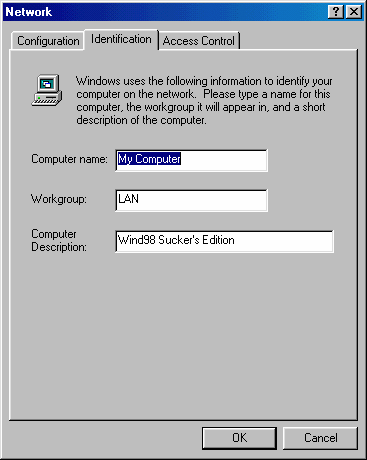
Identification:
Computer name:
This is whatever you wish to call your computer. In the graphic below I have chosen
"My Computer".
Workgroup:
This has to be the same on all computers regardless of what operating system you
are using: If it's connected to your LAN and you want to share access with all computers
on your LAN then this must be the same for all.
Computer Description:
This is the information that others will see as associated with this computer on
your LAN.
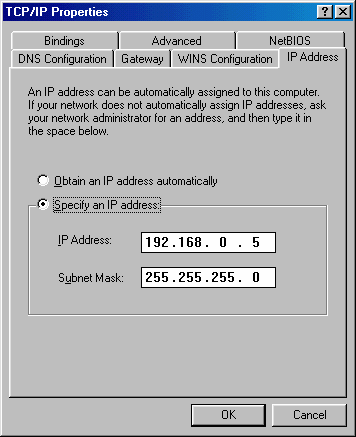
TCP/IP Properties:
IP Address:
Here you will put the IP address of this machine as pertains to your LAN.
Subnet Mask:
This will invariably be; 255.255.255.0.
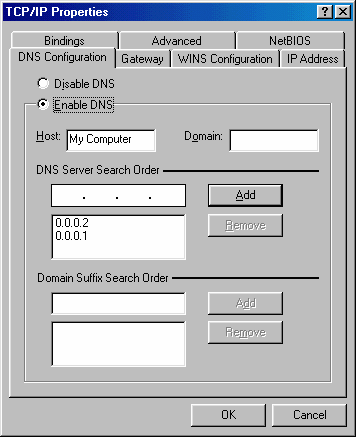
DNS Configuration:
Enable this.
Host:
Here you will put the name of your computer as entered above.
Domain:
Leave this blank.
DNS Server Search Order:
This will the the DNS address(s) that your ISP has given you. Enter the preferred
one last which will put it at the top of the search order. Type in the numbers and
click "Add".
NOTE:
Even though Windows will ask you
many times if you want to enable WINS Resolution do not do so!
File and Print sharing for Microsoft
Networks:
Microsoft loves to adapt to a standard
and then break from it in some minor but disrupting way, claim the standard as its
own and rename it for its own benefit.
Double click, (or single click and
select "Properties").
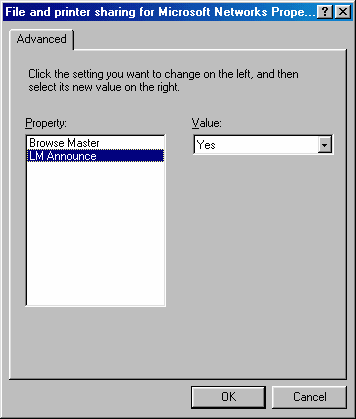
Within the "Advanced" tab
you will find "LM Announce". This is part of the long existing standard
for computer networking. By default this is off and thusly has caused many headaches
for numerous people around the world. The book of Microsoft says it must be so,
so it is so. However, the book of Microsoft holds no sway the in the universe of
OS/2 and I say "Turn it on!" (I feel the power Obi-Wan!) 8)
Going back to the main "Network
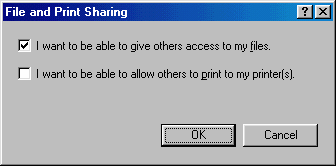
Configuration" window and moving down just a little you'll find a button labeled;
"File and Print Sharing..." Push it! Make sure "I want to be able
to give others access to my files" is checked.
That's all we'll cover for Windows
networking. Now, I know that you can have troubles even though this guide works
as listed, however, Windows is notorious for doing something different each and
every time even if you do the same thing and enter the same data time and time again.
Consequently I'll leave Windows with this final pointer; If nothing works simply
un-install all the protocols, (and NIC driver if need be), and re-install them.
Now, everything I know about logic dictates that this shouldn't make any difference,
however, experience has taught me that with regard to Windows, it can make all the
difference in the world! Even the order in which you install the protocol might
win the war and get things flowing.
With this you should have all computers
on your network seeing each other and sharing in all resources. Now! Onto the final
leg of our journey;
The Firewall:
When it comes to Firewalling software
there are several choices available. What you choose depends largely on your needs.
There are more than a few good proxy servers out there for OS/2 that are very easy
to install and configure and will suit the average users needs quite well. I will
not cover those; The installation instruction that come with them are sufficient
and their limitations are too restrictive for my needs, and for the specifications
of this article.
For full IP Masquerading, or NAT,
(Network Address Translation), there are essentially two programs to choose from;
InJoy Firewall and SafeFire.
When I had a Phone Modem I used my
licensed copy of InJoy for a long while. It's fast, smooth working, very low on
the resources and it did everything it claimed it would do. Money well spent.
InJoy Firewall is made to pick up
where InJoy Dialer left off; It works with Cable Modems and LANs. I tried it on
several OS/2 machines, (and with different hardware and software), with both TCP/IP
4.0 and 4.1 and I have never been able to get it to work despite e-mails and replies
to and from support. Some people experience similar problems with it and others
have it work flawlessly right out of the box.
NOTE:
Keep in mind this article is not
a review of software; It's not a recommendation for anything nor advice against
using certain software. I tried Link Guard Solutions SafeFire and after a brief
configuration it worked and has worked flawlessly for me ever since. Hence, this
is the one I have chosen to use and this is the one I'll deal with, in this article.
Ergo: Don't shoot me! I'm just the messenger! 8)
First we setup the firewall. After
installing, copy and rename the sample configuration file that comes with it. It's
called; "sfire.smp." Name the copy "sfire.cfg."
Set the following;
[ nat ]
enable=yes
defragment=yes
forward_ignored=no
private_net=yes
[ ident ]
enable=yes
[ filter ]
enable=yes
For now set the software to accept
all. You can do this by placing the following in the "Filter" section;
rule=65500 allow all from any to
any
Please note that this is not the
recommended final setup. It leaves you wide open to attack from wannabe hackers.
(Of course, in regard to security, your greatest defense is anonymity; if no one
knows you even exist how can they hack you?) 8)
After you have finished with the
setup and everything that you want to do over your LAN via the Internet is do-able,
then go back and change your settings from "allow all" to "deny all"
and create rules that open only the ports that you will want / need opened.
That's it! You now have the foundation
to place your throne of world domination upon! 8) You will also be able to play
online games over one or more of the remote machines at the same time, use web browsers,
e-mail programs, IRC, FTP, NTTP, (News Readers) and everything else your little
heart desires... except order black, silky stockings... oh, wait a minute! Yes!
Yes, by gum! You can even do that! Not that I've done that or anything... * coughs
and looks around sheepishly *
Have fun, enjoy and when you finally
rule the world remember who put you there and have mercy when you look down upon
me!
Ben Dragon
|
Previous Article |
|
Next Article |