
This article in the ODBC series covers the basic steps in using the ODBC API from a C language program. We will cover:
The intent of the article is not to replace the ODBC Reference manual, but rather to show how to compile C programs that use the ODBC library and provide some sample code for getting up and running quickly. The code samples are written to make the task clear, and do not have error checking included nor are they necessarily written in the most efficient manner. The C programs are all compiled with IBM's VisualAge C++ version 3 from the command line rather than by make files, for simplicity.
All the sample programs are zipped together and available here.
The ODBC SDK that we will be using is a beta version of the version 2.x ODBC API. While there are some pretty significant function and declaration name changes between version 2.x and version 3.x there are not many functional different between the two versions. Since there are a large number of ODBC version 2 database drivers out there in OS/2, I believe we are better off programming to the version 2 interface than programming to the version 3 interface; this gives our "applications" the greatest compatibility possible in OS/2. As I pointed out in last month's article - part 9, programs written to the version 2.x API can be compiled with version 3 headers, and run with version 3 ODBC Administrator and database drivers. Programs written to the version 3 API however cannot be compiled with a version 2.x SDK, and they cannot run in a version 2 ODBC Driver Manager, and cannot be run against version 2 database drivers if they use any version 3 features; if the program is written to the version 3 API and compiled with the version 3 headers it can be run against version 2 database drivers if it doesn't use any version 3 specific features. Whew - got all that? In summary I think that programming to the version 2.x API is the best bet in OS/2. Besides, I don't know of any version 3.x ODBC SDK's available for OS/2, so your best choice is also your only choice.
The only potential downside of programming to the version 2.x API is that if you also want to compile your ODBC program so that it is a CLI program - meaning you compile your ODBC source code against a specific database's CLI headers - then the version 3.x API is a better bet. This is because the ODBC version 3 API conforms completely with the CLI standard. This is not really an issue with OS/2 since the only OS/2 database that has a standards conforming CLI is DB2/2, and the DB2/2 CLI will accept either version 3.x or version 2.x ODBC source code.
--- process SQL statement(s) ----
--- retrieve results ---
Steps 4 - 6 are usually repeated many times in an application for a single connection. Usually a single connection is all that is needed between the application and a data source (a database.) However a single application may need to make multiple connections to the same data source if that application is running multiple concurrent transactions, since only one transaction per connection is allowed. The number of connections a single data source can handle is dependent on the database driver; most can handle multiple connections.
It is also possible, although less common, for a single application to be connected to more than one data source at the same time.
The stuff that happens between steps 4 and 5 doesn't have any functions shown because of the wide variety of action that an application may chose to do, see the table below for possibilities.
The following table shows a summary of all the ODBC functions, categorized by task. We will only be covering a small number of these in the sample programs, but the table will give you an idea about the capabilities of the ODBC API.
| Task | Function Name |
Conformance |
Description |
Connecting to a Data Source |
SQLAllocEnv |
Core |
Obtains an environment handle. Once allocated, an environment handle is used for one or more connections |
SQLAllocConnect |
Core |
Obtains a connection handle. | |
SQLConnect |
Core |
Connects to a specific driver by data source name, user ID, and password. | |
SQLDriverConnect |
Level 1 |
Connects a a specific driver by a connection string, or requests that the Driver Manager and driver display connection dialog boxes for the user. This is an alternative to SQLConnect. | |
SQLBrowseConnect |
Level 3 |
Returns successive levels of connection attributes and valid attribute values. When a value has been specified for each connection attribute, connects to the data source. | |
Obtaining information about a Drive and Data Source |
SQLdata sources |
Level 2 |
Returns a list of available data sources. |
SQLDrivers |
Level 2 |
Returns a list of installed drivers and their attributes. | |
SQLGetInfo |
Level 1 |
Returns information about a specific driver and data source that is currently connected to by the application. | |
SQLGetFunctions |
Level 1 |
Returns information about which driver functions are supported. Requires a connection. | |
SQLGetTypeInfo |
Level 1 |
Returns information about data types supported by a connected data source. | |
Setting and Retrieving options for a Driver/ Data Source |
SQLSetConnectionOption |
Level 1 |
Sets or retrieves information and options about a connection, such as auto-commit, etc. |
SQLSetStmtOption |
Level 1 |
Sets or retrieves information and options about a statement. | |
Preparing SQL Statements |
SQLAllocStmt |
Core |
Allocates a statement handle |
SQLPrepare |
Core |
Prepares a statement for later execution. | |
SQLBindParameters |
Level 1 |
Assigns storage for a parameter in a SQL statement. | |
SQLParamOptions |
Level 2 |
Assigns multiple storage for the same parameter for "bulk" operations. This is an alternative to SQLBindParmeters. | |
SQLSetCursorName |
Core |
Sets and retrieves the cursor name associated with a select statement. If the cursor name is not set then ODBC automatically assigns one. Cursor names are used for positioned updates and deletes. | |
SQLSetScrollOptions |
Level 2 |
Sets options that control the behavior of the cursor, e.g. scrolling cursors, etc. | |
Submitting SQL Statements |
SQLExecute |
Core |
Executes a previously prepared (SQLPrepare) statement. |
SQLExecDirect |
Core |
Executes a statement directly, i.e. one that has not been prepared. | |
SQLNativesql |
Level 2 |
Returns the text of an SQL statement as translated by the driver. This may be of interest, for example, when using ODBC escape sequences. | |
SQLDescribeParam |
Level 2 |
Returns the description for a specific parameter in a statement. | |
SQLNumParms |
Level 2 |
Returns the number of parameters in a statement. | |
SQLParmData |
Level 1 |
Used in conjunction with SQLPutData to supply parameter data at execution time. Useful for long data values. | |
SQLPutData |
Level 1 |
Send part of all of a data value for a parameter. Useful for long data values that are sent in "chunks". | |
Retrieving Results and Associated Information |
SQLRowCount |
Core |
Returns the number of rows affected by an insert, update or delete request. |
SQLNumResultCols |
Core |
Returns the number of columns in a result set. | |
SQLDescribeCol |
Core |
Returns basic information about a column in a result set, such as column name, the ODBC data type, size, etc. | |
SQLColAttributes |
|
Also returns information about a column in a result set (see SQLDescribeCol). This function returns things like whether the column is case-sensitive, the name of the table containing the column, the owner of the table containing the column, the qualifier of the table containing the column, the data source data type of the column, etc. | |
SQLBindCol |
Core |
Assigns storage for the result column, and specific the data type expected. | |
SQLFetch |
Core |
Returns a row from the result set. | |
SQLExtendedFetch |
Level 2 |
Returns multiple result set rows. | |
SQLGetData |
Level 1 |
Returns part or all of one column of one row in the result set. Useful for retrieving long data in "chunks". | |
SQLSetPos |
Level 2 |
Positions a cursor within a fetched block of data. Used with scrolling cursors. | |
SQLMoreResults |
Level 2 |
Determines if there are more result sets available and if so, initializes processing for the next result set.This is used with bulk operations (see SQLParamOptions). | |
SQLError |
Core |
Returns more information or status information. | |
Catalog Functions |
SQLColumnPrivileges |
Level 2 |
Returns a list of columns and associated privileges for one or more tables. |
SQLColumn |
Level 1 |
Returns a list of the columns in a specified table. | |
SQLForeignKeys |
Level 2 |
Returns a list of column names that comprise foreign keys, if they exist for a specific table. | |
SQLPrimaryKeys |
Level 2 |
Returns a list of the column name(s) that comprise the primary key for a specified table. | |
SQLProcedureColumns |
Level 2 |
Returns the list of input and output parameters, as well as the columns that make up the results set for the specified database procedure. | |
SQLProcedures |
Level 2 |
Returns a list of the procedures stored in a data source (database). | |
SQLSpecialColumns |
Level 1 |
Returns information about the optimal set of columns(s) that uniquely identifies a row in a specified table, or the columns that are automatically updated when any value in the row is updated by a transaction. | |
SQLStatistics |
Level 1 |
Returns statistics about a single table and the list of indexes associated with that table. | |
SQLTablePrivileges |
Level 2 |
Returns a list of table and the privileges associated with each table. | |
SQLTables |
Level 1 |
Returns a list of the table names stores in the currently connected data source. | |
Statement Termination |
SQLFreeStmt |
Core |
Ends statement processing and closes the associated cursor, discards pending results and optionally, frees all resources associated with the statement handle. |
SQLCancel |
Core |
Cancels/terminates an SQL statement. Use to interrupt database processing of a statement. | |
SQLTransact |
Core |
Commits or rolls back a transaction | |
Connection Termination |
SQLDisconnect |
Core |
Closes a connection. |
SQLFreeConnect |
Core |
Release the connection handle and associated resources. | |
SQLFreeEnv |
Core |
Release the environment handle and resources. | |
Misc |
GetPrivateProfileString - OS2 |
NA |
Gets names or data for a key or value in the ODBC.INI file. This is useful for setting up dBase and other file-type data sources when connecting. |
All the examples are compiled with the command line batch file compile.cmd. To compile the examples,
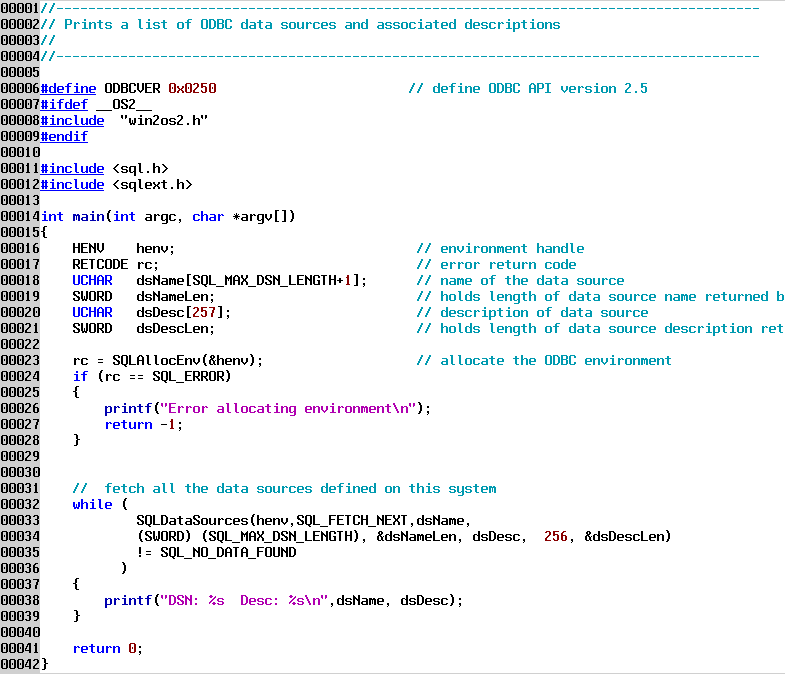
Notes on the code:
Line 6 defines the version of the ODBC API that we are coding to. This becomes important when compiling against a version of ODBC that does not match the version of the API used to create the program. You can compile against later version SDKs than what you coded to, but you cannot compile against an earlier version. This is mainly a concern if you also will be compiling your ODBC applications on Windows, which has a number of different version ODBC SDKs available. It is also important to declare the version of the ODBC API you are coding to if you intend to compile the program against DB2/2's CLI SDK.
Line 23 is where we allocate an ODBC "environment." Allocating the environment gets ODBC set up to handle the program.
Line 32 - 36 is a while statement broken into multiple lines in order to fit on the screen. The SQLdata sources function retrieves each data source defined in ODBC.INI. When no more data sources are in the list, the function returns the value SQL_NO_DATA_FOUND.
This example has almost no error checking. We will introduce how ODBC errors can be determined in the next example. The results of running this program are shown below.
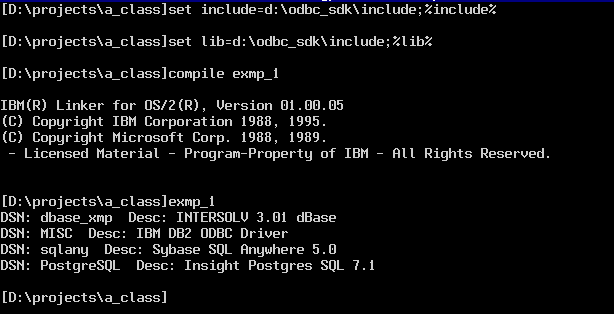
Notice that we set the include and lib environmental variables at the start of the session. Then we run the COMPILE.CMD batch file specifying the name of the source file to be compiled (without the extension,) in this case exmp_1.c. Then we run the executable that we created. The program lists all 4 data sources defined on my machine, as shown below.
Notes:
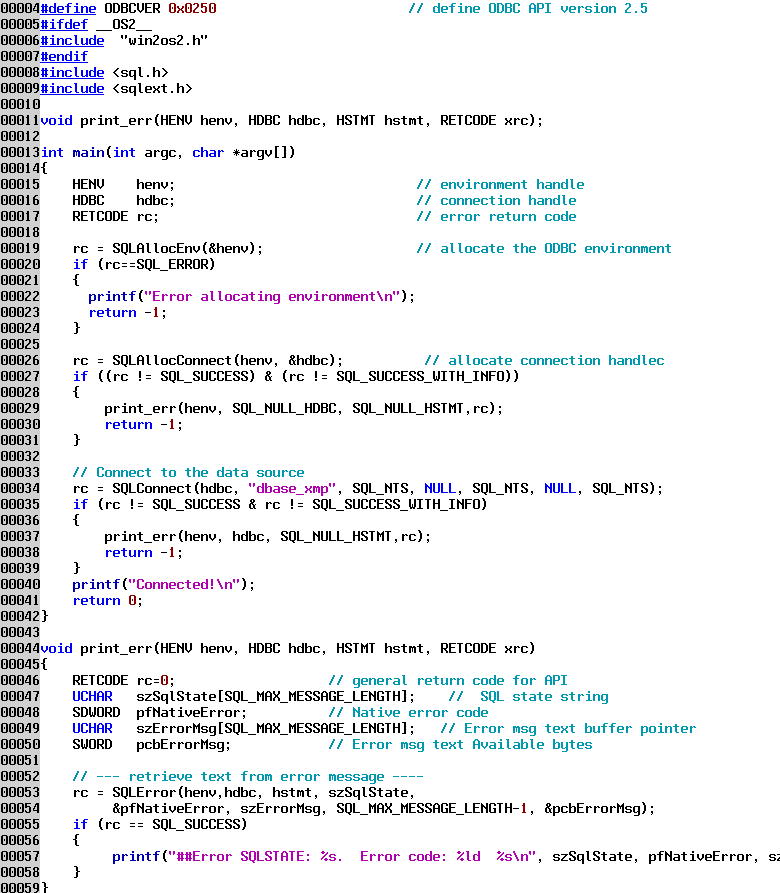
Line 19 is where we allocate the ODBC environment. This is done once for the program.
Line 26 is where we allocate a connection handle, which is passed to other functions to indicate which connection is being used. This is necessary because a single program can have multiple connections open at the same time.
Line 27 introduces more robust error checking. If any error condition is indicated, we call the function print_err() which is defined on lines 44-59.
The print_err function returns the last error associated with the environment, connection or statement handle (we will see statement handles in the next example.)
Line 34 is the function that does the connect. We are connecting to the dBase data source named dbase_xmp. On OS/2 the case of the data source name passed in this function must match the case of the name as defined in the ODBC Administrator. If it doesn't match you will get all sorts of unpredictable behavior, even though you connect. Since dBase "databases" do not have user IDs or passwords those parameters are left blank. If you want to connect to a database that requires user IDs and passwords you can just fill in those parameters, as shown below.

This shows connecting to a SQL Anywhere data source; the user ID is dba and the password is SQL. Whether the user ID and password are case sensitive is dependent on the database driver. The third parameter in this function indicates the length of the data source name; SQL_NTS means that the string is a null terminated string. Generally you can use SQL_NTS for length parameters any time you are passing C strings, otherwise you would have to pass the actual number of bytes in the name parameter.
Notice on line 40 that the third parameter, the statement handle, is null. This is because there is no statement handle allocated. If there were no connection handle allocated then we would pass a SQL_NULL_HDBC value for the connection handle.
While this example connects to a data source it doesn't do much in the way of output.

The next example program connects and then queries the connection in order to determine information about the type of data source that the program has connected to. In this example we are querying the name of the database, the user ID that is assigned by the database, how the database uses the "owner" attribute and whether the database handles procedures.
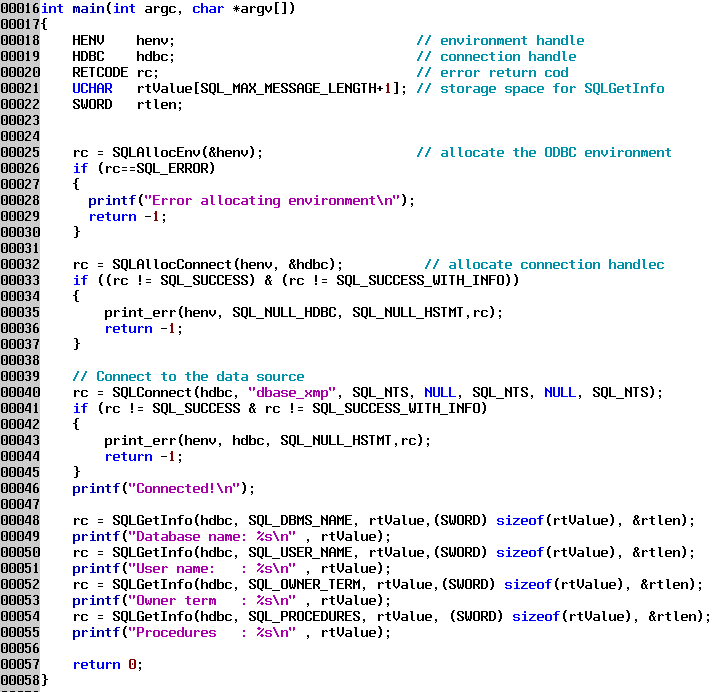
The second parameter to SQLGetInfo tells the function which information we are looking for. There is a huge amount of information that is available about a particular data source; we are only querying for 4 items.
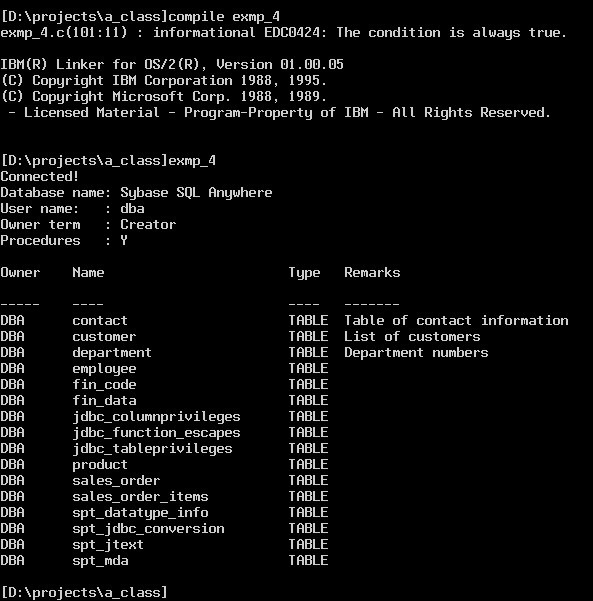
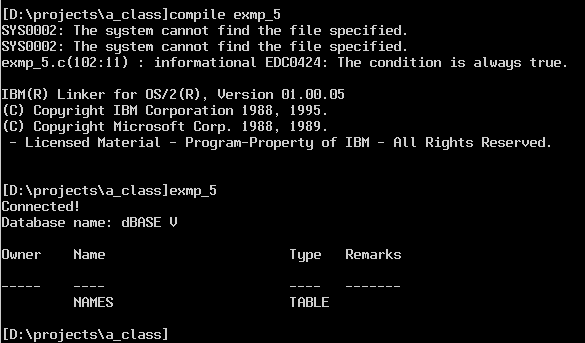
dBase databases are very simple compared to "normal" SQL databases, so we don't see much information here. If we connect to SQL Anywhere we will see more data.

We are just showing from line 54 down in the file because of the file size.
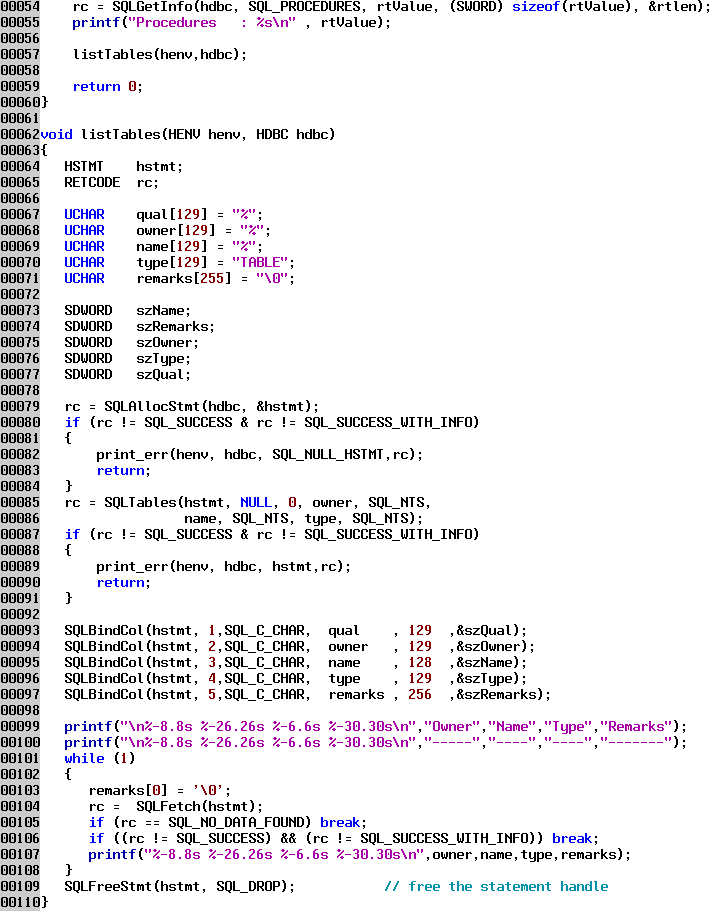
Line 57 calls a new function we define on lines 62 - 110. Since it is possible that there is more than one table defined in a data source, ODBC returns the table list as a result set. The procedure for handling the result set is the same as if we were working with data from a table itself. First we have to allocate a statement handle, line 79. Then then SQLTables function on line 85 creates the result set. We then must tell ODBC where to put the data items for each row (each table in the list) from the result set. This is done with the SQLBindCol functions on lines 93 - 97, passing in the statement handle, the type of data we are expecting back from the result set, a pointer to the location where that data is to be stored, and the maximum length of data that can be stored in that location. The final parameter is an "output" parameter that is filled in by the fetch process; it returns the actual size of data that is returned, or else an indicator that tells us there is no value, i.e. a NULL value for that data item.
SQL Anywhere, along with DB2/2 and many other databases, does not have the concept of a "qualifier" in the ODBC sense. Therefore the qualifier parameter is passed as a NULL; otherwise the database driver will complain that it is not capable of handling the function call. The values passed for the owner (schema) and table name are SQL wildcards that match any number of characters; this will get us all tables for all owners. Alternately we could specify a single owner/schema name or value to limit the tables displayed, or we could put in a more complex name specification, e.g. PROJ_% The values are case sensitive, just like normal SQL. If all the values are left blank except the qualifier, the list will return all valid qualifiers in the database. Likewise if all the values are blank (zero length strings) except the owner, which contains a % then the list would return all the owners in the database.
Some of the possible types that can be specified are: TABLE, VIEW, SYSTEM TABLE, GLOBAL TEMPORARY, etc. Multiple comma delimited types can be specified in the type parameter.
Line 104 fetches each row from the result set, putting the columns of data into the variables or storage locations indicated by the SQLBindCol for each column.
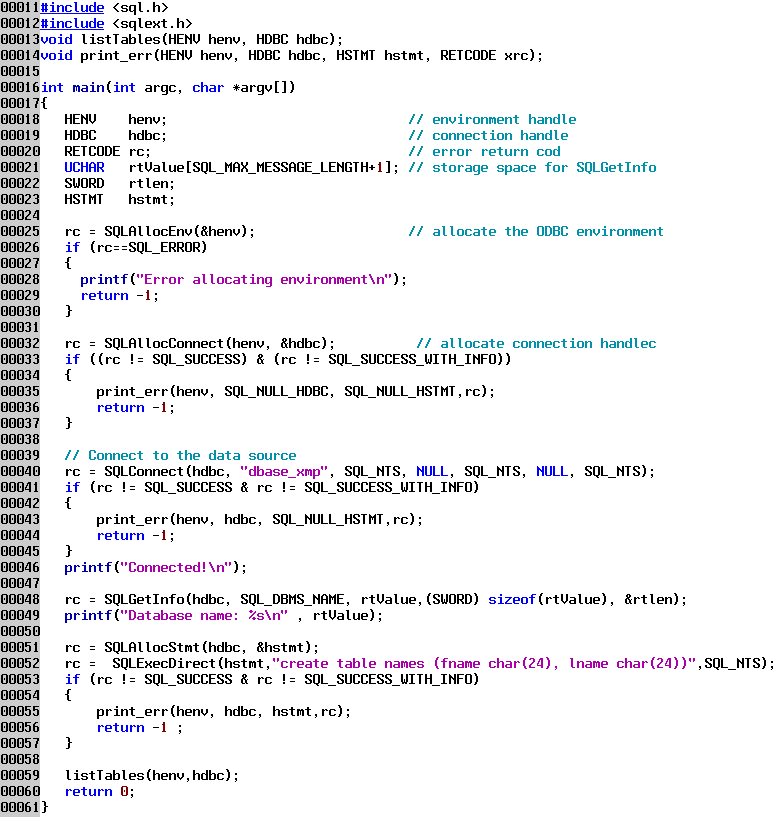
Line 51 allocates the statement handle we need, then line 52 executes the SQL statement; the last parameter is telling SQLExecDirect how long the SQL statement is, in this case we are specifying a null terminated string. If you intended to execute the same (parameterized) statement over and over again then you should prepare the statement and use SQLExecute instead of SQLExecDirect, since this saves the overhead of preparing the statement each time it is executed. (You can realistically only reuse a SQL statement if it has parameters that you intend to replace or update before each execution.)
You may wonder with dBase where the table is created, since dBase tables are stored in files on the hard drive. With dBase a directory on the hard drive is considered to be the "database", and all the table files located in that directory are considered to be in one database. You can fully qualify a table name with the drive and path to explicitly specify where the table is located; otherwise the directory used will be the one specified on the dBase setup screen when the data source is created, as shown below in the Database Directory.
The directory path is available as the "qualifier" and can be queried after a connection is made. This works perfectly in Intersolv's version 3.x dBase driver, but in earlier versions it is broken; you must set the qualifier connection attribute from the setup screen in order to get the database directory setup value to work properly. This work-around is shown below.
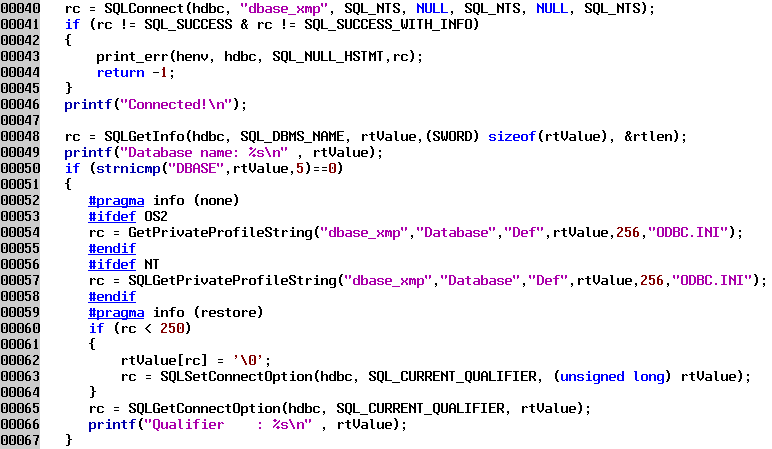
Line 54 queries the entry in the ODBC.INI file for the specified data source, and then sets the connection qualifier attribute to the value retreived from the ODBC.INI file on line 63. This is one of the few places where there is a difference between ODBC on Windows and ODBC on OS/2.
After the table is created we list the tables in the data source, which means for dBase to list the *.DBF files located in the database directory.
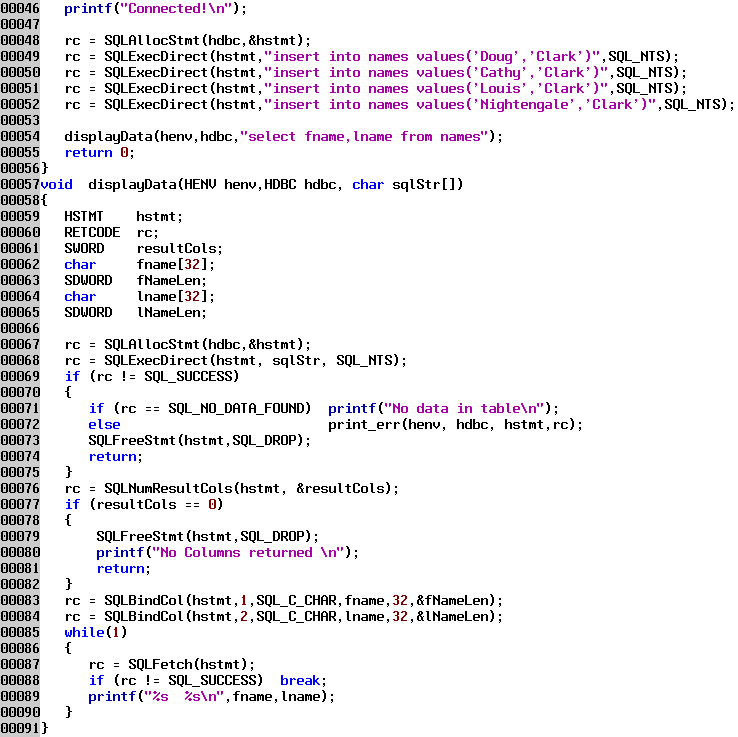
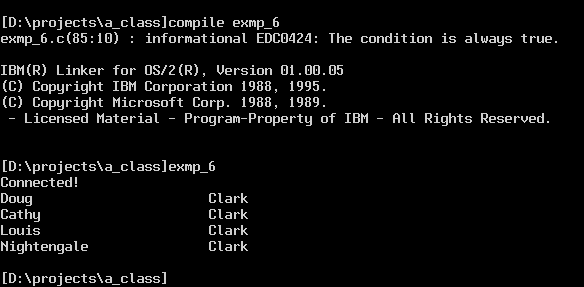
Lines 48 - 52 insert 4 rows of data into the table. The new displayData function called on line 54 gets the data from the table and prints it to the screen. After the statement handle is allocated, the SQL select statement is executed, which creates a result set. We could have then used the SQLDescribeCol function to query each column of the result set for the type of data, name of the column, etc. To keep the example simple, and because we already know the structure of the table, we don't call SQLDescribeCol. We do have to bind each column of the result set to storage locations in order for ODBC to know where to copy the data to. Since we know in advance what data types the columns are it is pretty easy to create storage (here we are using local variables or stack storage) and point the result set columns to our created storage. If we didn't know what data types the result columns were, we would have to query each column with the SQLDescribeCol function, malloc some storage of the proper type and size, and then bind that storage to the column. The third parameter in SQLBindCol indicates the type of storage you have allocated to hold the data from the result column; ODBC and the database driver will convert the data from the data type in the result set to the type you specify, if possible. All database types except binary can be converted to SQL_CHAR or character arrays. If you are going to display the data anyway you might as well just use character arrays to store the data and save yourself the trouble of trying to malloc the correct type, although formatting numerical values can then be somewhat difficult since you then can't use printf formatting.
When the SQLFetch function is called, ODBC copies the data from all the columns that are bound in the current row into the storage locations bound to those columns. An alternative to binding columns to storage locations and having the SQLFetch function automatically copy the data is to use the SQLGetData function. This can be called for a specific column and you can specify the amount of data to be retrieved for the column. This is useful when retrieving long values (large object or LOB's) since you can repeatedly call SQLGetData for a single column until you get all the data. SQLGetData can be combined with binding where you call SQLGetData on the long columns which are not bound, and let SQLFetch copy the data for short columns that are bound.
The figure below shows the four rows we entered.
Since ODBC is a C language API, you get the most flexibility and power using the C interface. There are other
interfaces to ODBC that provide benefits; next month we will look at a set of C++ classes that greatly simplify database
access.
This article is courtesy of www.os2ezine.com. You can view it online at http://www.os2ezine.com/20020116/page_10.html.