February 16, 2002
Cristiano Guadagnino is a dedicated OS/2 user/developer since the 2.0 release.
If you have a comment about the content of this article, please feel free to vent in the OS/2 eZine discussion forums.
There is also a Printer Friendly version of this page.
|
Previous Article |
|
Next Article |

Maul Publisher v2.03
Recently I had a need to print a few thousand labels with a
custom logo, for some friends of mine. The problem was that the labels were
round, label-sheets where of an uncommon (and non-standard) format, and
some of the labels were too near the border of the sheet. I had
to carefully measure the sheet, all the
distances between labels, and the distance between labels and the edge
of the sheet. Once done with this job, I had to find a program capable
of doing very precise formatting of the print job. Also, since I had to
put some text around the logo, it had to be able to perform some
powerful text-formatting operations.
To be honest, I had already done the job a few times in the past, using StarImpress from the StarOffice 5.x suite. While it did the job reasonably well, I had to deal with frequent crashes, heavy memory consumption, and bugs. The most frustrating bug was that every time I closed and then reopened the document, StarImpress would reformat all the circular text around the logos, so that the text was partially overlapping the image.
I told to myself: "OK, this time I'll get it right!". Time was
ready to look at a new product, so, remembering something I once saw on
Hobbes, I found the homepage for Maul Publisher (www.manglais.com.)
Maul Publisher Installation
If you look at the features, you'll see it is a very powerful product. I don't know how it compares with other desktop publishing products on the Windows (or Mac) platform, since I had no use for those until recently. The latest release, at the time of this writing, is v2.03. After downloading it to a temporary directory, you need to unzip it and launch the install program. Read the instructions carefully, there are a few problems with the config.sys parser in the installer. One bug that is not mentioned is that you can't install from a directory whose name is only one number.
I usually maintain several numbered directories under my \temp directory, where I unpack the programs I want to try out. I had a hard time understanding why the install was failing on two totally different OS/2 systems! Once I renamed the directory, the installation finished without problems.
![]()
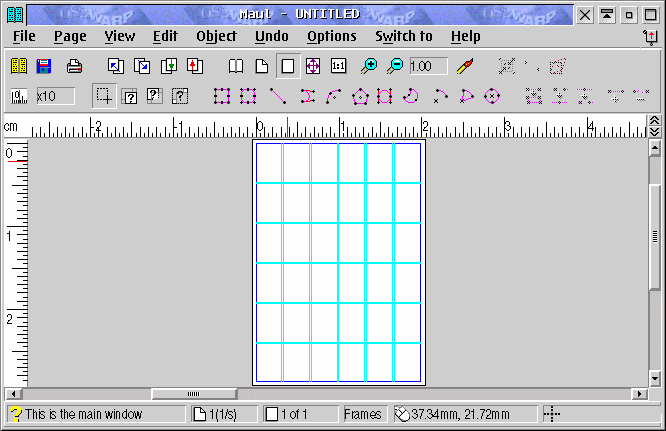
At Work With Maul
First of all, I had to create a new form, with the non-standard sheet measurements. Maul supports the creation of new forms. If your printer only supports standard forms there's no problem, provided you select, in the printer settings dialog, a form that will contain the newly defined form. "Good!" I thought, although my printer driver supports the definition of new custom forms. But after a few minutes and a few restarts from scratch, I had to drop the idea of creating a form with Maul. I am probably not skilled enough in the art of desktop publishing, and the form definition dialog of Maul is not terribly intuitive.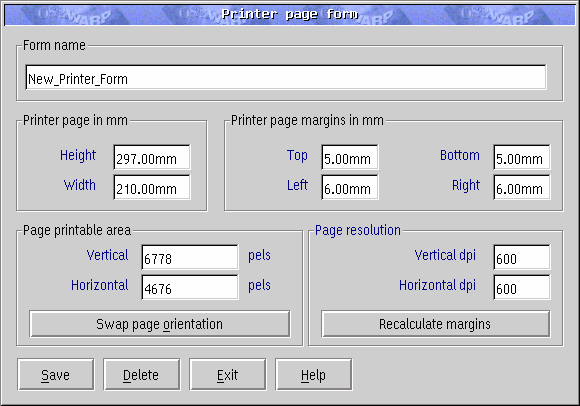
As you can see, there are four different groups of options for defining the size of a new form. You can set the page size, as I did, but this is not enough: you'll get your printer margins completely screwed. Even if you try to force the margins, you won't get what you want, because as soon as you leave the entry fields Maul will do some calculations of its own, and screw it up again. Reading the on-line help I seemed to understand that I had to set the page's printable area, so that Maul could do its calculations correctly. But the page printable area is defined in pixels! Fortuantely the on-line help comes to the rescue again: you can specify a unit (e.g. millimeters) and it will use it, even if there is that hardcoded "pels" to the right of the entry fields. So I entered it, and entered the true resolution of my printer in the "page resolution" fields, only to find that Maul was again calculating the margins wrong.
The problem here is probably not Maul's, it is that I am not able to understand how it calculates the margins based on what you enter. I always ended with negative margins, and the preview box always showed my form out of the physical sheet, no matter what modifications I did. It could very well be a bug, but because of my limited understanding of the matter I will not venture into saying it is.
Ok, so why mess with this confusing dialog when my printer driver can do this in a simple and effective way? This is maybe time to get a little off-topic: do you know that you can set the properties of your printer driver?. Note, NOT the print job's properties! Open your printers folder, than click with the right mouse button on your printer icon and select "properties". Now go to the "Printer driver" notebook page. You see two containers. The lower one contains the selected driver for the printer. Click on it with the right mouse button, and select "properties" again. Depending on the printer, you'll have many configuration options, and probably one of those will be the possibility to define custom printer forms.
After defining the new form this way, Maul was quite happy to use it right away. At first I chose to use a grid of 6 columns and 7 rows, which is pretty easy to define. The "snap to grid" option comes in very handy for positioning the objects if you use such a grid.
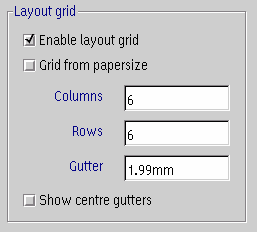
After a bit of experimenting, I realized that the grid was not good for my job, because the labels were oddly spaced on the sheet, and you don't have an opportunity to define grids that have different spacing for rows and columns. You can, however, define custom gridlines, placing them directly on the sheet with the mouse. This filled my needs, but I needed to place them very precisely, and you can't do this with a mouse over a virtual ruler. Again I looked at the on-line help, which suggested zooming in until I had sufficient precision. While this worked quite well (the zoom function is very powerful, and you can easily achieve sub-millimeter precision even using a mouse), it is not a very convenient way to work, especially if you already have all the measurements you need. A simple dialog to enter the position of the gridlines (something like the "tabulator" settings in a word processor) would have been much more effective. This way, you have to jump back and forth all over the sheet, which is enormous due to the high zooming.
Frames and Handlers
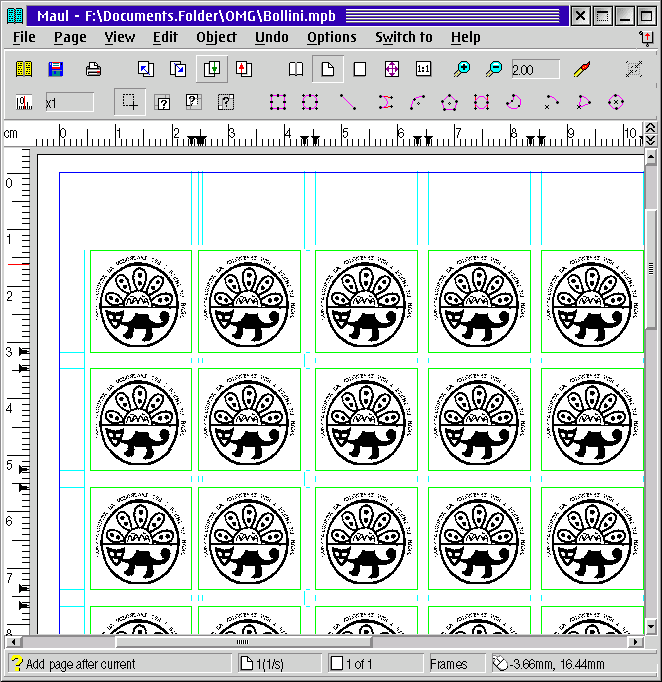
The next step was to insert the logos. Well, how do I do it? Maul works in a peculiar way, which is very powerful once you grasp the concept. At first, you have to define a "frame" that acts as a base for subsequent actions. You have all the usual tools to draw frames: the rectangle tool, the circle tool, the spline tool, etc. Then you apply a handler to the frame. Handlers can be applied to the content of the frame, to the border of the frame, or to the background of the frame. Handlers are plugin modules, so you can have tons of effects applied to your frames, provided someone volunteers to write new plugins. The program however comes with all the needed plugins for a beginner like me.I began by adding a rectangular frame to the first cell grid of the page. Then I applied a content handler, to import the logo bitmap. It was time to create a circular frame around the logo, to be able to place the text later. It was very easy, and the "Wingstamp express" handler then added the circular text around the logo in a snap! One good thing I have to say is that, unlike a lot of graphic programs, the text is not rendered as an image once placed: it is real text, and you can select end edit it as you like, even if it is on a wildly curved path. At the end of this process, I grouped the frames together, to obtain a single object that could easily be copied and pasted, or exported. At last, I copied the object and pasted it in all the other grid cells. Wow!
Printing your work
Maul does a good job of printing your work, and you don't need a "preview" window because What You See Is What You Get. Well, almost. The problem is that the resolution of the screen is very inferior to that of the printer, so you don't notice some of the aspects of your work until you've printed it. Once printed I noticed a strange behaviour: the pasted objects were not exact copies of the original one, but presented some slant in the rendering of the circular frame, so that some of the logos were not centered in the circle, and even worse some of the circles were not circles anymore! After a lot of tweaking, I had to resort to a different approach. I fired up a new document, and recreated a big copy of the logo with the circular text. Then took a screenshot of the completed logo, cropped it carefully, and saved it as a BMP. So I had created a static version of my objects grouped together, and this time I could be sure they weren't going to be reformatted.I took the original document, deleted all the frames, and created a new rectangular frame in the top-left grid cell. Imported the newly created bitmap, then copied the frame to all the other cells. This time I zoomed in the page to be sure it was all as it seemed at first sight. Time to print again... perfect!
Summary
So, am I satisfied? Well, I am very satisfied for the fact that, despite the initial effort, I now have my document perfectly formatted, and don't have to mess with it again every time I open it. If I want to print additional labels, I just have to drag the document over my printer, load the label-sheets, and I'm done.On the other hand, Maul was a pleasure to work with, but not quite as much as it could be. Though I think the product is mature enough for most of the uses of a desktop publishing package, there are quite a few rough edges that could be straightened out without too much effort.
The "handler" concept is very powerful, and easy to work with once you've grasped it. Maybe it is not a new concept, but it's the first time I have been exposed to it. The fact that handlers, in Maul, are effectively plugins only makes things better, because it extends its possibilities virtually infinitely.
Will I buy the product? I am very tempted to do so, especially because I will have to create these labels again and again. On the other hand, I usually have no other use for a desktop publishing package, and 99 dollars is not a very small price, though compared to other DTP packages it could be considered near to nothing.
I highly recommend the download to anyone who needs sophisticated
document layouts under OS/2. The program is small, fast, stable,
and consistent, in the best tradition of OS/2 software.
Maul Publisher V2.00 for OS/2
Price: US $99
Type: Shareware
Support: Email only, maul@manglais.com
Sales Email: orders@manglais.com
Order Online: www.manglais.com
Download URLs: maule203.zip 3786k (3.79MB)
Supported platforms: OS/2 Warp, Windows
System Requirements: Requires MMOS2 multimedia installation
|
Previous Article |
|
Next Article |