16 November 2000
 ShyGuy
likes to describe himself as the "Dark Loner Genius in the Corner" In
reality, he is a technician plus salesman plus web designer at DSE
Computers
ShyGuy
likes to describe himself as the "Dark Loner Genius in the Corner" In
reality, he is a technician plus salesman plus web designer at DSE
Computers
If you have a comment about the content of this article, please feel free to vent in the OS/2 eZine discussion forums.
| Previous
Article |
|
Next
Article |
Changing and Creating Icons in OS/2
With the recent release of the eCS preview edition, discussion has turned to the look of the default OS/2 icons. Some have argued that they are beginning to show their age. The state of the GUI has changed since 1996, and a 16 color icon isn't quite as pretty as a 24bit color icon.
But wait! you're not stuck with the default icons, the WPS is nothing if not configurable. Look at the properties for any file or object and you can change the icon to any picture you please. Easiest way is to drag the new icon onto the program's icon properties.
There are literally thousands of OS/2 icons available at Hobbes. The icon libraries have almost any graphic you could imagine, but Hobbes might not have the absolutely perfect icon for you. It's time to take the bull by the horns. It's time to create your own icon.
Making
the icons the easy Way
There are several levels
of involvement when it comes to making your own icons. The easiest way is
to choose your favorite image file and view with the OS/2 image viewer (the
default association) and click on Image then Set Icon. This is the quickest
way to make an icon in OS/2 but it has a couple of drawbacks. First, the
image viewer only creates the large version of the icon (not sure if this
is a bug or a feature), so you don't see your custom icon when in a tree
or details view. Second this isn't yet a true .ico file so sharing it with
another system isn't quite as clean.
Getting
More Involved.
If you really want to express your artistic ability when making your own icon, you have to bring up the icon editor.
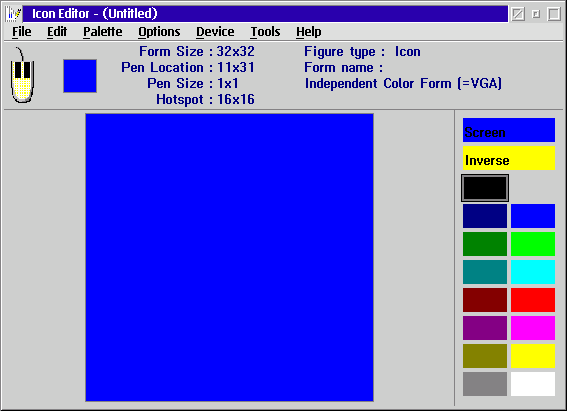 Although the icon editor has a few drawing tools, I don't really recommend
using it to sketch out the icon. You will get better results if you make
the picture in a graphics program and paste the results to the icon editor.
The default icon template is a 32x32 16 color form, but to make a higher
color icon with several different sizes, I recommend working off of one
of these Templates
The zip file contains 5 templates. I generally use the 24bit color form
with 40x40, 32x32, 20x20, and 16x16 sizes.
Although the icon editor has a few drawing tools, I don't really recommend
using it to sketch out the icon. You will get better results if you make
the picture in a graphics program and paste the results to the icon editor.
The default icon template is a 32x32 16 color form, but to make a higher
color icon with several different sizes, I recommend working off of one
of these Templates
The zip file contains 5 templates. I generally use the 24bit color form
with 40x40, 32x32, 20x20, and 16x16 sizes.
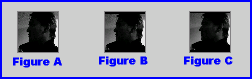
Fire up your favorite imaged editor, I generally use Embellish, and open the graphic you want to use. For this example We can use that picture of me at the beginning of the article. If I copy and paste the entire article from Embellish into the icon editor, It will automatically be re-sized and stretched so that it is perfectly square. The results of doing it this way is in figure A below. Now doing it this way stretches out my head a bit, so Let go back into Embellish and add a little space at the top and the bottom to make my picture perfectly square. To easily do this in Embellish I chose colors, then borders, and placed a top and bottom border in black to even it out. Select the entire picture and paste in the icon editor. The results are figure B below. See? no more stretchy head. Okay so the image is in proportion but some of the detail was lost resizing it down. If I do the resizing in embellish I can anti-aliasing to smooth out the image a bit. Re-sized with "no jaggies" is figure C.
Now the templates I use have four different sizes. 40x40 and 20x20 for high resolution screens, 32x32 and 16x16 normal resolution screens. If you click on Device then List in the icon editor you can switch to the different sizes and even create your own sizes and color depths.
Well, I hope this article has offered some insight into the mechanics of creating personalized icons for your system. The artistic aspect of the process is up to you, but with some good pictures and a little work, you're on your way to making a completely custom system.
| Previous
Article |
|
Next
Article |