16 February 2001
This article was written by Jon Bijnens.
If you have a comment about the content of this article, please feel free to vent in the OS/2 eZine discussion forums.
|
Previous Article |
|
Next Article |
ftpd and FtpServer for OS/2
At work I've always used the standard ftpd that comes with OS/2 Warp 4 for our dedicated ftp server.
Some time ago I was asked to display specific welcome messages for users of our ftp server and also to hide the path of the ftp directories, so I started to browse through the manuals of ftpd supplied with Warp 4.
As I suspected that someone was trying to hack our ftp server, I also wanted a detailed log of all that was going on
Introduction to ftpd
The Message Problem
I learned that there are 3 kinds of messages possible:- A welcome message that is given to the user when he first accesses the server. This is specified by a file welcome.ftp. This file must be placed in the directory etc which can normally be found in the mptn directory. You can also search for an environment variable etc in your config.sys to tell you the specific etc directory.
- A message that is given when the user changes to a specific directory. This is specified by a file message.ftp and must be placed in each directory you want the message for, e.g. if you want this message to be displayed when the user enters c:\ftpdata\public a file message.ftp must be placed in this directory. You can make it invisible for the user by assigning the hidden attribute to it. (attrib +h message.dir)
- A message that is given when the user fails 5 times to provide a valid login and password combination. This is specified by a file badlogin.ftp. This file must be placed in the directory etc.
As I soon found out, the behaviour of the message.ftp file was not quite what I expected. If the user is placed in a certain directory when he logs in (the default directory) the contents of the message.ftp file in this directory are not displayed. It is only displayed if he leaves this directory by going to another directory and then returns. I wanted three distinct welcome messages :
- One that was given when the user makes contact with our server.
- One that's given when the user successfully logs in.
- One that's specified by the directory the user is placed in or descends into.
Hiding the Path of the FTP Directories
This is impractical to do with the standard ftp server. To do this, you have to use NETBEUI as well as TCP/IP and make the directories shareable, then connect to them and assign a drive letter that you could use to specify the directory for the ftp account. For example, to hide the path d:\ftpdata\john when the ftpserver is running on a machine with the NETBIOS host name borg: net share example=d:\ftpdata\john
net use t: \\borg\example
You can now use t: to specify this directory for a ftp account. This is not exactly an elegant and useable solution.
Transaction logging
To have the standard ftpd log anything, you should have syslogd running. You must specify for each individual ftp account what you want to log. This is done by creating a loginfo entry in the file trusers. The file trusers can be found in the directory etc and is used to specify the ftp accounts that are allowed to use your ftp server. This file is normally created and updated when you create ftp accounts using tcpcfg (TCP/IP Configuration notebook.)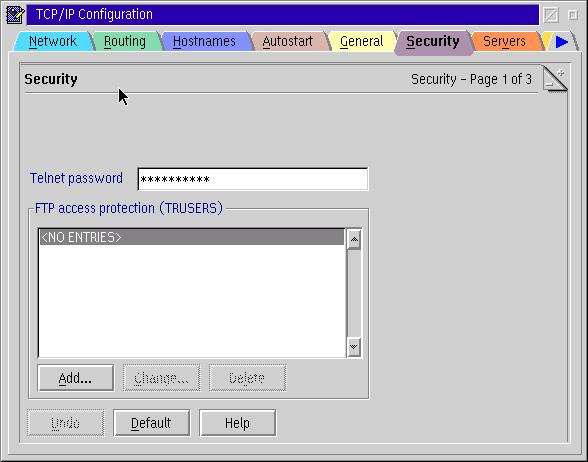
Enabling logging cannot be done from within tcpcfg, you must do it manually by editing the file trusers. Suppose you have an account named blake that you want to log. In the file trusers you will find an entry like:
user: blake
rd: e:\ftpdata\public e:\data
wr: e:\ftpdata\incoming
To activate logging add the line loginfo.
user: blake
rd: e:\ftpdata\public e:\data
wr: e:\ftpdata\incoming
loginfo: logall
The following keywords are valid for loginfo :
|
I have about 220 ftp accounts on our server so I was not happy with the fact that I would have to enable logging manually for each account.
These 3 problems (How to create specific welcome messages, how to hide the names and exact place of ftp directories and how to do transaction logging) made me search for a replacement for the standard ftpd. I read about FtpServer in a WarpCast message so I thought I would give it a try.
FtpServer
Installing FtpServer
Installation is very easy. After you have downloaded the ftpser090.zip software, you create a directory where you want it to install into, unzip the package in this directory, and run folder.cmd to create a folder FTPServer on your desktop which contains all the necessary objects.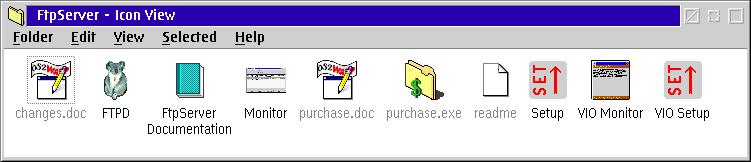
Starting FtpServer
There are two ways to start FtpServer. One way is to place a shadow of FTPD in the startup folder so it is started every time you start your computer. Be sure it is FTPD from the FtpServer package that is started, and not the standard ftpd daemon. Both executables have the same name ftpd.exe. Take care that the standard ftpd service isn't also started, either by executing ftpd.exe directly or by inetd. You can check this with tcpcfg in the TCP/IP Configuration notebook tab Autostart as is shown in the next figure.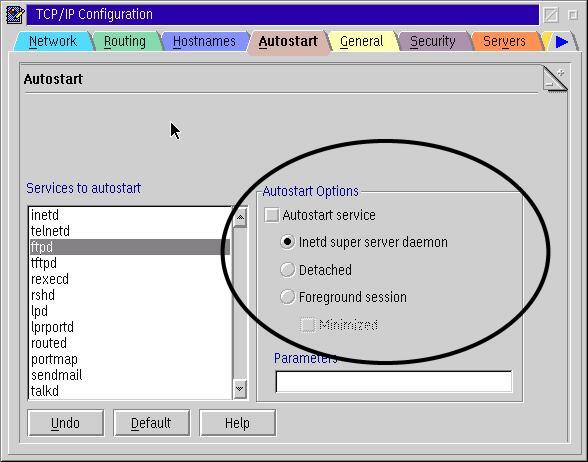
The other way to start FtpServer is to start it as an inetd service. You can find a very good explanation about how to accomplish this in the documentation accompanying the software. Inetd is a kind of listener that is constantly listening to specific ports. If there is any request on the ports dedicated to ftp (usually port 20-21 as defined by the services file that can be found in the directory etc) it starts ftpd if ftpd is not already started. The intention is to have only those daemons running that are really necessary and to start the others only the moment they are needed. Personally I prefer to start FtpServer from the Startup folder.
Configuring FtpServer
There are two configuration programs available in the FtpServer folder. One of them is Setup, this is a PM application. The other is VIO Setup and as the name implies this is a VIO application.Setup
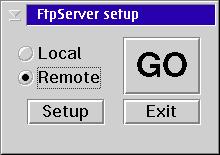
When you start Setup by double clicking its icon you get the following start screen: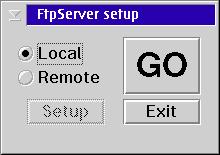
Choose the type of configuration you wish to do and then press Go!
- Local : configuration will be done on the same PC where FtpServer is running.
- Remote : configuration will be done on a PC other than the one FtpServer is running on.
Local
You can start local configuration by picking Local and pushing the GO button.Setup - Basic - Global settings
Within the Global settings you can change the port number the FtpServer is to listen to. Normally there is no need to do this. The default value 21 is the port number that is standard for a FTP server and is defined within the services file. A reason why you might nevertheless want to change this number is if you have two network cards in your computer, each connected to a different network segment and you have two different FtpServers running. With this configuration you could have one FtpServer listen on network card 1 and only allow a group "1" of specific users and another FtpServer listen on network card 2 and only allow a group "2" of specific users.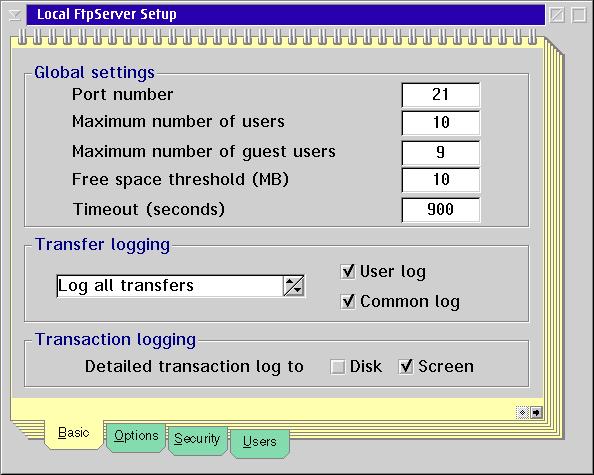
You can also limit the maximum number of concurrent users. This comes in handy when you have a relatively slow network connection and want to make sure that there is adequate bandwith available for each user.
The maximum number of guest users is one less than the maximum number of users. This way there is always one user account available for the manager user.
The Free space threshold entry specifies the amount of free space that must be available on a drive for uploads to be enabled. If the free space (in megabytes) falls below this level then uploads will be disabled.
With the Timeout entry you can specify the time that a client session may remain idle before the user is evicted. As the manual of FtpServer states,you'll find that many ftp clients, especially web browsers, don't log out properly, so their sessions have to be killed with the timeout mechanism.
Setup - Basic - Transfer logging
There are four ways of logging- Log all transfers
- Log all clients
- No transfer logging
- Log successful transfers
These logs can be placed in two different files : a user log and a common log. These logs can be found in the directory you have FtpServer installed in. Below you can find an excerpt of a common log and a user log with the option Log all transfers.
common.log
193.190.57.5 - john [26/Sep/2000:13:49:44] "GET O:/vnc/about.txt FTP" 200 214 "-" "ftp client"
193.190.57.5 - john [26/Sep/2000:13:49:44] "GET O:/vnc/auth.c FTP" 200 2004 "-" "ftp client"
193.190.57.5 - john [26/Sep/2000:13:49:44] "GET O:/vnc/clip.c FTP" 200 2115 "-" "ftp client"
193.190.57.5 - john [26/Sep/2000:13:49:45] "GET O:/vnc/d3des.c FTP" 200 15471 "-" "ftp client"
193.190.57.5 - john [26/Sep/2000:13:49:45] "GET O:/vnc/d3des.h FTP" 200 1602 "-" "ftp client"
193.190.57.5 - john [26/Sep/2000:13:49:45] "GET O:/vnc/info.c FTP" 200 5460 "-" "ftp client"
193.190.57.5 - john [26/Sep/2000:13:49:45] "GET O:/vnc/keybd.c FTP" 200 15935 "-" "ftp client"
193.190.57.5 - john [26/Sep/2000:13:49:46] "GET O:/vnc/keymap.c FTP" 200 1660 "-" "ftp client"
193.190.57.5 - john [26/Sep/2000:13:49:46] "GET O:/vnc/keypad.map FTP" 200 681 "-" "ftp client"
193.190.57.5 - john [26/Sep/2000:13:49:46] "GET O:/vnc/keyst.c FTP" 200 7702 "-" "ftp client"
193.190.57.5 - john [26/Sep/2000:13:49:47] "GET O:/vnc/keysymdef.h FTP" 200 66265 "-" "ftp client"
193.190.57.5 - john [26/Sep/2000:13:49:47] "GET O:/vnc/LICENSE.jpn FTP" 200 20189 "-" "ftp client"
193.190.57.5 - john [26/Sep/2000:13:49:47] "GET O:/vnc/LICENSE.txt FTP" 200 18007 "-" "ftp client"
193.190.57.5 - john [26/Sep/2000:13:49:47] "GET O:/vnc/main.c FTP" 200 4293 "-" "ftp client"
193.190.57.5 - john [26/Sep/2000:13:49:48] "GET O:/vnc/Makefile FTP" 200 1699 "-" "ftp client"
ftpusers.log
john  [193.190.57.5]
Logged in:    2000-08-17 15:40:59
Downloaded:   E:/bin/pmeuro/pmeuro.exe (200438 bytes, 0.27 seconds, 742363 bytes/s)
Downloaded:   E:/bin/pmeuro/pmeuro.ini (508 bytes, 0.00 seconds)
Downloaded:   E:/bin/pmeuro/pmset.ini (36 bytes, 0.02 seconds, 1800 bytes/s)
Downloaded:   E:/bin/pmeuro/readme.txt (14257 bytes, 0.02 seconds, 648045 bytes/s)
Finished:     2000-08-17 15:41:30

john  [193.190.57.5]
Logged in:    2000-08-18 09:46:48
Downloaded:   E:/gnu/bin/smartbar3.1/CPUINFO.DLL (2716 bytes, 0.01 seconds, 271600 bytes/s)
Downloaded:   E:/gnu/bin/smartbar3.1/DLLRES.DLL (1705 bytes, 0.02 seconds, 85250 bytes/s)
Downloaded:   E:/gnu/bin/smartbar3.1/GIFLIB.DLL (5610 bytes, 0.01 seconds, 701250 bytes/s)
Downloaded:   E:/gnu/bin/smartbar3.1/HARP.WAV (9460 bytes, 0.01 seconds, 1182500 bytes/s)
Downloaded:   E:/gnu/bin/smartbar3.1/HWSENS.DLL (1756 bytes, 0.01 seconds, 175600 bytes/s)
Downloaded:   E:/gnu/bin/smartbar3.1/LANGDE.DLL (11794 bytes, 0.01 seconds, 982833 bytes/s)
Downloaded:   E:/gnu/bin/smartbar3.1/LANGEN.DLL (11797 bytes, 0.02 seconds, 589850 bytes/s)
Downloaded:   E:/gnu/bin/smartbar3.1/LANGFR.DLL (12391 bytes, 0.01 seconds, 1239100 bytes/s)
Setup - Basic - Transaction logging
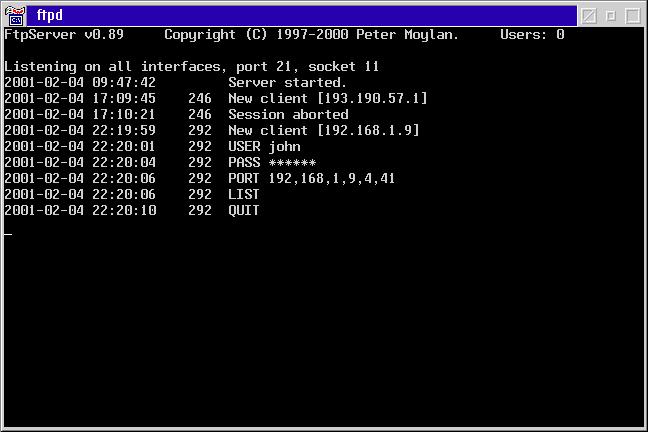
You also have the option to enable very detailed transaction logging. By default the option Screen is enabled. This means that all transaction data is written to the window FtpServer is running in. If you enable the option Disk the same data that is written to the screen will be logged in a file called ftptrans.logYou can see a picture of a FtpServer window in the figure below.
Setup - Options
Here you can specify whether you want FtpServer to listen on all available network cards or just on one specific address.Setup - Security
Here you can find the options to allow or disallow certain IP addresses or domains from connecting to your FtpServer. By default any IP-address is allowed to make a connection.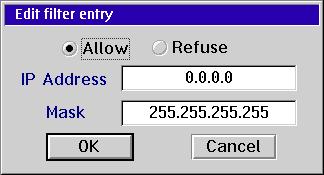
Setup - Users
You can very easily create new users.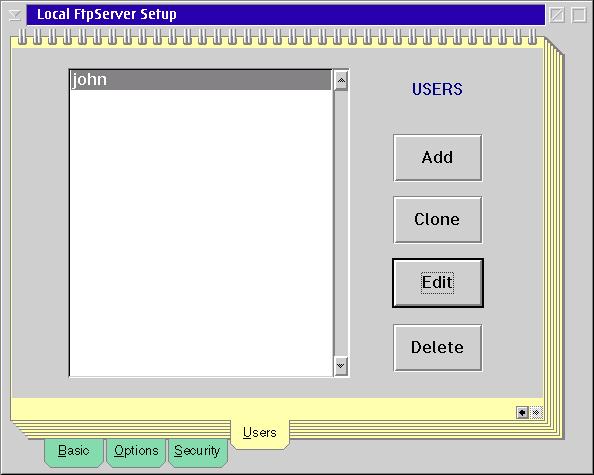
There are 4 categories of users :
- NoPassword: as the name implies, this kind of users doesn't have to supply a password to log in.
- Guest : a user who has to provide an e-mail address as a password.
- User : a user who has to provide a 'real' password.
- Manager : this is a user who has some special priviliges, e.g. he can see all system and hidden files in a directory listing and he is allowed to use SITE MNGR commands.
You can specify the maximum transfer rate that is allowed for a particular user with the speed limit. This way you can prevent the ftp users from consuming all available bandwith of your OS/2 system. You can also specify the maximum number of simultaneous sessions with a specific user name. This is the user limit.
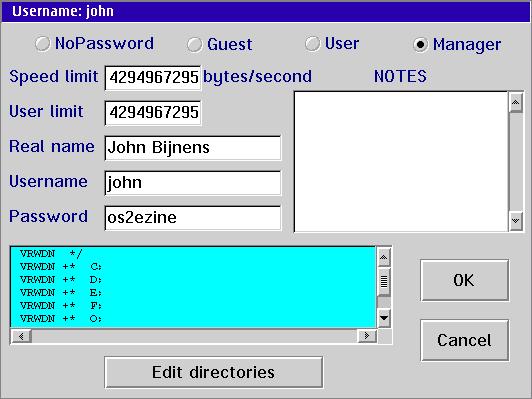
What I like very much about FtpServer is the ability to virtualize the ftp directory structure. Virtualization helps you hide the real directory structure. I will give an example to explain the concept.
Suppose you have a user with the username project. When project logs in and asks a directory listing he sees the following directory structure
Projectdata
- incoming
- public
Where incoming is in fact e:\project\data and public is f:\projectdata\pub.
There are 3 ways you can virtualize the ftp directory structure
- subdirectory or file.
- link : as the name implies this is a link to a particular file or directory in your file system.
- pseudo-directory : this acts as a directory to the ftp user but in fact it is not pointing to any actual directory.
In the previous example Projectdata is a pseudo-directory whereas incoming and public are links.
Within FtpServer you have a very complete set of access permissions that can be applied to all kind of members of the ftp directory structure, whether they are a subdirectory or file, a link or a pseudo-directory. A very detailed explanation can be found in the FtpServer documentation.
Two of the remarkable things you can do with these access permissions are
- make a directory invisible while granting the user access to read in and/or write to it and
- make a file invisible while still granting read and/or write access.
Remote Configuration with INIServe
In order to be able to do a remote configuration you need a special program, INIServe, that must be started on the same PC as FtpServer is running on. INIServe is a freeware utility that can be downloaded from the homepage of Peter Moylan (http://eepjm.newcastle.edu.au/os2).The current version is iniser07.zip. This zip file contains two other zip files server.zip and client.zip.
Unzip server.zip and client.zip in the FtpServer directory of the machine you want to configure remotely. This will place four files iniserve.exe, iniserve.inf, inied.exe, inied.ico as well as some other files into the FtpServer directory.
Start iniserve.exe and kill it immediately by pressing Ctrl-C. You need to do this to create the file INISERVE.INI. By default there is no password defined to start the remote configuration. Left alone, this is a high security risk as anyone equipped with the FtpServer software could define anything he wants on your PC e.g. he could create a new user with manager privileges. So the first thing you should do is define a password. You can define a password by adding a key Password in the file INISERVE.INI and define the desired password as the key value. To accomplish this you have two choices : you can use inied which is a small ini file editor, or you can use whatever ini editor you like (I prefer UniMaint).
After you have defined the password you can restart iniserve.exe. The INISERVE.INI which contains the password you've defined is now loaded. You can place iniserve.exe in a startup script, the startup folder or in tcpstart.cmd to start it automatically when you boot your PC you use as FtpServer.
Now you can start the remote configuration on another PC you have FtpServer installed on. As with the local configuration, start it by double clicking the Setup icon. Activate the remote checkbox and push the Setup button.
In the dialog box Remote server details you have to enter:
- hostname : The hostname or the IP address of the PC you have FtpServer running on.
- INIServe port : The TCP port that INIServe has been configured to listen on. The default value is 8000. You might want to change this if you have multiple FtpServer daemons running. In this case you should also run multiple INIServe.exe. Don't forget to change the port number in the appropriate INISERVE.INI with an ini file editor.
- INIServe password : The password you've defined in INISERVE.INI to connect to FtpServer.
- FtpServer directory : The directory FtpServer is installed in on the remote PC.
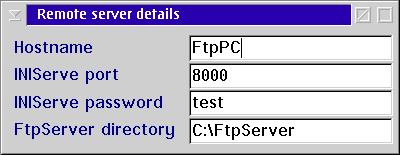
After you've everything specified, close the dialog box Remote server details and start the remote configuration by pushing the GO button.
Defining Welcome Messages
There are 3 welcome messages possible :- A message that is displayed to the user when the initial connection is made. This message is defined by a file WELCOME0.MSG that must be situated in the same directory as ftpd.exe from FtpServer
- A message that is displayed to the user after the username and password have been accepted. This message is defined by a file WELCOME.MSG that again must be situated in the same directory as ftpd.exe.
- A message that is displayed when the users go to a specific directory for the first time. This message is defined by DIR.MSG and it must be situated in the directory it is meant for. You can do an ATTRIB +H DIR.MSG to make it invisible to ftp users. You can also accomplish this by placing the right permissions settings for this file but I don't like this method as it implies that I have to do this for every individual user, and as I have rather a lot of ftp users...
There is a limited form of macro expansion available in these message files. This makes it possible to generate a message like 'You are user 1 of a maximum of 10. Local time is ...' More information about these macros can be found in FtpServer Documentation.
Shutting down FtpServer
One obvious way to shutdown FtpServer is to kill the process by closing the window of the FtpServer daemon. You can accomplish the same thing by doing a quick shutdown by typing Q inside the window FtpServer is running in.There is a much more gracious way to shutdown FtpServer and that is by typing G inside the window FtpServer is running in. This way, FtpServer will only shut itself down after all active ftp users have logged off.
Another way to shutdown FtpServer is by using the Kill Server option in the Monitor program discussed in the next section.
Some utilities delivered with FtpServer
Monitor - VIO Monitor
These programs must be run on the PC you have the FtpServer daemon running on. Monitor is a PM application whereas VIO Monitor, as the name implies, is a VIO application.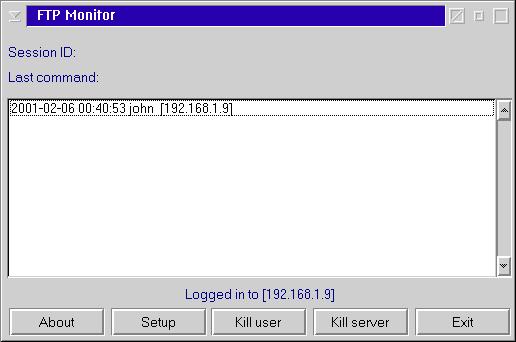
Both programs are used to monitor the use of FtpServer (e.g. what account is active for the moment). You can also use them to kill an active user or to kill the ftp daemon.
Before you can use Monitor you must configure it by specifying the username and password of a manager account.
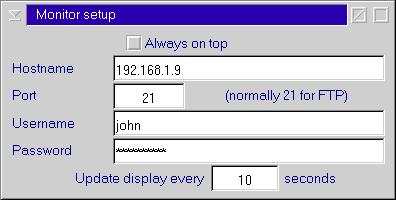
LogAnalysis
This is a small program that can found in the installation directory of FtpServer. It must be started from a command line. It gives you an ordered summary of FTPUSERS.LOG.Remove.cmd
This is a small REXX program that removes a user entry. I use it together with a schedule program like cron to create temporary ftp users.Suppose I want to create a ftp account example that may only exist for two days. In this case I just create the user example and then I create a new batchfile remove_example.cmd which contains only the following lines
	c:
	cd FtpServer
	remove example
	deltree d:\users\ftp_example
(The last line is used to delete the home directory of the ftp account.) Then I use cron to start remove_example.cmd two days later.
LoadPRM - StorePRM
LoadPRM is used to upload an user profile into ftpd.ini.
StorePRM is used to store an user profile defined in ftpd.ini into a PRM-file.
Using FtpServer at Work
At work I have to maintain a ftp server that is used for distributing software updates of our antivirus software. There are about 220 employees using this service. All these users need to be notified when there is a new update available on the ftp server. From time to time I have to remove a bunch of users. I use remove.cmd for this purpose.When I had to define 220 ftp accounts I was not eager to do this manually. Therefore I've automated this task using LoadPRM. I used StorePRM to create a dummy profile to see how it was built.
First I started with a list of the e-mail addresses of the employees that needed to be added. Then I used a freely available password generator (you can find several of them on Hobbes) to generate the passwords for these 220 people. These passwords are stored in a file docenten_passwd.txt.
This file has the following format:
e-mail address password
The e-mail address is formatted as:
name.surname@dep.khlim.be
In previous versions of FtpServer there was a problem with profiles that had multiple periods in their name so I substituted an underscore for the period between the name and surname.
The following C-program now creates all the profiles:
	#include <stdio.h>
	#include <string.h>

	void main( void )
	{
	   int  iNrDocent;

	   FILE *fpDocenten;
	   FILE *fpProfile;

	   char szDocent[256];
	   char szPasswd[256];
	   char szProfile[256];
	   char szLine[256];
	   char *pszPoint;

	   fpDocenten = fopen( "docenten_passwd.txt", "r" );

	   for ( iNrDocent = 1 ; iNrDocent <= 220 ; iNrDocent++ )
	   {
	      fscanf( fpDocenten, "%[^ \t]%*[ \t]%[^\n]%*c", szDocent, szPasswd );
	      sprintf( szProfile, "Profiles\\%s\.prm", szDocent );
	      pszPoint = strchr( szProfile, '.' );
	      *pszPoint = '_';
	      fpProfile = fopen( szProfile, "w" );
	      fprintf( fpProfile, "U\n" );
	      fprintf( fpProfile, "\"%s\"\n", szPasswd );
	      fprintf( fpProfile, "4294967295  4294967295\n" );
	      fprintf( fpProfile, "\"%s\"\n", szDocent );
	      fprintf( fpProfile, "(\*\*)\n" );
	      fprintf( fpProfile, "\"\/\"=\"e\:\\users\\ftp_labos\"" );
	      fclose( fpProfile );
	   }

	   fcloseall();
	}
To upload all profiles into ftpd.ini I use the following C-program. docenten.txt is a file that is derived from docenten_passwd.txt. It contains only the ftp user names name_surname.
	#include <stdio.h>
	#include <string.h>
	#include <stdlib.h>

	void main( void )
	{
	   int iNrDocent;

	   FILE *fpDocenten;

	   char szDocenten[256],
	        szCommando[256];

	   fpDocenten = fopen( "docenten.txt", "r" );

	   for ( iNrDocent = 1 ; iNrDocent <= 220 ; iNrDocent++ )
	   {
	      fscanf( fpDocenten, "%[^\n]%*c", szDocenten );
	      sprintf( szCommando, "loadprm profiles\\%s", szDocenten );
	      printf( "%d\t%s\n", iNrDocent, szCommando );
	      system ( szCommando );
	   }

	   fcloseall();
	}
After this C-program is executed, all 220 ftp accounts are created and ready to be used. This example gives you an idea of what's possible with FtpServer.
Summary
FtpServer is shareware although the software is not crippled in any way. As registration only costs $20 I would encourage anyone that is using this fine software to support development for OS/2 by purchasing it.
When I encountered a small bug in loadprm I found the author very helpful and very quick in his response.
FtpServer
Author: Peter Moylan
Website: http://eepjm.newcastle.edu.au/os2/software.html
Email: Peter Moylan can be reached at peter@ee.newcastle.edu.au
Price: Shareware, 30 day trial. Registration is U.S. $20 from BMT Micro.
|
Previous Article |
|
Next Article |