16 January 2002
Robert Basler is the president of Aurora Systems, Inc. and a dedicated OS/2 user since he tired of rebooting Windows 3.1 twenty times a day.
If you have a comment about the content of this article, please feel free to vent in the OS/2 eZine discussion forums.
There is also a Printer Friendly version of this page.
|
Previous Article |
|
Next Article |

Moving OS/2 to a New Drive
Earlier this month my hard disk started making odd clunk-clunk noises from time to time. Then OS/2 started acting
funnier and funnier. First one program started acting up saying a file wasn't there that clearly was. Then my INI
files went bang, it thought the "F:" drive was "ALPHABET" so none of my apps would run, and OS/2 was unable to
locate my desktop, instead taking me to OS/2's dreaded "Temporary Desktop." I was worried.
Fortunately I had solid backups (only a week old - woohoo) and was able to resurrect the INI files and with some help from a number of people online, get OS/2 going again. I decided that it was time to get a new hard disk in there ASAP.
The system had Windows ME and an LVM OS/2 system installed and I wanted to make room to add Mandrake Linux, all started by Boot Manager. Since both operating systems had taken a lot of effort to customize and bring up to date, I didn't want to lose anything like I would if I simply put the new drive in and reinstalled everything. Instead, I decided I would transfer the old drive's contents to the new drive. If you have a drive imaging program, this is no problem, but I didn't, so here is how to do it the old-fashioned way.
This article covers a lot of little tidbits of information plus some general background on how operating systems
boot that I have collected over the years. The techniques here should work for any system that has LVM. If you
are using an older OS/2 that doesn't have LVM, your mileage may vary.
WPTools - Use It
If you don't use Henk Kelder's free WPTools package on an occasional basis, you most definitely should. As I was having problems with my INI files, I ran CHECKINI and my OS2SYS.INI file shrunk from 2.7M to just 480K and Workplace Shell suddenly got a lot faster. If you've never run CHECKINI, you'll be amazed at the junk that WPS has stored away.The ALPHABET Problem
One of my big problems was that OS/2 thought my F: drive was called ALPHABET. Apparently this is caused when the WP ROOT. SF file in the root directory of a drive gets damaged. This is a workplace shell file that it is safe to delete (it will be recreated later.) You can use your boot diskettes and the ATTRIB command to make it visible for deletion (it is a Hidden System file) and then to delete it.A Warning about JFS Volumes
If you are planning to move a JFS volume, read the section Other Problems in this OS/2 eZine article before you start. JFS will eat your volume if you do some of the things described in this article on a JFS volume without taking extra precautions.The New Drive
The new drive is a Maxtor 40G 5400RPM IDE drive. I selected a 5400 RPM drive rather than one of the newer 7200 or 10000 RPM drives (which would no doubt be faster) because I find the high-pitched screaming noise most of those drives make very annoying. When I first powered it up I had to put my ear right up to the drive to hear it to make sure it was working - wonderful.Hardware Installation
While installing a new drive is pretty easy, I'm not going to get into the details of the actual hardware installation here. If you want to do it yourself and don't know what you're doing, you should get someone who does to help you. You don't want to accidentally fry your PC, your new hard disk, or even worse, yourself.The Goal
I'm a firm believer in separating operating systems, and further separating the OS and your applications. This has saved me a lot of trouble in the past. That led me to the following arrangement of drives and partitions:
The Original and Desired Partition Layouts for my Drives
|
Make a List, Check it Twice
It ain't just for Santa... the most important step when you are considering this sort of move, is to make a detailed plan of everything you are going to do, and check each item off as you progress. If you are in a hurry or get a little flustered when something doesn't work right, the list makes sure that you don't forget anything important. It also helps you make sure that you have everything you need when you start -- before you start taking things apart.Here is the list I wrote for my transfer:
- Create OS/2 boot disks
- Create Windows recovery disk
- Create Partition Magic recovery disk
- Set new hard disk jumpers to slave
- Insert new hard disk as slave on primary controller
- Boot OS/2
- Start LVM to create compatibility volumes
- Create 1M Primary Partition to leave room to install boot manager later
- Create 2G Windows Primary Partition
- Create 50M primary partition for Linux /boot
- Create 1G OS/2 extended boot partition
- Create 15G OS/2 extended Apps drive
- Create 10G Windows extended Game drive
- Create 384M extended partition for Linux swap
- Create extended partition with rest of drive for Linux root partition
- Reboot OS/2, format H: and J: as HPFS drives
- Start Partition Magic disaster disks. If it offers to "repair" the damaged partition table - don't
- Delete placeholder boot manager partition on new drive
- Format new Windows partitions as FAT32
- Change 50M primary partition to ext2 for use later by Mandrake as a \boot partition
- Format Linux root partition as ext2
- Change linux swap partition to swap type
- Boot from OS/2 Floppy Recovery Disks
- Copy OS/2 and Windows files to new drives.
- Power down, unplug power and IDE cable from old drive
- Change new drive jumpers to Master
- Boot Windows recovery diskette
- Run SYS C: from RAM disk D:
- Boot OS/2 floppies
- Insert disk 0, run SYSINSTX D:
- Insert disk 3 again and run LVM, Swap E: and F: drive letters, install Boot manager
- Make sure Windows, OS/2 are added to Boot Manager, set defaults
- Update IDE drivers on hard disk
- Check OS/2 and Windows are working
- Install Mandrake
- Boot OS/2 Add Mandrake to Boot Manager
Steps 1-3: Recovery Disks
Bootable recovery disks THAT WORK are most important when you start doing stuff like this. After you make them, give them a try and make sure they work. I needed recovery disks for both Windows and OS/2, plus I wanted to be able to run the bootable version of Partition Magic - just in case. I have Partition Magic 6, apparently the last version that has full support for HPFS.OS/2 Disks
My OS/2 boot disks are a little unusual in that they support FAT32. I have Henk Kelder's FAT32 drivers installed so that OS/2 can see my FAT32 Windows drives (C: and E:). To create the basic recovery disks you just run OS/2 System, System Setup, Create Utility Disks. This will create 4 disks.To add FAT32 support to your boot diskettes, open CONFIG.SYS on Disk 1 with your favourite text editor, and add
ifs=fat32.ifs /Q /EAS /CACHE:2048
call=cachef32.exe
to the end of the file. Next, insert Disk 2 and add FAT32.IFS and CACHEF32.EXE to that disk. If you find that there isn't enough room, you'll have to delete some other files to make them fit. There was lots of room on mine. Having the CACHEF32.EXE file operating is particularly important. I copied one drive without it and it took over 5 hours to copy a measly 1.5G.
If your OS/2 boot disk is HPFS, you'll also have to modify Disk 0 (the Installation Diskette) to add UHPFS.DLL. There was no room on this disk for this file, fortunately there were two .TXT files that could be safely deleted to make room. You need UHPFS.DLL for SYSINSTX which we'll use later.
You should make sure your utility disk 3 includes the following:
- BACKUP.EXE
- CHKDSK.COM
- CHKDSK32.DLL
- FORMAT.COM
- JFS.MSG
- LVM.DLL
- LVM.EXE
- LVM.MSG
- LVMH.MSG
- NLS.DLL
- ODPANS.DLL
- ODPRTDRV.EXE
- OSDELETE.EXE
- OSO001.MSG
- RESTORE.EXE
- SHPIINST.DLL
- TEDIT.EXE
- TEDIT.HLP
- UCONV.DLL
- UFAT32.DLL
- UHPFS.DLL
- UJFS.DLL
- VIOCALLS.DLL
- XCOPY.EXE
If anything is missing, you should be able to find these files in your OS2, OS2\BOOT and OS2\DLL directories.
TEdit
One handy tool on this last disk is TEdit. This tiny text-mode editor will allow you to edit files when you are booted from diskettes in text mode. Although I find it quite confusing to use, it does work just fine for simple editing. When TEdit starts, you need to hit the Esc key to enter editing mode. There is online help which you can use for assistance. Press F3 to leave the online help. Press F3 to leave the file you are editing and it will prompt you if you want to save it.Get the Latest IDEDASD.EXE Drivers!!!
I can't emphasize this enough. Get the latest IDEDASD drivers and install them onto your recovery diskettes. This one bit me very badly, I'll talk about that later. You need to copy the new versions of IBM1S506.ADD, and IBMIDECD.FLT to Disk 1. Then copy DASD32.DMD Disk 1 and rename it to OS2DASD.DMD. If you aren't using LVM, see the included README for additional instructions on this last step.Don't Just Use Alt-F1, F2
Don't use the bootable command line shell that is available on your hard disk by pressing Alt-F1 at the OS/2 Boot Blob. This has the potential to lock files on your hard disk so that they will be skipped during the copy. It is safer just to boot from diskettes. In this sort of operation, planning and safety have to be foremost if you want to succeed.Windows Disks
You'll need a Windows recovery disk to add a Windows boot sector to your Windows disk after you copy all the files from your old drive to the new one. I was unable to figure out any way to get the Windows version of FORMAT to format the Windows drives FAT32. I found out afterwards that apparently if you enable large drive support in Windows FDISK and create partitions larger than 512M, it will automatically create FAT32 partitions for you. I didn't figure this out, so I used Partition Magic to create my FAT32 partitions. I also don't trust the Windows FDISK program to muck with my partition table, so my advice is to spend the $40 on a copy of Partition Magic 6.To create a Windows recovery disk in versions of Windows after 98, go to Start, Control Panel, Add/Remove Programs, Make Recovery Disks. You only need one diskette for this.
Partition Magic Disks
Partition Magic has the ability to boot standalone so you can work on your hard disk. This can be VERY helpful if something goes wrong. You need two diskettes for this.Just in Case
Have another working PC around, preferably connected to the internet, just in case you find you need drivers or advice while you're doing this. You might also want a set of Warp 4 diskettes including FDISK just in case neither LVM nor Partition Magic can read your partition table - it can happen.Steps 4 & 5: Install the New Drive
I installed the new drive as a slave drive, putting it next to the computer on a small stack of computer books so that the cables all reached it without me having to actually install it into the case before I had everything working.This part went particularly badly for me because my system's BIOS didn't recognize the new drive. This manifested as the computer hanging while it was attempting to identify the drive. Fortunately there was a BIOS upgrade available for my motherboard to add support for 40+G drives. If your computer has a flashable BIOS, only upgrade it if it has a fix you absolutely require, because if something goes wrong during the flashing procedure, your motherboard is probably going to end up as a doorstop. Also, most motherboard companies nowadays require you to have a working Windows installation to make a bootable diskette to update your BIOS.
Steps 6-15: Use LVM to Create Partitions
One area of PC's that is in desparate need of improvement is the matter of partition tables. These little gems hold all the information on how your hard disk is laid out, what drives are stored where, and more. The problem is, every program that manipulates them (DOS FDISK, OS/2 FDISK, Windows FDISK, LVM, Partition Magic, Disk Druid, etc. etc.) seems to have a different take on what the table should look like. This results in different programs displaying different information from the same partition table. When it comes to a matter as important as the very integrity of the information on your hard disk, this sort of a mess is a very big concern.My basic rule of thumb is to let OS/2 do most of the partitioning and use the fewest possible number of partitioning tools possible. So on an LVM system, you should use LVM to initially set up the partition table. Even though it is tempting to use Partition Magic, I haven't had much luck at all going that route. You should also take a look at this article on LVM and Partition Magic which will make your time with those two programs much easier.
A 7 on the Weird Meter
The first try moving my drives, I created my partitions with LVM, formatted my new drive's D: and F: HPFS, then went to Windows to run Partition Magic to format the new drive's C: and E: as FAT32. It offered to "fix" my partition table and I let it. After I had formatted the new FAT32 drives I went back to OS/2 to copy the files, it could no longer read the drive. At all.OS/2 would boot, then the drive light would come on and stay on, and the drive was inaccessible. Hmmmmm. Pressing Alt-F2 at the boot blob told me that IBM1S506.ADD (the IDE driver) was taking a very long time, and the computer would hang forever at IBMINT13.I13 with the hard disk drive activity light on. I found an older version of IBMINT13.I13 on some old Warp 4 diskettes and then OS/2 would actually boot, but it still couldn't see the new drive. Hmmmm. With some reading I learned that IBMINT13.I13 is a sort of backup hard disk driver for IBM1S506 which gave me an idea. Maybe IBM1S506 is too old to see the new drive and IBMINT13.I13 is also having problems. A-Ha! That was it. I installed new IBM1S506 drivers and all of a sudden everything started working again.
What I suspect happened was that the IBMINT13.I13 driver was able to read the disk using the BIOS up until Partition Magic mucked with it. Then for some reason it couldn't do it anymore. This is a good thing of course because otherwise I might never have noticed that the IBM1S506 driver wasn't working.
I would have found this all out a lot sooner if I had added the /V or /W switch to the IBM1S506.ADD line in my disaster disks' CONFIG.SYS file so that it would have told me it hadn't found the new drive. This switch gives a very nice display of how the driver sees the system, and when you are booting from floppies, you even have time to read it before it scrolls by.
To create new partitions using LVM, you need to create new "Volumes." I use HPFS and FAT32 drives, so I create exclusively "Compatibility Volumes." If you want ot use JFS on any of your drives, you'll need to create an LVM volume for that. Since I wanted a specific layout for my partitions, I checked frequently back to the "Physical View" which shows the partitions in the order they appear on the disk. One feature missing from LVM that used to be in FDISK is the ability to specify whether a new partition is allocated at the start or the end of the freespace on the drive. The way it seems to work in LVM is that if you create a bootable volume it will be created at the start of the freespace, and if you create a non-bootable volume it will be created at the end. So if you want your partitions to end up in a particular order on the drive, you'll have to do a bit of planning on their sizes and their creation order.
One of the considerations for my situation was that according to Partition Magic, Windows will corrupt drives in extended partitions that cross the 1024 cylinder boundary. So in my case, I ended up having to put my HPFS F: drive before the FAT32 E: drive on the disk so that the HPFS partition (which doesn't have any problem with the 1024 cylinder boundary) rather than the FAT32 partition, would cross that boundary. Fortunately with LVM this isn't a problem because you can override the default drive lettering that OS/2 provides which would make the HPFS drive E: and the FAT32 drive F:.
The 1024 Cylinder Line
You'll note that I added a 50M boot partition for Linux. This makes sure that Linux can boot even if the rest of its partitions are above the 1024 cylinder line. Most operating systems' boot partition must be a primary partition entirely below the 1024 cylinder line due to bios limitations. Newer versions of OS/2 with Boot Manager installed can boot a partition above the 1024 cylinder boundary, but your mileage may vary with other OS'. Also, OS/2 and Linux are the only OSes I know that can boot from a logical partition. Good thing, since now we're right out of primary partitions (you can have either 4 primary, or 3 primary and as many extended partitions as you like on a single drive.)Step 16: Format your New OS/2 Drives
While you're in LVM, check the drive letters that OS/2 has assigned your new disk's partitons. Write them down. You don't want to accidentally format the wrong partition. Before you format any partition, do a DIR of it first to make sure you haven't gotten confused and that it doesn't contain anything important.Since the FAT32 drivers for OS/2 can't format FAT32 partitions, I just formatted the two HPFS partitions for OS/2.
Steps 17-22: Use Partition Magic to setup for Windows and Linux
Starting Partition Magic generated several messages about "errors" in the partition table offering to fix them. I told it not to fix them because on a previous try, OS/2 was unable to read the table after it was "fixed." I then used it to format the two FAT32 partitions, to remove the Boot Manager placeholder partition, and to format the Linux /boot, swap and root partitions.Steps 23 & 24: Copy the Files to the New Drive
Booting the OS/2 floppies again, I used XCOPY to copy all the files from drive to drive, both for the FAT32 and HPFS partitions. Since I had four drives to copy and I didn't want to have to come back after each drive was completed, I used the "COPY CON: E:\COPYALL.CMD" quick and dirty editor trick to create a COPYALL.CMD file containing the XCOPY commands as below:XCOPY C:\* G:\ /h/o/t/s/e/r/v
XCOPY D:\* H:\ /h/o/t/s/e/r/v
XCOPY E:\* J:\ /h/o/t/s/e/r/v
XCOPY F:\* I:\ /h/o/t/s/e/r/v
Lastly, press Ctrl-Z to end the copy.
You may have noticed a "mistake" in the last two commands but remember, my F: and E: drives on the new disk are in the wrong order and I haven't used LVM to correct that yet. Note that A: must be the active drive for this to work since XCOPY uses some DLL's so switch to A: and start the command file like E:\COPYALL. See you in a couple hours...
Step 25 & 26: Disconnect the Old Drive
Ok, copying is complete. Have a look at the drives just to make sure. Now you're ready to power down, remove the old drive and put the new one into the case. Don't forget to set the new drive as Master before you put it into the case.Steps 27 & 28: Put in the Windows Boot Sector
Put your Windows recovery disk into the floppy drive and reboot. You will find a SYS command on the RAM disk, it should be drive D:. Type:SYS C:
and Windows should transfer a new boot sector to your Windows disk in your hard drive. Note that you can't run SYS until the Windows files are copied onto the new drive, it won't let you unless it finds the files it needs already in place.
Steps 29 & 30: Put in the OS/2 Boot Information
While I've been researching this article I've found some statements contrary to my beliefs about SYSINSTX. Apparently if your boot drive is HPFS you do not need to run SYSINSTX if you are copying from an old HPFS boot drive. In the past I've run into a number of "operating system is missing" messages if I left out this step so I use SYSINSTX. Your mileage may vary. To make an OS/2 drive bootable, reboot your OS/2 diskettes, then reinsert disk 0. Type:SYSINSTX D:
to install the OS/2 boot information onto the OS/2 boot disk D:.
A Word on the MBR
You may have heard of the MBR or Master Boot Record. In general you should never need to do anything to this. It will come configured from the factory all ready to go. The only exception is if you happen to get a boot sector virus or if your partition table becomes mangled beyond operation by any of the programs. You do not need to do this to move an OS/2 boot partition to another disk. If you ever do need to know how to do this, use LVM to install a new MBR on your disk with the /NEWMBR:disk switch. (Disk 1 is the primary IDE controller's master, disk 2 is the primary slave, disk 3 is the secondary IDE controller's master and disk 4 is the secondary slave.) NEWMBR has one parameter, the drive to install the MBR onto in the range 1 to 4 like /NEWMBR:1Steps 31 & 32: Install Boot Manager
Next run LVM again to install boot manager. Make sure your Windows and OS/2 boot disks have been added to the menu. While you're in here you can rearrange your drive letters, in my case I had to swap E: and F:.Step 33: Update the IDE drivers on the Hard Disk
Next I needed to update the IBM1S506 IDE drivers on the hard disk since they used the same drivers as my original boot disks that didn't work. The same three files need to be updated: IBM1S506.ADD, IBMIDECD.FLT and OS2DASD.DMD. You'll find the originals in your \OS2\BOOT directory.Step 34: Pray
Now I removed the boot diskettes, and had my little moment of truth. And it worked! Boot Manager came up, and selecting OS/2 booted back to my familiar desktop. I ran a couple apps from my Apps drive just to make sure all that was working, looked that C:, D:, E: and F: were in the right spots, then shut down and tried the same thing for Windows. Windows saw C: and D: just as it should, success there also.Steps 35 & 36: Install Mandrake and Add Mandrake to Boot Manager
Now that the computer was finally working again I was a little nervous to muck with it further, but I took a chance and went through the Mandrake install. Before I started the install I booted OS/2 to use the GUI version of the Logical Volume Manager to create a bootable volume using the existing \boot partition, and it happily added that to Boot Manager's Menu. The Mandrake install was completely painless, I just had to tell it where to put \boot and \ and go through the Expert install so that it would give me the option to install Lilo on the \boot partition's boot sector rather than in the MBR, but it detected and installed everything automatically and perfectly. Note that you must mark the /boot partition as "bootable" in LVM before you run the Mandrake install.Wrapup
Here's a screenshot of LVM after all was said and done.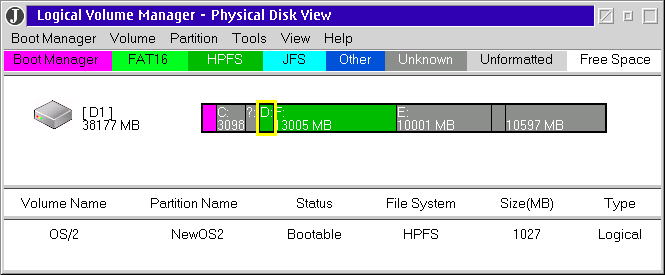
All of this actually took me four days of major frustration and I had a lot of false starts and trouble spots involving a lot of software that I would normally avoid like the plague (I actually saw an option for a low-level IDE drive formatter in my travels - YIKES! - although I didn't use it.) Hopefully the information here makes it easier for anyone else wanting to do something similar in the future. Fortunately, once you know how to do it, it isn't too tough, it just takes a long time, especially if you are figuring things out as you go. Plan not to have anything to do for a couple of days in case something goes wrong.
Good luck.
|
Previous Article |
|
Next Article |