November 16, 2004
Keith Merrington has been in computing since they used to be programmed with punch cards and were made of discrete components and transistors. He built his first computer soldering the chips in by hand ,back in the 80's before the first PC was born. It was based on a Signetics 2650 8 bit microprocessor with a massive1K memory and with two 8 inch floppy drives. He still builds (assembles) his own PC's and has been using OS/2 since Warp 3 came out. He is married and lives in the Netherlands but was born in London England.
If you have a comment about the content of this article, please feel free to vent in the OS/2 e-Zine discussion forums.
There is also a Printer Friendly version of this page.
|
Previous Article |
|
Next Article |

Keyboard Input from A to - Part 2
In part 1, I discussed character sets. codepages and various ways to enter data via the keyboard. In this concluding part I will look at ways to redefine your keyboard and how I made use of those additional Windows and multimedia keys.Keyboard Redefinition
Now if like me you have a US keyboard and need regularly to type characters with an accent or umlaut etc., but cannot always remember the ALT key codes we discussed in Part 1, and you are looking for a simpler way to do things, then you should maybe consider redefining your keyboard. This sounds simple but what should and can you redefine your keyboard to. Within OS/2 there are a wide range of keyboards defined to satisfy most national requirements. To select a different keyboard you can do this temporarily by going to system-setup > keyboard and select the keyboard from the list shown under the TAB "Layout". The highlighted name is that of your current keyboard.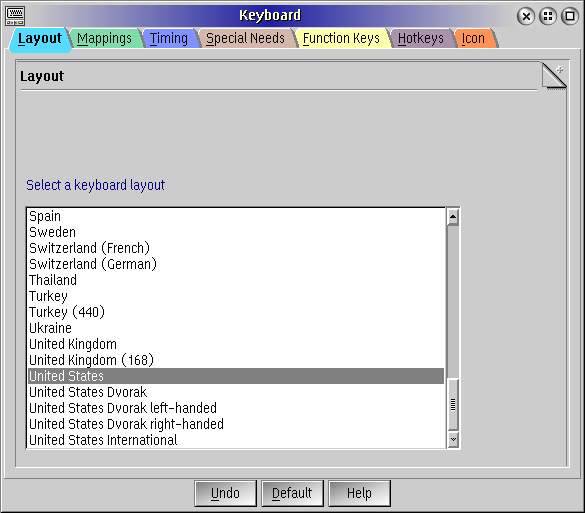
Keyboard Layout Selection - Fig 7
Alternatively you can type from a command prompt, KEYB layout, where layout is the country code such as US for the standard US keyboard, or UX for the international version. The change to the keyboard is instantaneous and affects all keyboard input. Typing KEYB without any parameters reports the current keyboard association in the same format as used in CONFIG.SYS
To permanently change the keyboard definition you need to edit CONFIG.SYS at the line:
DEVINFO=KBD,US,x:\OS2\KEYBOARD.DCP (where x is your system drive)For the US international keyboard this would result in the following line:
DEVINFO=KBD,UX,x:\OS2\KEYBOARD.DCP (where x is your system drive)
If not part of your documentation you can find a complete list of the various keyboard definitions and codepages at Hobbes. It can be downloaded as a PDF file codepages.zip. If you only want to list the available keyboards on your system, just type HELP KEYB at a command prompt and click on layout in the command syntax. When looking through the keyboard definitions, the logical choice, if you have a US keyboard, would probably be to select the US International keyboard (shown in Fig 8). Looking at the US International keyboard you can see that it differs from the standard US keyboard in that there are a lot of additional characters available.
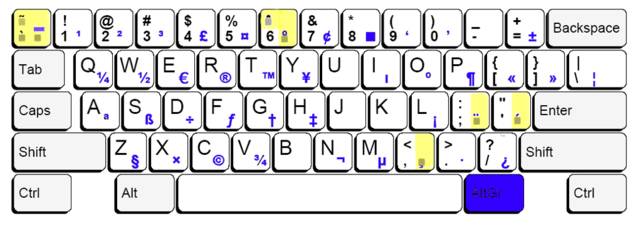
International Keyboard IBM UX 103 - Fig 8
The additional characters I have coloured blue in Fig 8. These characters are obtained by pressing the appropriate key together with the right hand Alt-key designated as AltGr. There are also so called dead keys, coloured light yellow, and its these keys which we use to compose characters. You should notice that there are small grey squares shown on these keys but are generally missing on a keyboard . These squares represent the position of the character relative to the diacritics (as they are called.) If for example I want to create (o caret) then I need to depress first the dead key with the caret (that's the 6 plus the shift key on the alphanumeric keyboard) and then the o. If you use the 'e' editor, you will see first the caret (^), but the cursor will not move. Next when you type the o the new character will be displayed. In some other programs or at a command prompt for example, after depressing the diacritic nothing will be displayed until the second character is entered. The same principal applies to the other diacritics. If you just need the diacritic just press the space bar after the diacritic. If you press a dead key and a character (but not the space) that does not combine to form a valid diacritic nothing is displayed in most but not all programs!
So with this keyboard you can create all the characters with an acute accent by using the appropriate character key together with the acute accent key (the first key to the left of the Enter Key).
ﭖ ۰ ﻅ ۱ ﻓ ۲ ﻠ ﮞ ﻥ
or grave accent by using the appropriate character key together with the grave accent key (the top leftmost key).
ﺓ ﺿ ﻐ ﻙ ﻣ
or with a cedilla by using the appropriate character key together with the comma key and AltGr
with a tilde by using the appropriate character key together with the tilde key (the top leftmost key).
ﺩ ﮄ ۳ ۴ ﻛ ﮒ
with a ring by using the appropriate character key together with the alphanumeric key 6 together with AltGr key.
or with an umlaut by using the appropriate character key together with the semicolon key together with AltGr key.
ﺽ ﻊ
or combination characters by using the keys a A d D o O t T together with the semicolon key together with AltGr key to obtain
ﺷ ﺹ ﻝ ﻟ
The advantage of this keyboard is the wealth of diacritics that you can compose plus all the extra characters such as ?, ؛, ۸ etc., These are generated by pressing the AltGr key and the corresponding symbol key. The only problem is in my case is that the keyboard still looks the same to me and I now need to remember where these keys are and which ones require the use of the AltGr key. If I try to buy such a keyboard in The Netherlands I cannot find anybody who sells one. I could not even find it on the IBM site! The only US International version I have found is the Microsoft version. This is shown in Fig 9. I have shown in red the characters which differ from the IBM layout, the differences are significant. This makes this keyboard useless as a replacement for the IBM one. Even the dead key for the umlaut is now moved one key to the right!
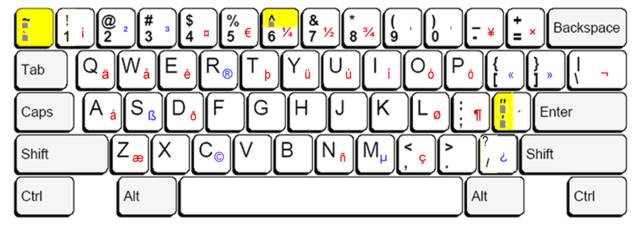
US International Keyboard (Microsoft) - Fig 9
So using the US International keyboard does not really solve the problem since I cannot find one. You might be more lucky! If your needs are limited such that you do not need the special characters and some of the diacritic combinations (ring characters etc.), there is another option. Its the Brazilian keyboard 274 (see Fig 10). It's identical to the US standard keyboard but also has dead keys to create most diacritics.

Brazilian Keyboard BR 274 - Fig 10
It works just the same as with the US international keyboard but without the AltGr key and of course all the special characters previously associated with this key. Again you must first press the relevant key to obtain an diacritic. For an acute accent you use the quote key followed by the appropriate character. For an umlaut its the same key but now by using the shift key as well, you select the double quote. Characters requiring a caret, tilde, or accent grave are similarly generated. For the cedilla the apostrophe key is used but then with the c to get . The grey square is in this case in the wrong position. An added advantage for me is that with the exception of the , I can create my diacritics in the same way as at work, when due to company policy I am forced to use Windows 2000 and its a real bind if I have to change my typing habits when I switch from one OS to another.
It is sometimes useful to disable the dead key functionality, for example when writing a CMD file, as it is not always handy to have to enter a space every time you need an apostrophe or quotes. Switching between keyboard layouts is then the answer. Of course you can type in keyb or using the PM, go to the keyboard properties page every time, but a more elegant method is to use a small program. You might want to try a REXX program written by Marcus de Geus called KeybUSBR.zip, which can be downloaded from Marcus's site. This is a REXX program which switches between the standard US and the Brazilian 274 keyboard. Installation is simplicity itself. Unzip the file and run Keybinst.CMD. You will now have a icon on your desktop which when active, will toggle between the Brazilian 274 and the US keyboard. What I really like about this REXX script, is that it changes its own program icon according to the installed keyboard type. This makes it easy to see at a glance which keyboard version is active! Placing the program in the eCenter allows switching with one mouse click between the two keyboard layouts a piece of cake! Of course by editing the program you can use it to switch between any layout you wish. Marcus developed this program for Warp3 and it works without change also on Warp4. However with eComStation 1.1 (and probably with Wseb) you will need to change one line as keyb gives a slightly different reply. If you have loaded the Brazilian Keyboard 274 then in Warp 3 and 4 the reply given is "BR.", in eCs its "BR 274.". To correct this is very easy but requires a small change at line 44 of the file KeybUSBR.CMD
from
if (Keyboard = 'BR.') thenTO
if (Keyboard = 'BR 274.') then(NOTE there is a space between the BR and 274, and a . at the end of 274)
So now you can change from one keyboard layout to another to get those characters you want. There is one pitfall and that is WINOS2. When you use a WINOS2 program you will use the keyboard as specified in the WINOS2 in Control panel in main and not the keyboard as defined by OS2. Also the codepage used by Windows is different. One Windows program which is different because it bypasses WINOS2 is OpenOffice for OS/2, which uses the OS/2 keyboard definition!
Keyboard redefinition
If the Brazilian keyboard does not meet your needs completely for a keyboard layout (I still miss one symbol which is shown on the standard European US keyboard and is used quite often, the Euro sign "ﻁ" ), you might want to try a keyboard re-definer program. The one program which I found is called Kbdredef.zip by Pal Ferenc. With this program you can define up to 4 characters per key but there is unfortunately no provision for defining dead keys which does somewhat limit this program. On the plus side it does however allow a quick switch between the redefined keyboard and your original keyboard which in my case is now the Brazilian 274.After unpacking the zip file, you will have a directory which includes a number of keyboard layouts, a read me in English and in Hungarian, one DLL, and the program itself : KBREDEF.EXE. All functions are executed by this program. The various functions are selected with one of the following parameters:
- /Kill - Unloads KBDREDEF and restores original keyboard layout.
- /View - Shows the current active layout. (only works when KBDREDEF is active and only in a OS/2 full screen)
- /Edit [kbdfile] - Activates the Layout Editor. If optionally a filename is specified then that layout can be edited.
- /Status - Display status information about KBDREDEF.
- /Toggle - Toggles between new and original layout.
- /Help - Shows an online help.
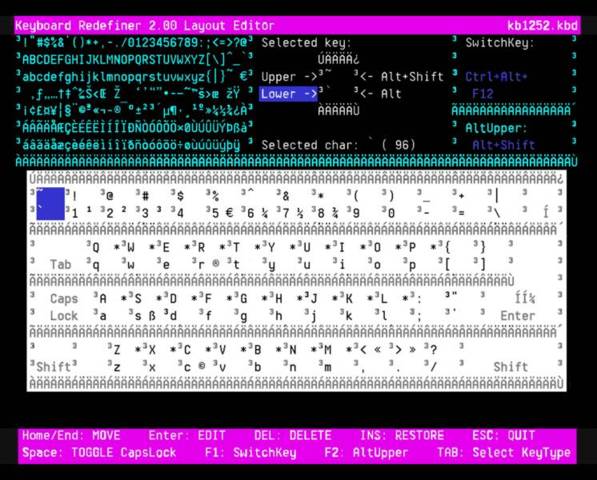
To make your own keyboard layout using the built in editor as shown in Fig 11 below it is first advisable to made a copy of the US.KBD and rename it. Then in an OS/2 full screen, use the Layout Editor to edit this file. Defining a key is simplicity itself. First you select the key you want, using the cursor keys, then using the Tab key go to one of the four positions of a key. Next press the Enter key to enter the edit mode for the key. You can now select from one of 255 characters shown in the top left hand corner of the screen again by using the cursor keys. Pressing the Enter key again and you will place the selected character in the key. Use the TAB key to select another position in the key or the cursor keys to move to another key. When finished pressing the Esc key allows you to either save or discard your new layout. The red asterisks (I presume) indicate the standard 101 keyboard characters. It is possible if you have a 102 key keyboard to define an extra key shown in the Fig 11, between the left shift key and the Z. If you redefine this key a warning message is given. All keys may be redefined except the Tab, Enter, Caps Lock and Shift keys. It is not a zippy PM program but as Pal states in his readme file, its not something you use every day.
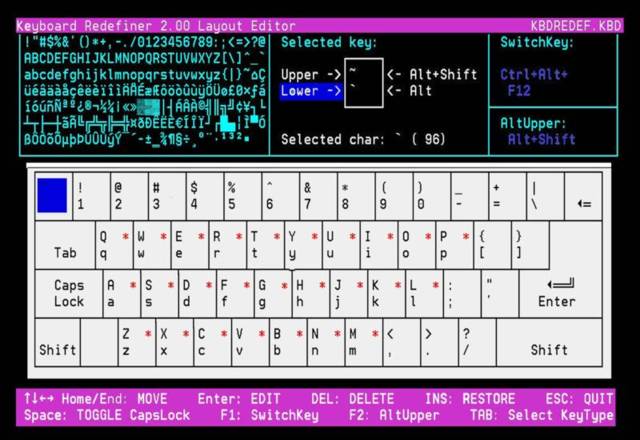
KBDREF Edit Screen - Fig 11
The main thing I did was to add the Euro symbol to the 5 key, which is shown on my keyboard and some other symbols that I occasionally use. These symbols I assigned to keys I can easily remember such as the copyright symbol to the C key etc. To display the modified keyboard layout type kbdredef /view in an OS/2 full screen. At a windowed screen only the first lines of text are displayed! You can see my new layout below in Fig 12.
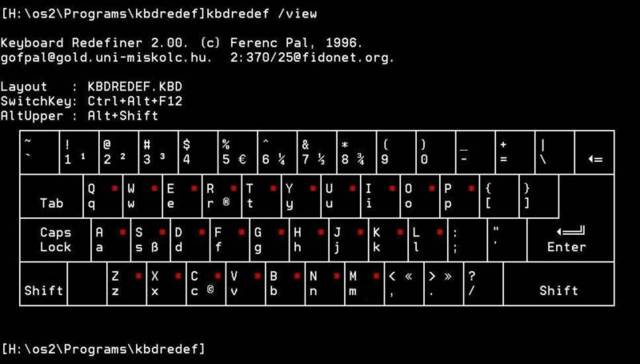
My Redefined keyboard Layout - Fig 12
Switching between your default layout (Brazilian 274 in my case) and the redefined layout is simple using Ctrl+Alt+F12 anywhere BUT NOT in a full screen, here you must use the /Toggle option. This key combination can be redefined in the layout editor to any combination of Ctrl, Alt, Shift plus a function key. If changed, KBDREDEF must first be unloaded from memory and then reloaded before the changed key combination will work. When a switch between keyboard layouts takes place, a beep as confirmation is given. Using the /Status option will let you know which keyboard is active. If you use the KEYB command to select another keyboard layout then again a beep will be sounded. Although the KEYB command returns US 103R. when the redefined keyboard is active you cannot use the KEYB command to go to this keyboard as US 103R is an invalid layout, layout US 103 will be loaded instead.
Also if preferred the selection of the character in the upper right of your key in your new keyboard can be selected to use ALT+CTRL instead of the default ALT+SHIFT, these changes are also accomplished in the layout editor. Apart from the fact as I said earlier you cannot define a dead key the program only works with the standard 850 code page. Switch to a different code page and you switch back to your original keyboard. Conversely since the character codes are different if you use the /view or /edit command the line draw characters are changed to etc which does not make for easy reading or use.
As I mentioned earlier all WINOS2 programs use there own keyboard definition so you cannot use KBDREDEF for WINOS2 programs. I also mentioned that OpenOffice (OO) for OS/2 uses the OS/2 keyboard definition but it uses codepage 1252. This means that a redefinition based on codepage 850 will not give you the characters you want. There is away round this which I use. Redefine the keyboard for codepage 1252. To do this at a OS/2 prompt, change change to codepage 1004. If your alternate codepage is something else, then you will first need to change your alternate codepage in CONFIG.SYS to 1004. You may wonder why if OO for OS/2 uses codepage 1252 why put 1004 in CONFIG.SYS. Well 1252 with a US keyboard definition in CONFIG.SYS O Codepage 1252 is rejected and I even get a trap. Fortunately codepage 1004 and 1252 are identical! Now from the same OS/2 prompt in which you set the codepage to 1004, open the kbdredef editor. Because of the codepage difference, all the line drawing characters and special characters are different and the keyboard layout looks messy (see Fig 12a), however editing is just the same as before. By assigning the same keys as I did earlier, I now have two different keyboard definitions, but whose keys give the same characters in both codepages!
KBDREF Edit Screen with codepage 1004 - Fig 12a
Other keys
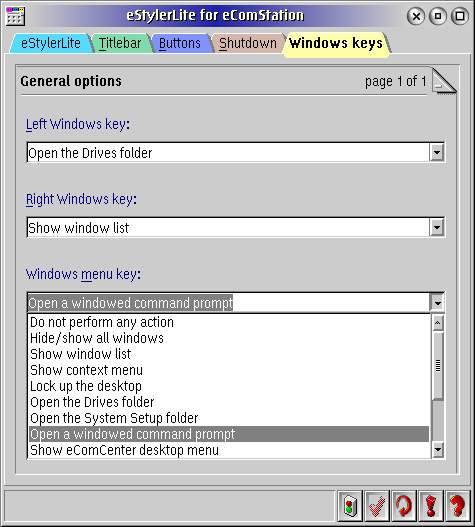
Windows Keys definition - Fig 13
Now of course there maybe other keys on your keyboard, such as the well known Windows keys. If you are using eComStation then you can define how you want your system to react on these three keys.
These keys are defined in the Tab "Windows Keys" of eStyerLite which can be accessed from System Setup > Appearance > eStyler Preferences. As shown in fig 13. For each of the three keys you can assign an action to be executed when one of these keys is depressed, including "do not perform any action", which is the default setting.
But you may also have an Internet or multimedia keyboard like me with even more keys or buttons. On my Logitech Y-ST39 (see Fig 14) there are 7 additional keys, which with the driver supplied for Windows can be used to adjust and mute the volume of my sound card, to start a browser, email program, find file function and call up a File Manager. For keyboards with these type of keys it is also possible to define them in eComStation.

My Logitech Multimedia Keyboard - Fig 14
First you need to define these keys by obtaining their scan codes. This is done by selecting the keyboard properties and then, at the tab Function Keys (see Fig 15), depressing the right hand mouse button when the mouse pointer is anywhere in the columns Key Description - Hardware scan code. This will cause the box, "New Function key" to be displayed.
Keyboard Properties, Tab Function Keys - Fig 15
Clicking on "New Function Key" results in the following dialogue (see Fig 16) in which you can find the scan code and give a name to that key. First clicking into the entry field, shown pink, and thereafter by depressing the to be defined key, the scan code will be read and associated with this key name you entered, "search" in this case. After pressing OK, the name will be added to the list shown in Fig 15.
Multimedia / Function Key definition - Fig 16
Now that the key has been defined it is just a matter of going to the properties of the program you want to start when this key is used. Go to the tab "Icon", click in the window "Object hotkey :", depress the key you want to use, the name given to that key is then displayed and then press the set button. In the example shown in Fig 17 after pressing my newly defined multimedia key, the name "search" which I had given to it is displayed. Now every time you press this hotkey this program is started. Hotkeys can be any key such as cursor and function keys, or a key combination which can include Alt, Ctrl and Shift., but single alphanumeric keys or symbols are rejected.
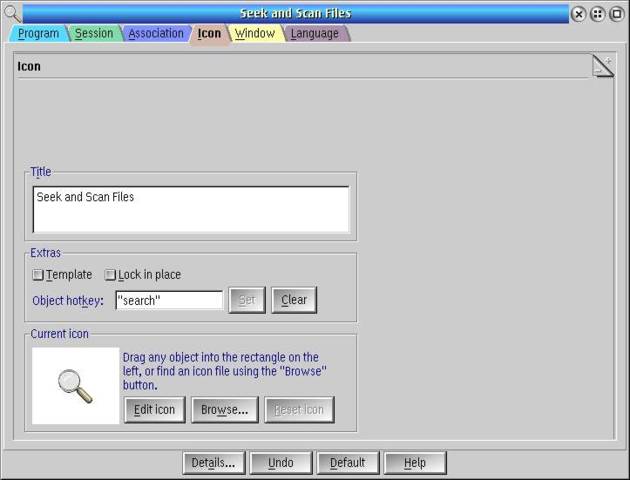
Associating a Hotkey to a Program - Fig 17
After you have assign all the keys to the various programs you can cross check on the status of this by looking at the TAB Hotkeys in Keyboard properties (see Fig 18).
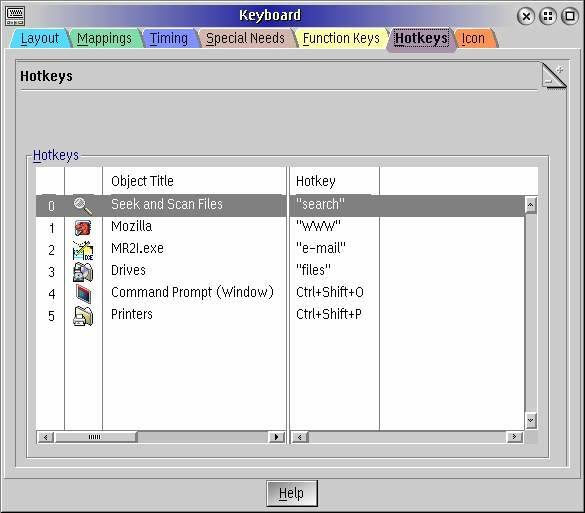
Hotkey summary - Fig 18
Two problems remain. One of my keys on my Logitech Keyboard refuses to be scanned. Its the key marked "email". This is a bug in (but not limited to) OS/2 which does not recognize some keys on modern keyboards correctly. A driver is supplied for Windows with this keyboard which grants use of this key but there is no OS/2 driver supplied. My other gripe was that I did not find a way of using the mute key, the + and ? volume keys as there is no easy way to perform these actions via a program in OS/2. I even thought of writing a REXX program but in the multimedia section of REXX I can only start, stop, play etc., but no direct way to control the volume. Both problems were solved when I discovered Win95Key.
Win95Key
If you do not have eComStation or if you want to do things another way then Win95Key, which was written by a Russian, Viktor Remennik [Editor: Since his e-mail seems to originate from Ukraine, perhaps he is Ukrainian? It might be important to some], is maybe the solution for you. This program does more than just allow you to use the 3 extra Windows keys. It allows you to obtain the scan codes from all keys, including those additional "multimedia" keys. At the time of writing this article, Win95Key is at version 3.09 (dated 20 Aug 2004) and can be down loaded from Hobbes at the location Here. After downloading and unpacking the files, which also include the source files installation can begin. Installation is simple as you only have to run install.cmd which will create a new folder on your desktop. During the installation you will be asked if you want to start WinKey95 automatically at start up, in which case it will be added to your startup folder. You will also be asked if you want to use the Russian or English version. The new folder as shown in Fig 19 contains a PM program for Win95Key configuration, the program Win95Key documentation plus a folder "Tools" with some utilities, and another folder containing the source code.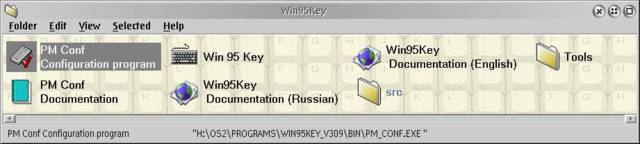
Win95Key Folder - Fig 19
The actual workhorse is Win95Key.exe. However since Win95Key stores its information in an INI file we will not configure this program directly but by using a PM front end. This program is called PM_CONF and was written by Viktor Remennik to provide an elegant way of accessing and modifying Win95Key's data. To get started, first open PM_Conf and you will be greeted with a two tabbed dialogue as shown in Figs 19 and 20. As opposed to the hotkey function in eComStation, it is possible to do a lot more than just launch a program. Unfortunately it is a little confusing that the Settings TAB refers to functions, and in the Hotkeys tab they are referred to as plugins. I will always refer to them as plugin/function. The plugin/functions that are available are determined by which ones have been loaded. To load, remove or to see which plugins/functions are loaded, start PM_CONF and select the "Settings" TAB. As can be seen in Fig 20 the various plugins/functions are listed in the window "functions" and when selected the associated DLL is displayed in the "DLL" box.

Win95Key Plugins - Fig 20
Win95Key Plugins - Fig 20a
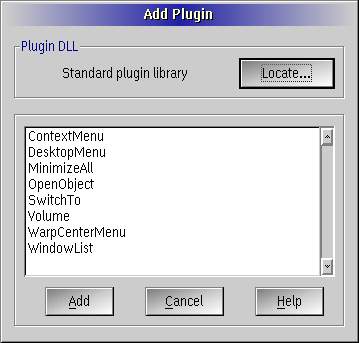
Pressing "Add" in the plugin section will bring up the "Add Plugin" dialogue. This dialogue is initially empty and only after using the "Locate" button (Fig 20a) to select a DLL, will the plugins/function be displayed. To use these plugins/functions, that is those that are required, they must first be selected and then added using the "Add" button. This will close the dialogue and you will see the new plugin/function in the "Function" window in Fig 20. With the "Remove" Plugin button (Fig19) the highlighted plugins/functions can be removed.
Currently there are 5 DLL's which are listed below with the plugin library name, the DLL file name in brackets, and the plugin/functions:
- Standard Plugin library (w95k_std.dll)
- ContextMenu- shows the context menu of the current application.
- SwitchTo - switches to the task specified.
- WindowList - calls OS/2 Task List.
- DesktopMenu - calls context menu of Desktop.
- WarpcenterMenu - plugin for operations with WarpCenter.
- MENU - calls "OS/2 Warp" menu of WarpCenter
- WINDOWLIST - calls Window List
- LOCKUP - calls OS/2 Lockup
- FIND - calls WarpCenter Search
- SHUTDOWN - OS/2 Shutdown
- INFO - switches WarpCenter indicator
- TRAYS - changes current tray
- CLOCK - switches WarpCenter clock
- PROPERTIES - calls WarpCenter properties
- OpenObject - opens WPS object or launches a program.
- Volume - manages main volume control.
- MinimizeAll - minimizes all windows.
- Object desktop plugin (w95k_od.dll)
- SwitchToVirtualDesktop - changes active desktop in the Object Desktop program.
- Pipe Plugin (w95k_p.dll)
- SendToPipe - sends text to the pipe specified by user.
- APM plugin library (w95k_apm.dll)
- ProcessAPM - manages APM (advanced power management) subsystem in OS/2. Note: requires standard OS2 APM drivers installed.
- Semaphore posting plugin (w95k_sem.dll)
- SemPoster - posts an OS/2 event semaphore.
With the exception of the Object desktop plugin, all other plugins are loaded by default after the initial install.
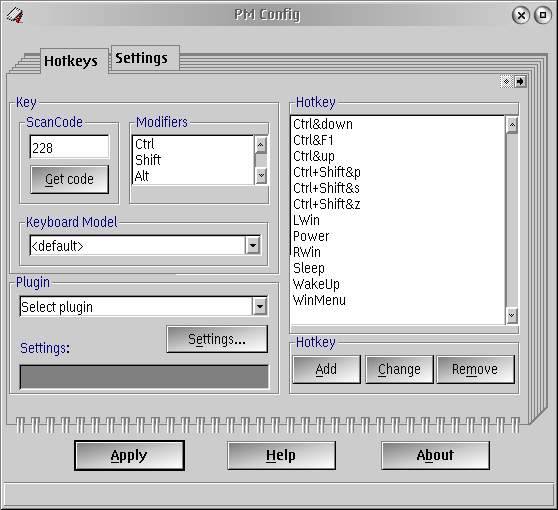
PM_Conf Hotkey definition Window - Fig 21
To associate a key with a plugins/function the following sequence has to be followed using PM_Conf.
- Press button "Get Code",
- When the small dialogue "Press Key" appears, press the key to be defined. A scan code or name for the key should appear in the "ScanCode" box (228 in the example in Fig 21). If nothing happens after pressing a key, as happens with my keyboard after pressing the "email" button, you will need to run one of the tools called "Keyboard DosMon* tester"
(a)Using Keyboard DosMon* - which is to be found in the subdirectory "Tools" - will open a full screen and after the initial program info give you information on any key that you depress. in my case the following four lines of info are given. The first two as the key is depressed and the second two as it is released (Note: other keys may only generate two lines):

The important item in this line is the scan code which needs to be placed in the file kbdfix.cfg. In this example it is 108. Edit the file kbdfix.cfg (which can be found in the win95key\bin directory) adding a description line and the scan code with the following format:# "e-mail" key Key 108
(b) Add kbdfix to CONFIG.SYS by adding a line with RUN=X....\Win95Key\bin\kbdfixd.exe (Where X.... is the drive and full path name). Reboot and when you now start PM_CONF, depressing the key that was not previously seen by OS/2 will be available together with the scan code you have determined. So in my case when I now press the "email" key I see 108. - The next thing is to select a plug-in which you will use in combination with this key. I selected OpenObject which allows me to call my email program. The program is specified using the settings button and entering the location of the program or by using Drag and Drop. Now press Add and your new hotkey is added to the Hotkey window. Before you can use it you still need to press the "Apply" button which will update the ini file used by Win95Key. If Win95Key is not running a warning message will be given.
- If you want to know what plugins/functions is associated with a hot key, just select the hot key with a click of the left mouse button, and you will see which plugins/functions is used and the applicable settings.
Since all keys can be modified with the Ctrl, Alt and Shift keys it is possible to make hotkeys for anything you want. By default a number of keys have already been defined and are all shown in Fig 21. These include the Windows keys plus a few others, one of which is Ctrl+Shift+s which calls PM_CONF. If you do not have enough modifiers then you can add them. Be careful with naming a key. If you make a new modifier then it must be one word without a space as otherwise you cannot remove it.
A nice refinement of Win95Key, is the possibility to select a keyboard. At this moment there are only two keyboards defined plus a so called default keyboard. The definitions of each keyboard are contained in the file keyboard.def which is located in the bin directory of Win95Key. To add a new keyboard definition use a text editor adhering to the simple format already used in this file. When you have done this for your keyboard, then instead of a scan code being displayed the name that you have given in the keyboard definition file will be displayed. Doing this makes everything less ambiguous. Don't forget to send your keyboard definition file and Keyboard fix and cfg file to Alex Samorukov but after you have tested it, and thank him and his colleagues for all their work.
If you have eCs then you can use "kbdfixd.exe" to get around the problem with those keys which are not recognized on modern keyboards, and just use the standard hotkey functions in eCs. If you want more use Win95Key. Any key defined by Win95key will take preference over any key defined as a hotkey in eCs.
A write up of how to use a plugin for this program, written by another Russian, Alex Samorukov can be found in OS2/eZine November 2001.
Note: Win95Key when running it is not shown in the task list! To close down Win95Key double click on the "Win 95 Key" icon in WIN95Key Folder to open win95Key, and then you can close it in the normal way.
Conclusion
By using a combination of the above tools I can use all the keys on my keyboard, I can switch between codepages easily, I can type all those strange characters without having to remember their ASCII codes, I can mute and control my volume using my keyboard. in fact I can do exactly what I want. I have not found any adverse combinations of the above software, but obviously defining the same key combination in three programs makes no sense and some key combinations should be avoided. I would thank all of the people who made that possible with their time and effort by writing these utilities all of which are freeware!- Rich Walsh for Code Page Pal
- Dmitry Steklenev for Characters Map/2
- Pal Ferenc for Kbdredef
- Marcus Degeus for KeybUSBR
- Viktor Remennik for Win95Key
- Alex Samorukov for PM_CONF and kbdfix (bundled in Win95key).
References
|
Previous Article |
|
Next Article |