![[PMMail: Internet Mail Like You've Seen it Before... In Your Dreams]](south.gif)
| Photo>Graphics v1.0 | - by Christopher B. Wright |
 ost of us are aware of the great possibilities of OS/2 as an operating environment for graphics designers and desktop publishers. With its superior multitasking and crash protection, you can do a lot of heavy stuff without worrying too much about your computer grinding to a halt and choking up on you.
Unfortunately, at the moment most of OS/2's potential in this area is unrealized. Although ColorWorks is a superior, high-end product for paint and image processing, that's only 1/3 of the Graphic Design world. OS/2 has no desktop publishing or vector drawing applications to speak of (Clearlook and DeScribe approach DTP standards with their use of frames but don't quite make it; Freelance for OS/2 is a very rudimentary product and CorelDraw 2.5 for OS/2 is no longer sold anywhere).
So to cover the other 2/3 of the Graphic Design/DTP world, we are forced to rely on Windows applications.
But we're making some progress in these areas. Aside from those companies mentioned above, TrueSpectra, a Canadian Company that has already released a high-end 3D animation package for OS/2 under the same name, has now released Photo>Graphics, an innovative graphics program that takes a "holistic" approach to graphics design -- it tries to do it all.
The secret to this is the TrueSpectra ColorWave Level 2.0 render engine, which gives painted and digitized images resolution independence. In other words, digital images can be scaled on your screen just like vector drawings can, without loss of image quality. Not only can you scale your image on screen, but you can determine its exact size when you print it as well.
Photo>Graphics is a multi threaded application that allows you to continue working while it is rendering other portions of your graphic. It is also object-oriented; each specific shape, effect, and mask is an independent object that modifies the objects sitting below it. All objects can be named, allowing you to better differentiate what they are.
At the moment, Photo>Graphics it is only available for OS/2, but later this year a Windows 95 version will be out. There are also plans to make it available for NT, Unix, and other platforms.
Photo>Graphics is strongest in the area of "painting" and "digital imaging", that is, creating a picture from scratch or modifying an already existing graphic. The basic idea behind Photo>Graphics is that all objects -- even text and vector lines -- consist of a shape and a modifier. Depending on these combinations (and although there are not many tools to choose from, the combinations are varied and interesting) you can create a great many objects.
Choosing a shape and a color gives you a geometric object: a rectangle, ellipse, triangle, star, or crescent moon. Choosing a non-rectangular shape (GIF, 1.5K) is a little confusing at first, because Photo>Graphics maps out all areas with rectangular fields before it fills in the area with the shape you've chosen. For example, if you decided to create a blue ellipse, dragging the mouse across the area you want the circle to appear in will give you a dotted rectangle, and when you reach the size you want, releasing the mouse will create an ellipse within the region of that rectangle.
Photo>Graphics tools are correctly named "Ellipse" and "Rectangle" -- there are no tools for creating squares or circles independent from these. Circles and squares can be made from the ellipse and rectangle tools readily enough, but if you're a perfectionist you might find the absence of circle and square tools frustrating. The triangle, star, and crescent moon shapes are interesting but I've found no use for them as yet -- I guess a little more experimentation is in order.
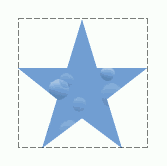
What I've found very useful are the "rectangle fade" and "ellipse fade" shapes. These shapes take the color you've chosen and fade it out as it reaches the edges, so the edges of the shape are undefined. This can produce some amazing effects, as shown in the example (JPG, 39k) I drew for this review.
You can, if you want, choose to use a multicolor fill tool. You can assign a color and hue to each "corner" of the object (ellipses are given four "corners") and they will bleed together toward the center. The default setting is an interesting tie-dye effect.
One of the more frustrating things about the geometric shapes, however, is that you can't create "hollow" objects. In other words, you can't create an ellipse that isn't filled. Further, Photo>Graphics doesn't let you differentiate between the edge and the fill; they are the same color. And, Photo>Graphics doesn't come with a "fill" tool (so you can't drop a color in an enclosed, empty space). More about some of the inconveniences of this later.
Choosing a shape and an effect gives you a mask or a filter to place over visible shapes. There are only a few masks and filters available at this time -- pixelate, noise, sharpen, blur, wave, contrast/color, emboss, button, and a "custom tool" feature I haven't quite figured out yet -- but you can do quite a bit with these objects. And if you choose a shape and a bitmap, the shape you draw will be filled with a bitmap of your choosing. Photo>Graphics can use a wide range of "bitmaps" (.gif, .tga, etc., not to mention its own .GDO format) so you're not limited to just .bmp files.
The vector drawing (line) tools aren't as complete as the "painting" tools, but they're close, and you can combine the two in interesting ways. Photo>Graphics gives you three basic types of lines: straight lines (that can be connected or disconnected), freehand lines, and a "paint roller" tool that's a lot like the PhotoShop airbrush tool.
All of these lines, when highlighted, will have a slew of X's running down their length. These are control points that you can grab and drag, changing the line's shape. The distances between the control points can be converted into Bezier curves with a simple right-click selection of the object's pop-up menu. Control points can be added or removed from any part of a line. Line thickness and "softness" can be modified, as well as the shape of connecting lines (beveled, etc.).
Furthermore, lines can be given effects instead of colors, allowing you to place masks "freehand" on graphics for touch up work or for weird, oddball additions to your work. You can even elect to fill the lines with bitmaps: if you choose a thick line, and draw on the screen, parts of the picture will fill in wherever the line passes.
Photo>Graphics's text-manipulation tools are not as fleshed out as the other areas, but you can still do some impressive stuff. There are two kinds of text tools: headline and block text regions. Either of these tools can have any effect applied to it, and text in either can be easily moved and resized. But resizing can be awkward, because Photo>Graphics doesn't size text in terms of point size, it sizes it in terms of "how many characters can fit in one line of this region?" This can be difficult for people who have a lot of different text regions that must use the same size text, but may have different sized text regions. Also, Photo>Graphics doesn't let you flow text from one text region to the next; the text just gets smaller, and you have to resize everything.
All objects, whether they are shapes, lines, masks, or text can be named to differentiate them from other objects. This can be very useful, especially if you have five or six invisible masks sitting on top of a graphic. Unfortunately, you can only see the name of one object at a time, so if you've got 20 objects sitting on top of each other, you have to click up to 20 times to get to the object you want to work with. I'd like to see a feature added that lets you view a list of every object on the screen, so you can select what object from that list you want to work with.
The resolution independence works extremely well in this product. You can scale bitmaps of many types to extremes without losing any noticeable image quality. There are limits, though. I tried cropping a picture of a child so that only his right eye was left, then expanded that to fill my entire page. It didn't look like an eye, but it didn't look like a bunch of separate pixels either (Photo>Graphics still made an attempt at interpolating the picture). I don't know how TrueSpectra managed to do it, but they've got a killer piece of technology at work here. In most cases, objects can be resized the way you'd expect to resize a vector graphic, and they can be rotated as well.
Changing objects is so easy in Photo>Graphics that you'll rue the absence of an "undo" feature. While masks floating on top of an object don't change the object itself (so you don't have to worry about applying an effect you don't like; you can delete it and the graphic will still be the same), if you do happen to change the object itself, you'll find yourself trying to re-create it. An undo feature would be a good addition for future releases, but if you're careful you won't have to worry about it.
The Power Tool can be displayed as either a box or a vertical tool bar. As a vertical tool bar, it can be locked to the left-hand side of the screen. The Object tool can either float above the work area or be locked at the bottom of the screen.
The Power tool (GIF, 4.6K) lets you choose whether you are going to draw or edit an object, or zoom in/zoom/out/pan. If you choose to draw or edit an object, you use the Power Tool to choose a shape and modifier.
The Object Tool (GIF, 1.5K) allows you to "finesse" what you've drawn. From the Object Tool, you give the object a name, alter the colors, and affect other parts of the object (how strong a mask will be, how transparent an object will be, whether or not an object will be "locked" into its perspective so you can resize it without destroying its shape). Using these two tools in conjunction, you can do almost everything you need to do in Photo>Graphics.
Photo>Graphics does not have a menu bar, instead, you use a right-click to open menu lists. The only way I've found to exit the program is to double click on the upper left-hand close button (or to use the one-click exit button that comes with apps like Object Desktop or Xit).
There are a few inconsistencies worth noting. Some of the Object Tool settings can be "torn away" from the tool itself (such as the line characteristics palette) so they are always floating on the desktop. This can be useful if you're working with lines a great deal, and want the line setting within easy reach. However, when you leave the palette floating on the desktop, you can only use it to define the characteristics of lines you're about to draw. If you want to change the line thickness of a line you've already drawn, for example, you cannot use the floating palette, you must use the settings on the Object Tool.
I was wrong.
Surprisingly, I found trying to draw the Help Desk Strip so frustrating that I gave up. Because I like to reuse shapes over and over again, I keep all my basic objects (Alex's head, his computer, his torso) in black and white and color them later. Photo>Graphics will not let you make "hollow" or "black and white" objects... if I wanted to create a circle with a white interior and a black edge, I had to make two circles, one black, and one slightly smaller white one sitting on top of it -- in other words, I had to fake it. Also, since Alex's hair is an irregular shape, I had no way of actually coloring it (when it came time for that) because there was is no fill tool in Photo>Graphics. While I think I could have eventually drawn an entire Help Desk strip with Photo>Graphics, it would have taken much longer than in, say, Presentations 3.0 (which is what I use now).
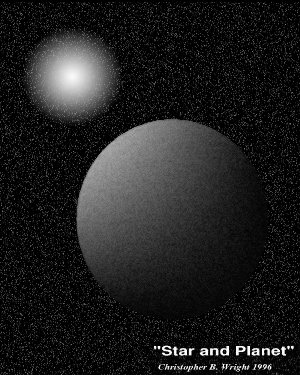
On the other hand, creating the planet hanging in space was simplicity itself. I created a black rectangle to act as the backdrop, then placed a 50% transparent noise effect on top of it to make it look like there were stars. To create the sun, I used a faded ellipse colored white, then placed a blur mask on top of it to make it look more fiery. The planet consisted of a multicolored ellipse (the "upper left" part of the planet was a light grey, and the other three colors were black, to make it look like the light was hitting it), a noise mask to give the planet some texture and a 50% transparent blur effect to make it look like there was a thick, hazy atmosphere covering it. And finally, I placed a contrast effect over the entire picture to make everything look a little brighter and more defined. Then I added a title and my name, and voila -- I was done. All this took about half an hour -- not bad for how it turned out.
 Photo>Graphics v1.0
![[Index]](toc.gif)
![[® Previous]](left.gif) -
-![[Feedback]](feedback.gif) -
-![[Next Ż]](right.gif)
[Our Sponsor: EmTec Innovative Software - OS/2 ISDN, modem and telnet software.]
Copyright © 1996 - Falcon Networking
This page is maintained by Falcon Networking. We welcome your suggestions.