
| |
| |
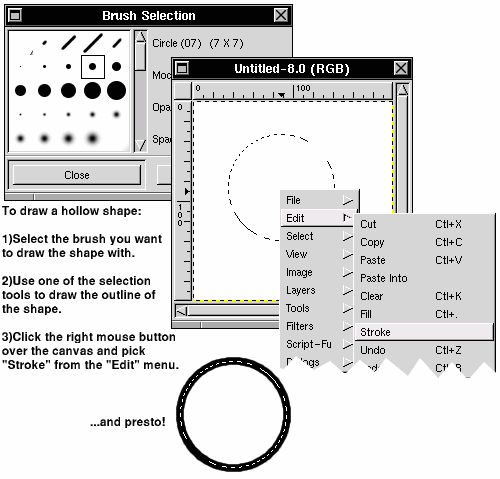
Summary: Learn how GIMP deals with common graphics tasks, with comparisons to PhotoShop, Embellish and ColorWorks to help those moving from other painting programs. Primitives, masks, channel operations and layers are prerequisites for any usable graphics application, should you be wanting to do more than poke dots where the eyes, nose and mouth of your cartoon character are supposed to go. With those and a decent collection of filters, you can perform about 90% of all common graphics tasks that you might do in the construction of a web site or piece of artwork. PrimitivesPrimitives are the tools you use to draw basic shapes, up to and including text. Rectangles, ellipses, polygons and bezier curves are the usual stock of the trade and it's as if each paint program has got a better way of doing it than the others. Take the drawing of circles: should you draw it from the center outward, or from corner to corner? And then: Should there be a separate drawing tool for circles and ellipses? Or even: Should there be a separate tool for drawing circles and selecting circular regions? While Embellish is the most extreme of all paint programs for OS/2 -- having separate tools for circles, ellipses, squares, rectangles, filled circles, filled squares, filled rectangles, circular selections, elliptical selections, rectangular selections, square selections and on and on and on -- GIMP has it boiled down to about three tools total: Elliptical selections, rectangular selections and curve-based selections. It's from these three that you can get all of the above. It works like this: You can only paint within the confines of the current selection and you can always tell GIMP to stroke the edges of the current selection with the current brush and color. To draw a filled circle you make a circular selection and fill it with the bucket fill tool. To make that selection into a hollow circle To make perfect squares or perfect circles, hold down the shift key while drawing. To make it draw from the center outwards, hold down the control key. To draw polygons that have no curves, use the curve selection tool but don't "drag" the mouse as you draw. Just click the points where you want the polygon's corners to be. If you click in the wrong place and need to move that corner, hold down the control key while you click on that corner's "node" and drag it elsewhere. To finish the polygon, complete it by clicking on the first node, make any final adjustments with the control-drag method, and then click inside the selection to tell GIMP you're ready to start using it. Now you can fill it or "stroke" it to make solid or hollow polygons.
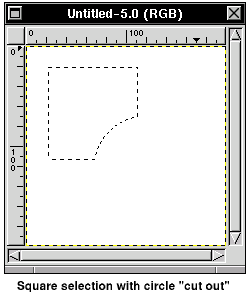
Getting a bit more sophisticated, GIMP can add or subtract from a selection - to take bites out of it or append new chunks to it. Draw a circle and then use the curve tool to take a pizza slice out of it. Or draw a rectangle and give it a rounded end with the ellipse tool. You do this with rectangles and circles by holding down the Shift key (for adding) or the Control key (for subtracting) at the time that you make the first click to start drawing the shape. Once you've started drawing and you still have the mouse button down, release the shift or control key and finish drawing the shape. The next time you hold down either Shift or Control while still drawing, GIMP will assume you now want to constrain the shape to a perfect square or circle (Shift) or draw from the center (Control). So, for example, let's say we want to take a circular slice out of a circular selection that's already on the screen - as shown by the "marching ants" - in order to make a half-moon or crescent shape. Hold down the control key after positioning the mouse, click and hold the mouse button down while you start to drag, release the control key and then press and hold it down again along with the Shift key now to make it draw a perfect circle from the center outwards. When you're finished and you release the mouse button, GIMP will subtract the difference of the overlapping circles - leaving a crescent shaped selection that can now be filled or stroked. For the polygon/curves tool, draw it as you normally would, and only hold down the Shift or Control key (to add or subtract) when you click inside the polygon to finalize it. Masks
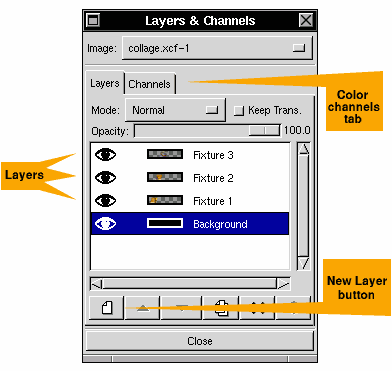
Masks are used to protect a region of your canvas from being drawn on and, in the best programs, come in what are called "8 bit" varieties. What that means is that the mask can be defined in up to 256 shades of gray, or white and 254 grays in between until you get to black. You don't see the mask in the final picture, you only use it for control of where paint is allowed to be applied. A mask is always the same size as the picture and each pixel of the mask corresponds to the pixel of the same coordinate in the picture. If that pixel in the mask is black, that corresponding pixel in the picture will be protected from change - no paintbrush in GIMP's toolset can paint over it while the mask is in effect. If the pixel is gray, paint will only partially affect that pixel according to how light or dark that shade of gray is. Best of all, you can create and edit a mask just by painting to it, even using cut and paste operations from other masks and other images. A common use for masks is to fill a shape with something other than a solid color, especially if the shape is a complex one, definitely if the shape uses fades or anti-aliasing to smooth the edges, and always if the shape is in another file or needs to be saved to disk for use later. In ColorWorks you might have dealt with 8-Bit masks as separate image files, usually saved together in an ever increasingly cluttered folder of other masks from other projects. You told the program to start working with masks, pointed to the mask in question and started painting with the mask active. GIMP is different in that it stores each mask with the associated image and you get to them by opening the Layers and Channels palette (or "dialog"). From GIMP's point of view, these masks are stored as channels, and at any point you can right click on a channel in the Layers and Channels palette, pick "channel to selection", and start working with that selection as if it were one you just drew with the regular selection tools. While the "marching ants" will display an approximate border - possibly making you think it's forgotten all your fades, blends and antialiasing - the 8-bit mask is actually in full effect. To create a new Mask in GIMP, flip to the channels tab of the Layers and Channels palette and create a new channel. Name it what you want. Now, after highlighting the new channel and making sure it's visible (click the white space until an eye icon shows up), go into the canvas and start painting. You'll be painting the mask here, so the only colors available to you will be grays. You'll also notice you can see your picture through the mask, as if what you're actually editing is a film of smoke across the glass that covers your picture. This is to help you match up the mask's shape and form with that of your picture. You won't be editing the picture itself, since you won't have either its layer or any of the Red/Green/Blue channels highlighted in the palette. GIMP only paints to whatever channel or layer is selected in the Layers and Channels palette. When you're done painting the mask, right click on the mask in the Layers and Channels palette, pick "Channel to selection" in the menu, flip back to the "Layers" tab of the palette and select either the "Background" layer or any of the others that you have created and want to paint on. You'll see the "marching ants" have outlined the approximate shape of your mask, and when you take any of the GIMP brushes to your picture they'll only apply color within that shape. Knowing how to use masks will come in handy like you'd never believe. If you've seen those fancy photo montages where one image blends into another and wondered how to do them, masks are about the only trick you need to know to do it. You just create masks that protect the areas of the montage that you've already done, and use fades (with the help of the gradient tool) in those masks to create the blends. Channel OperationsDepending on what color model you prefer to edit your images in, there will be at least three components to each color image. The default ones are Red, Green and Blue. Other major color models are Cyan, Yellow and Magenta, plus Hue, Saturation and Intensity. Any color in the spectrum (all 16 million of them from your computer's point of view,) can be described by these color models as a three number value, each number being between 0 and 255. The color white is represented, in the RGB model, as Red: 255, Green: 255 and Blue: 255. The color red is Red: 255, Green: 0, Blue: 0. And "e-Zine! Orange" is Red: 250, Green: 166, Blue: 2. Every paint program defaults to editing these color components together as a whole, adding the right amounts of red, green and blue to each pixel's color value automatically and transparently to you. You just pick the color and draw stuff. Try clicking on the color box in Gimp's toolbar and dragging your mouse around the square of color, watching the slider bars to the right move back and forth in real-time. It's in this color selector box that you'll see how each different color model has its advantages over others. For example, suppose you want a darker variant of your currently selected color -- just reduce its Intensity level. Or let's say you want a pale version of the color you have -- just reduce its saturation. In both cases you're editing the color in the Hue, Saturation and Intensity color model. It's impossible to create a color in one model that can't be represented in another model, so don't think that you're forced to choose one or the other. Just use whatever is most convenient for you. But what this brief tutorial on color models was meant to prepare you for was the concept of channel operations. This is where you stop editing your image as a unified color model and start editing only specific channels. In a picture canvas that you already have open, preferably with something like a photograph in it, flip to the channels tab of the Layers and Channels dialog and de-select two of the three channels you see there. Now start painting. Notice how the paintbrush doesn't behave as usual, it's not painting the same color as it was before and it's even painting transparent color - it only taints the picture. This is because GIMP is not painting to the color channels you have deselected. If a pixel's red component is 150 when you paint over it with only the green and blue channels selected, that pixel's red value will stay at 150, even though its green and blue channel values will change. Paint with black and you reset the green and blue value of each pixel to zero, leaving the red value intact, and leaving you with a deep red tint (made up of whatever red was present in the picture before you started painting). Paint with white and you elevate the green and blue component of each pixel to 255, giving you washed out cyans. But there's more, because just as you can paint to only the red or green or blue channels individually, you can also make GIMP assume a different color model and paint to a pixel's hue, saturation or intensity instead. But instead of selecting "hue" or "saturation" or "intensity" in the channels tab of the Layers and Channels palette, you do it a different way; you create a new layer and change the way it adds its contents to the combined picture. This can have a number of advantages to it, not the least of which is the ability to switch off a layer if you want to look at your picture without the effect that it adds, or to switch between different combination methods. In the layers tab of the Layers and Channels palette you create a new layer and, making sure its highlighted, change the Mode to something other than "Normal." For example, set the mode to "Color", pick a color to paint with and start painting. Try the other channels to get a visual idea of what they do. Depending on what kind of picture you're working on, it may or may not be immediately obvious what these different modes do. And of course it's not just the old paintbrush tool that you can use in conjunction with these channel operations either. All of the filters will work too, applying their effects only to the channels or layers you have selected at the time. As you play with this in "exploration mode" you will probably make a glorious mess, but bear with me, these channel operations (or "chops") are used for some nifty effects that you'll learn later. Layers
Imagine your picture is composed of sheets of clear acetate, each sheet having an independently editable part of the image on it. If your making a title banner for your web page the first layer might be the decorative backing (a stylized wood panel maybe), the second layer could be additional decorations (carved corners) and the third layer may be the text. If you make a spelling mistake and need to go back later to correct it, erasing the text layer won't affect what's on the other layers. Better yet, you can selectively switch layers on and off to see what the composite picture looks like with or without them. Support for layers has become another make-or-break feature for modern paint programs. In Embellish you work with objects rather than layers, ultimately emulating most of the same advantages. ColorWorks, alas, has no such analog. GIMP's Layer tool is patterned almost button for button after Photoshop's, so those in transition from Adobe's tool will have no problems getting to grips with it. A hidden advantage comes from having an alpha channel associated with each layer. An alpha channel is like a combination of the Masks and Color Channels that I described above. Like a channel, it's edited in the background by GIMP without you being aware of it, and like a mask it's used to control the degree of transparency for each pixel. Effects such as anti-aliasing (the smoothing of edges to remove the "staircase" appearance of diagonal and curved lines) are created in the alpha channel. Why? It's so that if you change the background of an anti-aliased shape, the edges will still blend from the foreground color to the new background color. Without it you'd see a "fringe" around the edge, where the anti-aliasing is trying to blend into the old background color. This is absolutely essential for a layering paint program, since the whole point of having the layers is to let you change the background as well as the foreground. If you've been following my examples so far then you've already created a layer to play with the channel operations. Adding more is simple, and at your discretion. Most artists (and even those humble enough not to use that term to describe themselves) invent their own rules and conventions for creating layers depending on what their style and skill level allow. You don't need to create a new layer for every brush stroke, of course. The undo and redo commands will usually suffice for most of your experimentation. You might find yourself creating lots of layers at the beginning, either in effort to understand the layers concept, or because you're not confident that you won't need to go back and edit your background. But as time progresses you may find it's convenient to only have one or two layers above the background, as your confidence of creating an effect right the first time rises. Wrap-UpIn order to teach fancier and cooler tricks, one has to make sure the basics are known first. That's what the above four are. They're the building blocks on which almost all other tricks are constructed from. The gadgets and "instant special effects" included with GIMP (see our article GIMP/2 For Button-Pushers in this issue) are all very well and good, but they're mainly for whipping up fancy headlines and logos, not serious design work. Yet to come are some more tips and tutorials for GIMP users out there, ones that could shift you up into the same gear as professional web designers. Not the ones who use Alien Skin Black Box effects and not the ones who sneak over to cooltext.com. Stay tuned.
| |||||||||||||||||
| | |
| Copyright © 1999 - Falcon Networking | ISSN 1203-5696 | April 1, 1999 |
