January 16, 2003
Isaac Leung got a degree in Engineering Physics and then Electrical Engineering after which he promptly got a job as a product engineer at a company which makes high speed datacom chips. He is old enough to have cut his computer teeth on Commodore 64's and first played with OS/2 1.3 EE while at a summer job with IBM. The first PC he ever owned came with Windows 95, but he soon slapped on OS/2 Warp 3 and has been Warping ever since. In his spare time, he plots to take over the world.
If you have a comment about the content of this article, please feel free to vent in the OS/2 eZine discussion forums.
There is also a Printer Friendly version of this page.
|
Previous Article |
|
Next Article |

Autonumbering with WordPro
A wordprocessor is supposed to make your life easier when it comes to creating documents. However, a lot of people experience a lot of frustration with their tools. But often, it's not because today's word processors aren't capable applications, but simply because they don't know how to do things the easy way.
This time, let's take a look at automatic numbering with WordPro.
Section Numbering
I hope by now that nobody is manually numbering their headings in their documents! But in case you have just moved to a modern word processor, let's take a look at why we want to auto-number headings (i.e. chapters, sub-chapters, etc) and how to do it nicely. (I've actually seen enough documents come across my desk with manual numbers that it may be worth going through just once!) And actually, at least where I am, this is consistently one of the top 3 arguments I keep hearing for not using wordprocessors and using LaTeX instead. So clearly, there are still a lot of people who don't know. It is, as you'll see, not a valid reason at all, since a word processor is perfectly capable of this task, with a very small amount of effort.Why do it?
You should always get in the habit of automatically numbering your section headings. (That is, if you want them numbered. Even if you don't, you should still always use styles.) Imagine how tedious it would be if every time you inserted a new chapter or section and you had to manually go through the document and change the numbers for everything! If it's only a page or two, it may not be too painful, but anything larger than about 20 pages, and you will be wasting your time. Especially when it is so easy to do, there's no reason not to.To start with, always learn to use Styles when working with text. Look at the bottom of your WordPro window. See that little button that says "Default Text"?
![]()
It's used for something! Click on it to get a list of styles available. (Alternately, you can right-click the mouse button to bring up the pop-up menu and select the "Styles" tab and change the text style from there.)
When you want a big heading, do not highlight your text, make it bold, 24 point, underline, etc. No, the first thing you should do is highlight your text, and change the style to something suitable, for example, "Heading 1".
Now just right-click to bring up the text menu and select the bullet/numbering tab. By default, WordPro has the numbering set to "NONE", but it's just a click of the mouse to turn it on.
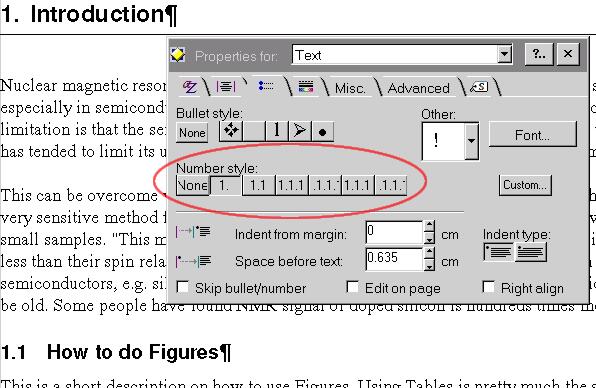
If you're not happy with the default numbering scheme, you can easily customize it yourself. You can use letter (A, B, C, etc) or numbers or even a mixture of both. You can even define some heading levels that won't have numbering. The flexibility does come with a small price. Just remember that you have set the numbering style for each heading level. (i.e. Heading 1, Heading 2, Heading 3, etc need to be manually specified to be numbered and in which manner.) It's actually not so bad, even in very large documents, I've rarely seen the need to go beyond the 3rd sub-section.
If you're happy with the numbering, carry on and make it look pretty. Does it look right to you? No, well go ahead now and play with it. Make it whatever size and font you want. In WordPro, you can even change the colour of the text, add lines or borders around it. It's up to you. Once you're done, be sure to Redefine the Style.
That's the whole point. You do all the work just once. After that, as long as you make sure you use styles, all your headings will look exactly the way you want them. Even better, if you need to change it, just do it and re-define the style again. All the appropriate styles will be automatically updated. No more hunting throughout the document and manually changing everything! From now on, all your headings will be automatically numbered correctly.
As a wonderful side-effect, you have a nice way of organizing and navigating your document as well. If you just click that tiny, obscure button on the top right, you can show these nice tabs.
![]()
Numbering for Tables, Figures and other things
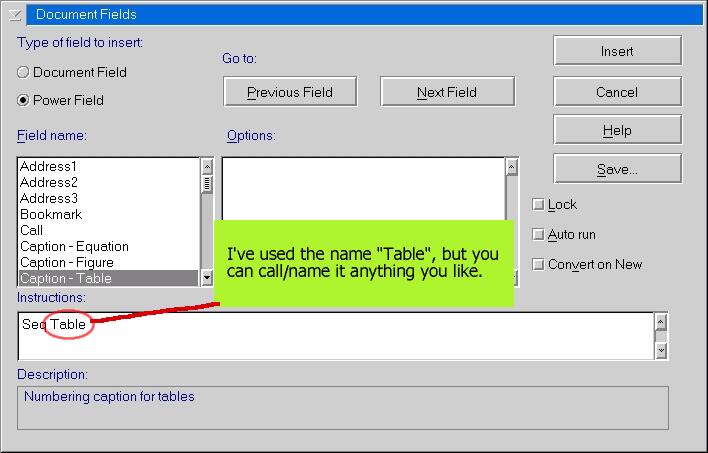
Okay, now that you know how to "turn on" the automatic numbering, it is almost trivial to set special numbering for other items such as tables, figures and equations. You'll also see why it's important to use styles to accomplish this. Now, I have to admit, if you're just doing tables, pictures and equations, Microsoft Word and WordPro for Windows (according to a manual I have) are slightly easier. Only slightly, because it effectively has the numbering styles for these items pre-defined for you. WordPro for OS/2 has one little extra step which you only have to do once at the beginning.Let's say I want to create an auto-numbered caption for tables. First thing to do is to highlight the text that I want to turn into a caption. Then, right click to bring up the text menu as before and select the bullets/number tab. Under the "Number Style" section, click the button to the far right that says "Custom". This will bring up the Custom Numbering dialog.
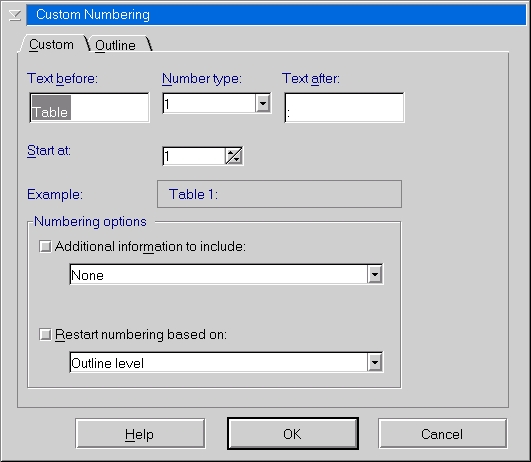
You can enter any text before the number (I like it to say "Table" for example), and anything after as well. The "numbering" can be a regular numeral, or alphabetic sequence (e.g. A, B, C, D, etc) or whatever else you choose. Check out the Example section of the dialog window, you'll get an idea of what it will look like.
Under "Numbering options", you probably want to un-check all the options. Or maybe not. Restarting the numbering based on outline level makes sense for chapter headings, but not so much for table captions. Here, I prefer to have a single sequence of numbers for the entire document. That's why I un-checked this option. If you wish to restart the table numbering every chapter, you can do that too. There's a whole list of possible options in the drop-down selection list.
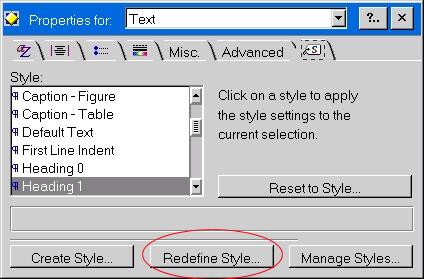
Once you are done, press "Ok" to go back to the Text properties dialog box. Now go to the Style tab. If you're doing this for the first time in your document, do not click on "Redefine Style...". You will likely want to first "Create Style..."
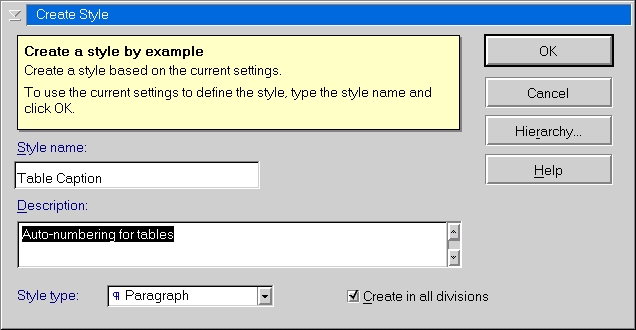
Here I've called mine "Table Caption", but you can call yours anything you wish. I can also, of course, define a "Figure Caption" in a similar manner, or any kind of numbering scheme I want. It's not necessary to enter a description, but I've just done it in this example to be complete.
Another way to number...
There is another more complicated way to do automatic numbering of automatic captions. Generally you probably don't want to do it this way because it's more complicated, but there are situations where you might want to, so I'll at least introduce it.If you go to the menu "Text"->"Insert Other"->"Power/Doc. Field...", you'll get the following dialog.
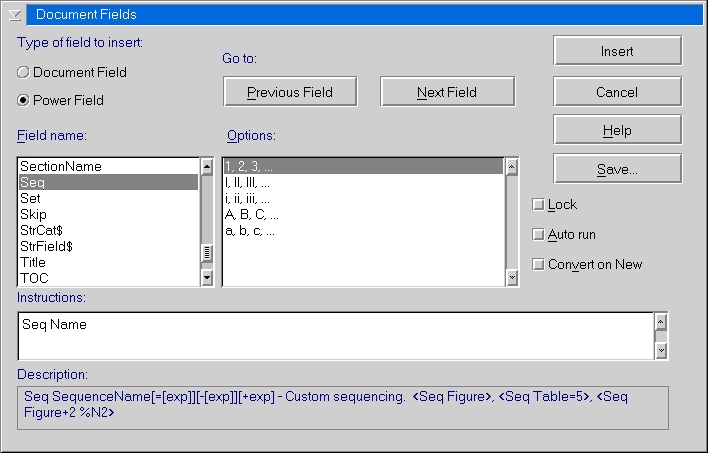
Go down and find the field name called "Seq". In the options field, you'll see a list of possible numbering styles that you can choose from. Now here's the tricky bit. This actually just shows a generic sequence, you'll see in the "Description:" field, a rather messy syntax and description. I'll make it easy for you. In the "Instruction" field, change "Seq Name" to "Seq Table" (or replace "Table" with some other name).
Once you click "Insert", you'll get to enter a name and description for this particular numbering sequence (I've called mine "Caption - Table").
All this does is give you a particular sequence of numbers which you can use for anything. If you want to insert a caption for a table, you'll have to do the following:
- Define a new Style, My Table Caption, for example. But unlike the previous example, do not have it auto-numbered
- Manually type in "Table"
- Go to "Text"->"Insert Other"->"Power/Doc. Field..." and select your previously defined sequence for table numbers. This will insert a new number in the sequence.
- Manually type in an entry for the caption (e.g. "New Car Prices").
- Now highlight all the text, starting from "Table", including the sequence numbering and your caption text.
- Change the style of the highlighted text to bt the new style you defined (in this case My Table Caption)
As you can see, very tedious (but not as bad as manually numbering!), but there is a reason for all this madness, if you have specific cross-referencing needs, which I'll go into later.
Cross Referencing
So now you have stuff all automatically numbered. One thing that usually is required is the ability to cross-reference. For example, you may wish to refer to "Figure 4". You certainly don't want to have to update this manually should you insert a picture and it becomes "Figure 5"! This is what cross-referencing is for.It's fairly easy to do in WordPro, but to compare to Word again, it is easier in Word if what you are cross referencing is something simple, since that function is built in. In Word, you can easily cross-reference a table, picture or equation, and reference the number or the entire caption. Beyond that, it's not as easy (if at all possible. You'll have to figure that one out yourself). The WordPro way is marginally more work for the easy stuff, but very easy for anything complicated.
Creating a cross reference
Go to the menu "Create"->"Other Document Part"->"Cross Reference...". A big dialog appears at the top of your screen. ![]()
See? Very handy, it even tells you what to do, and there are only 2 steps. First thing is to highlight the text you want to reference. In the case of Figure captions, you just highlight the caption (but you won't be able to higlight the auto-numbered part). No problem. Now just click on the button that says "Mark Text to be Referenced".
And that's it. Just enter a suitable description and you're done marking the text. As an aside, this is where WordPro is a bit better than Word. You can cross-reference any text in the document you please, with equal ease. What's more, you can supply a useful description. In Word, you just pick from a list of the captions of cross-reference-able items, which may or may not mean anything to you. (Especially in a big document.)
Cross referencing with custom sequence
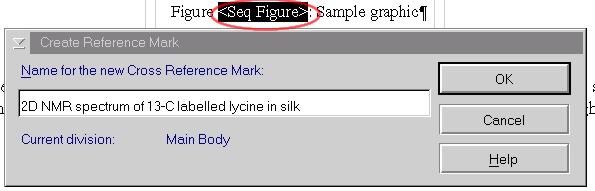
If you used the more complicated method of numbering using the auto-sequences described above, you will have much more flexibility into how/what you cross reference. This comes at a cost of more work on your part.For example, if you just wanted to reference the number "4" in "Figure 4", you'll have to specifically highlight that yourself. But be careful, here's a tip. Before you mark the cross reference, go to the menu and turn on "View"->"Show/Hide"->"Power Field Formulas". You can see I've done that in the screen-shot above. You won't see the numeral "4" anymore, but instead "Seq Figure", which is the actual document field you used.
Why go to all this trouble? Because if you just highlighted the numeral "4", for instance, you may not have marked the entire field! (I've learned this from painful experience.) The cross-reference won't be entirely correct if you haven't completely selected the entire document field. It may look okay at the time, but try opening it up next time, or updating your references. Ouch!
![]()
The only way to ensure you've marked all the text correctly is to show the document field and make sure you have highlighted the entire field, including the enclosing brackets. When the text has been marked, you'll see the two red marks which should completely encompass the entire field. After that, the procedure is completely the same as when you do a "normal" cross-reference.
Using a reference
Now you've defined all your cross-references, you want to use it, right? Same menu item, and the instructions are right there. Just plop your cursor wherever you want it to be and click on the button "Reference Marked Text". You'll get the following dialog.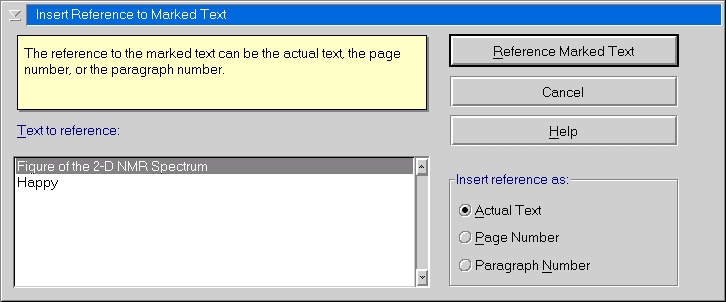
Here, you've only got 3 options. Most of them pretty self-explanatory.
- Actual Text: What your caption actually says.
- Page Number: The page your referenced text is on.
- Paragraph Number: This is probably the least clear. It means the auto-numbering text before your caption. For example, if you had "Figure 4", selecting this option would display "Figure 4", and not your caption text. If it were a chapter, say "Chapter 2.2", it would display "Chapter 2.2", not the title of that chapter.
I would've liked to see another option, that is just the numbering and not the text associated with the auto-number. In setting up the auto-numbering, you'll recall you can specify both preceding text and following text for the number. (e.g. I specified "Figure" and then "4" followed by ":".) In this case, all I can do is get "Figure 4:", even if I only need the number "4" to be reference. But this is a minor gripe.
Table of Contents and more...
In a large document, it is common to not only have a Table of Contents, but also Tables of Tables, Lists, Pictures and many other things. Since you have so nicely set up your document, it is a breeze to create an automated list now! Go to the menu "Create"->"Other Document Part"->"Table of Contents...". Yes, I know, it just says "Table of Contents", but you use the same function to create all your other tables.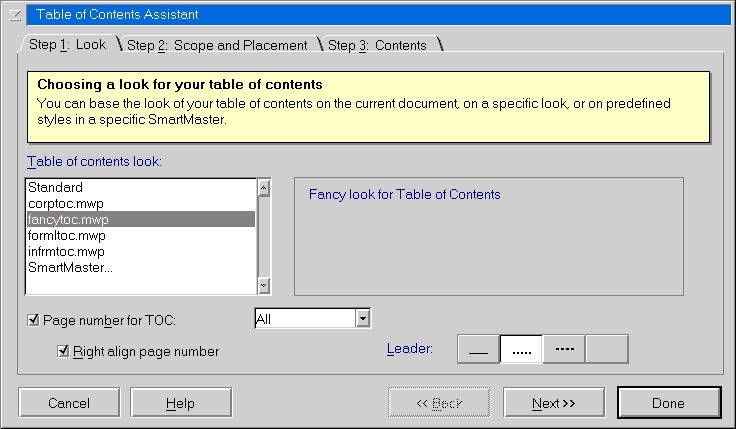
First step, pretty straightforward, just defining what it will look like. You'll just have to play with it and see which style suits your taste. Now moving on to Step 2 (which, by the way, nicely shown on the tabbed dialog.)
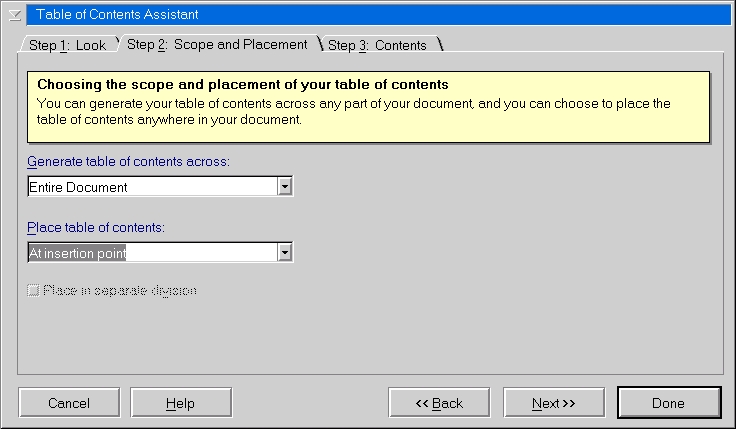
You see a couple of options in drop-down lists. The first one, most of the time, you'll probably want to generate across the "Entire Document", especially if it is for a Table of Contents. But, you do have the option to limit the contents to a particular division or section.
For the second option "Place table of contents:", I prefer to put the Table of Contents (or Figures, or whatever), exactly where I specify. (i.e. right where my cursor is now.) Other people may want it to be always at the beginning of the document (or perhaps you are making an index, and it should always go at the end.) Up to you. The last step is where the power is!
I think by default, WordPro will have the various "Heading" styles included in the Table of Contents specification. Of course, if this is what you're making, just click "Done" and you're...well...done.
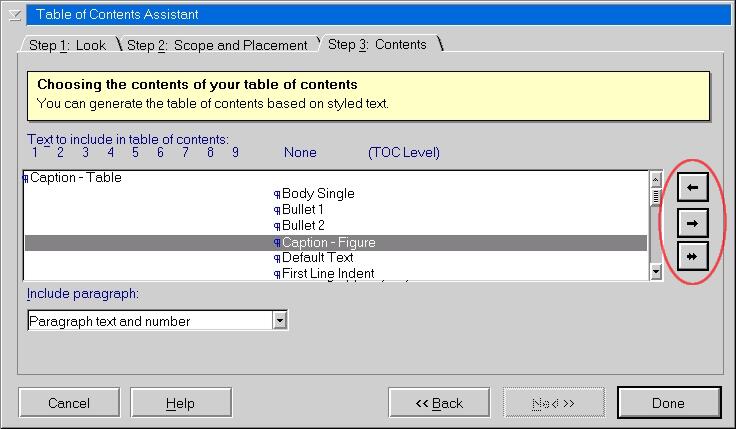
If you want to create a List of Tables, for example, no problem! See the arrow buttons I've circled on the right? You can use the double-arrow one at the bottom to remove any Styles you don't want to see in your list. I've removed all of the "Heading" styles in this example. The other arrows are for adding (or promoting/demoting the level) any style. For a List of Tables, I've chosen to add only those captions which are for Tables.
That's it. Just do your work once in the beginning and you're done. All so-called "Table of Contents" that you create are unique and separate, you won't have to worry about one being over-written (i.e. there isn't one single, global Table of Contents). And of course, everything is automated. Just right-click the mouse on any of them, and you'll see an option at the bottom "Update Table of Contents", which does exactly that, update all of them within your document.
Conclusion
I hope I've shown you how to do automatic-numbering with Lotus WordPro for OS/2, and hopefully, you'll be spending less time fighting with your documents and let your computer do the work for you. If you've got any other tips, be sure to let us know.
Beyond that, I think you can see how easy it is to be productive with OS/2. We certainly don't lack the tools to get the job done for most computing tasks that people encounter.
It's just a matter of someone showing you how to accomplish it!
|
Previous Article |
|
Next Article |