 r. Darwin would be proud. Tips work in both ColorWorks 1+ and 2.0
| Chris' ColorWorks Powertips | - by Chris Wenham |
r. Darwin would be proud. Tips work in both ColorWorks 1+ and 2.0
To select an area of pixels in an image, most popular programs will give you the 'marching ants' or dotted-line selection tools. The basic problem with these is that you have very little flexibility when drawing them, limited options to edit the outline and with complex selections the dotted line can dissolve into a mess of gray static with no clear and immediate indication of what is or what is not part of the selection.
The approach of ColorWorks is to let you paint the selection mask with any of the regular tools, with the power to use a mix of tools to define the same mask and erase portions of it the same way too. To select a pie shaped area I can use the circle tool to define the circle of the pie and then delete a slice with the triangle tool. The other benefit is that selected pixels are painted with a marker color, so there are no dotted lines to confuse -- you can tell instantly what's selected.
But the easiest way to select irregular shapes, by far, is with the floodfill tool. In other programs the same method would be called the 'magic wand.' By changing the tolerances ColorWorks uses to decide if the next pixel is in the same 'family' as the starting point, you can instantly select large areas of irregularly shaped, and irregularly colored pixels.
For example, to fill the sky in an image that has many different shades of blue you'd use a fill based mostly on hue. To fill a dark background made up of different colors that are surrounding a brighter object in the foreground, you'd use a fill based on luminosity
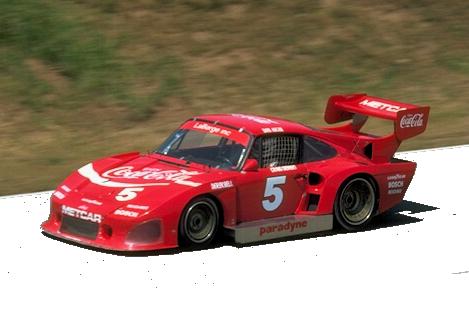
Let's work with the RACECAR.TIF image that comes with ColorWorks. There are three objects here that could be selected, the racecar, the road, and the grassy background. Using a simple fill with no tolerances manages to mask all of one pixel. Why? Well because in this photographic image there are very few areas where there are continuous spaces of same-color pixels.
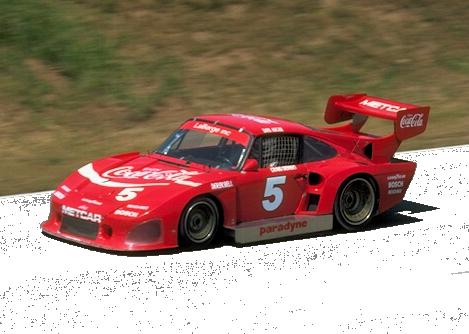
Because the road is mostly grey a hue based fill will work the best here. Double-click on the fill tool to bring up its settings notebook, then click on the "HLS" radio button. Enter 40 for Hue tolerance, 20 for lightness (since there are lighter and darker streaks of grey in the road) and just 10 for Saturation. Now use the fill tool and click somewhere on the road, you'll notice a dramatic difference (JPG, 20k) from when you didn't use any tolerances at all. The shadow of the car was dark enough that it fell outside of the lightness tolerance and the white strip along the side of the road stopped the fill before it got to the background (which is green and brown anyway, falling outside of the hue's tolerance).
Remember that the starting point you choose affects the results. If at first you're getting a lot of 'dirt' (JPG, 29k) from pixels that didn't fall within the tolerance, try picking a different starting point. So if the 'dirt' pixels are dark, choose a darker starting point to embrace that lower range.
For another example, the '5' on the door of the car, being in a shadow, was selected easily with a saturation based fill. The tolerances were Saturation: 40, Lightness: 20 (try it with a lower lightness, the brighter top of the '5' doesn't get selected), and Hue: 10.
I note your article drawing a neat pill shaped button (Curves and Highlights, Vol 1 Nr. 10). I recently purchased Color works V2 and note that I cannot draw an item less than 100x100 pixels or with a transparent background. This has been confirmed by SPG and may be fixed in V3. Your button is smaller than 100x100 and is transparent -- How did you make it seem so simple???
The trick I use is to have a copy of Galleria running alongside ColorWorks. I then create the image in a 100x100 canvas. Once finished I flip into mask mode and use the rectangle tool to mask the part of the image I want to save. Press CTRL-F (or pick 'Save and float image mask' from the Edit menu) to float the image, then pick 'Cut' from the Edit menu. Go to Galleria, select PASTE from its menu and the image is pasted into Galleria's window. With Galleria I can then reduce the color depth to 256 or lower (since .GIF can't handle 24-bit truecolor images) and save as a transparent GIF. Galleria will give you a palette of colors to pick the transparent color from after you confirm the filename to save as.
"I've found an easy way to make quick duplicates of the current canvas you're working on. Just go into mask mode, paint the canvas with the full-canvas tool, press CTRL-F to float the mask, and drag onto the ColorWorks desktop."
All quiet on the western front so far. SPG is deep in the process of getting version 3.0 ready for Beta soon, with a GA release sometime in Q1 of 1997. SPG is also planning to release a new technique lesson soon about Image restoration and repair.
I should be smacked with a wet noodle for not mentioning this page earlier, visit The ColorWorks PowerPage maintained by Michael Widmann for even more tips and a gallery of images, all created with ColorWorks.
![[Index]](toc.gif)
![[® Previous]](left.gif) -
-![[Feedback]](feedback.gif) -
-![[Next Ż]](right.gif)
[Our Sponsor: Mt. Baker Software - Developers of "Money Tree", OS/2 financial package.]
Copyright © 1996 - Falcon Networking
This page is maintained by Falcon Networking. We welcome your suggestions.