

| |
| |
|
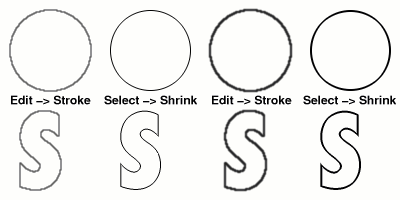
Summary: Learn how to crank out not just nifty stuff, but elegant stuff with GIMP. This tutorial covers a few techniques for getting smoother lines out of outlined shapes, as well as touching on some techniques you can learn to produce subtle montages of overlapping pictures. The Pencil-Smooth OutlineLast month I showed you how to create hollow shapes in GIMP by using the "Stroke" command in the Edit menu. This made GIMP use the currently selected brush and color to paint only the perimeter or outline of the selection (be that a rectangle or circle or polygon or even a bizarre and complex polygon). A problem that bothered me with it was that even after selecting a fine brush, the lines it drew were still too thick and fuzzy. Let me show you a few samples of shapes and text, some drawn with the "Stroke" command, and others drawn with a different technique.
Here are the two different techniques: The Edit -> Stroke Technique
The Select -> Shrink Technique
The two extra steps of the Shrink technique are usually worth it, as you can see from the examples. Razor sharp curves, no "bumps", and stronger color. BTW: It looks killer when you do it as white lines on a black background. Doing this for text requires an extra step that you usually don't need for the other primitives in GIMP's toolbox. Since GIMP wants to fill the text with the foreground color right away (how I keep thinking that "Transparent" needs to be added to GIMP's color palette for jobs like these) instead of just presenting you with the selection alone. You need to flip to the "Channels" tab of the Layers and Channels dialog, create a new channel, paint the text in there using white as your foreground color, and then use the "Channel to selection" command. Make sure you flip back to the "Layers" tab and select the layer you want to draw to, otherwise you'll be drawing to the channel again by mistake. Using Layers and Channels to Solve HeadachesIf it takes you 3 hours to create a piece of artwork, there will always be something unsatisfactory about the final result. This will probably manifest itself in clashing color schemes, a shape that's just a pixel too far in the wrong direction, too light, too dark, wrong contrast or whatever. Fixing it will never be a case of using the brightness/contrast tool or making a few dabs with the bucket tool or zooming in and erasing a couple pixels. It will always require re-painting the picture from scratch. It's Murphy's law.
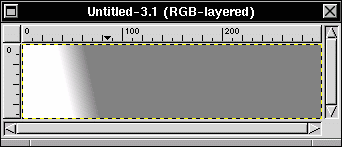
And so that's why Layers and Channels were invented. If you remember from our Basic GIMP/2 tutorial last month, user-defined channels act as masks that constrain painting to a given shape, area or density. You create a channel by flipping to the Layers tab of the Layers and Channels dialog, clicking the "new channel" button and painting to it just like an ordinary canvas, except that you paint to it with white, black and grayscales. When your channel is ready you turn it into a mask by right-clicking over its listing in the Layers and Channels dialog and picking "Channel to selection" from the pop-up menu. Then you flip back to the Layers tab, pick a layer, and start painting. The paint will be constrained to go only within the boundaries of the selection. Where you had painted white in the channel, paint can be applied. Where you left black in the channel, paint does not get applied. And where you painted in grays, the paint's intensity is reduced correspondingly. Like the templates that road construction crews use to spray-paint arrows and lettering on the blacktop, these masks let you paint the same shape (or fade) perfectly in any color or pattern, in the exact same location, every single time. That means that if you screw it up the first time, you can wipe it and paint it again without the agony of re-drawing that shape from scratch. Likewise, don't be afraid to create a new layer for almost every shape you paint. It'll mean that you can still go back to it and change it later, should you find that after being buried under 10 more layers of stuff it's the wrong color or in the wrong position. For me, I find that I spend about 80% of my drawing time working with just channels alone. Not a single drop of color touches the canvas until I've worked out how every shape should be in black and white "Spray-on" PhotosI often find myself creating channels with a fountain fill in them, then turning them into selections so I can make a photo fade out or fade in to another picture already on the canvas. The classic application of which is to create a montage of photographs that fade from one into the other. You've probably seen this effect used on a hundred encyclopedia covers, where the face of a Masai tribesman pokes out from a misty background of Da Vinci sketches, race cars and exotic fruit. There are two techniques to this, the first is to use a channel to define the shape of the area of the photograph that you want to blend in with the greater image, fading out the edges so there are no sharp boundaries anywhere. The second is to use the clone tool (or the Rubber Stamp tool in GIMP) to "spray on" the photo which you have opened in a separate canvas window. Here's how: Starting with a simple and linear montage, create a new image that's about three or four times wider than it is high. 300X100 for example. After creating a new channel, paint to it with the fountain fill tool, using a short line so the crossover from white to black is narrow but not too dense. It should look something like this:
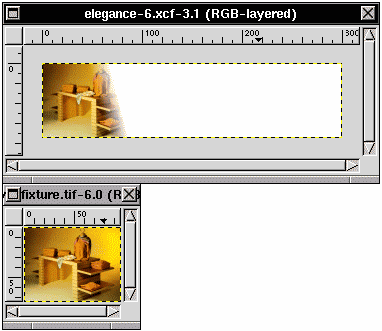
When you convert this channel to a selection, the white part will be where the photo shows through and the gray part will be where it fades out. Since GIMP displays the channel at 50% opacity (so you can see the picture underneath and use it as a guide), the solid gray area is actually black - where no part of the photo will show through. Turn this channel into a selection now and go back to the Layers tab, creating a new layer and naming it something like "Photo 1". Now open the first photo you want to incorporate into the montage, placing its window nearby. Select the Rubber Stamp tool and move the mouse over the photograph. Hold down the Control key while you click in the top left corner of the canvas (not of the window, but just inside the rulers). Now position the mouse over by the top left corner of the montage's selection in the montage canvas and start painting. The Rubber Stamp tool will use whatever the current brush is, so choose something like a large and solid one. With a few swishes you'll paint the source image into the main canvas, fading it out where you had drawn the fountain fill in the channel. You should have something a bit like this:
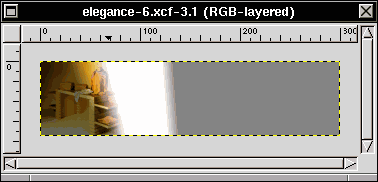
The photo has faded out, ready for another to start fading in right next to it. To get the next photo incorporated, you go back to the channels, create a new one and paint a fade, but this time you fade it in as well as fade it out. You do that by: 1) Painting the fade with the fountain fill tool, getting it to match as closely as possible (it doesn't have to be perfect, since some overlap is desired anyway). From left to right, it will go from solid black fading into solid white, or the inverse of the example seen at the top. Then 2) use the rectangle tool to draw a selection that includes all of the solid white area, but not the part where it fades from the black to the white. That protects the fade you just painted and lets you paint the fade out, going from white back to black. Here's an idea of what it would look like:
You can see that when we turn this into a selection, it'll let us "spray on" a second photo that will fade in from and overlap the first. Then, as you progress across the image, painting a few more channels in the process, you'll fill up the canvas with a montage that blends from one picture to the other. It may take some practice at first before you get the two main hand-skills down pat, which are: 1) Painting the fades just right and 2) aligning the source photo up with the destination canvas when using the Rubber Stamp tool. Even then, these skills only take a couple of minutes to develop.
Got any graphics questions you want answered? Contact me by e-mail to chris@os2ezine.com. |
| | |
| Copyright © 1999 - Falcon Networking | ISSN 1203-5696 | May 1, 1999 |

