
Anyway, we will make our own chat client today. And above that we will look into how to
make one application, which can be used as an applet or standalone whatever suits you best.
Unfortunately my health badgers me and I cannot go too deep into today's topics. Also, watch
out for missing curly braces, I may have missed one with the screen shots.
Since an applet is in fact inherently a panel, and we know a panel may be set to a frame, we conclude that it should be possible to set an applet to frame. And it is!
- java.lang.Object
- java.awt.Component
- java.awt.Container
- java.awt.Panel
- java.applet.Applet
- javax.swing.JApplet
The only trick we need to do is to fool the applet into thinking it resides in an Appletcontext. Further, we must give it the AppletStub it needs. First we need a frame that can behave as both.
|
We needed a frame that can masquerade itself as both a stub and a context, and so we did. If we will ever stuff this frame with any methods that need a reference to the applet, we use one member variable. The main method is thin as usual, it first creates the new applet object and sends that as an argument to the frame's constructor.
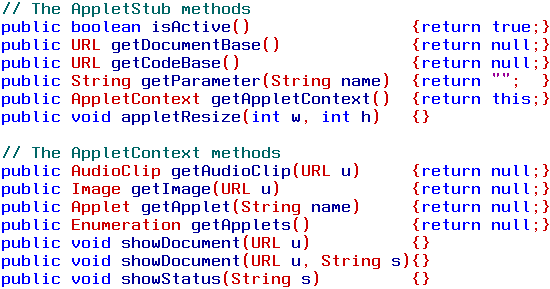
Implementing an interface is like signing a contract, so we must implement all the methods specified by the interface definition somewhere within our class. Unfortunately there are quite a few methods, let us look at them before we continue.
|
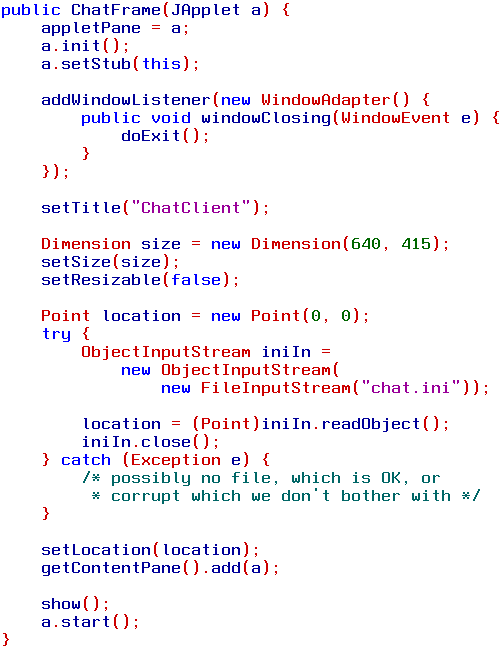
Now we have a class that has the look and feel of three other classes, one that can wrap an applet. We continue with the necessary constructor.
|
So far in this entry in the Into Java series we are pretty familiar with most of the code lines. Only a few things are really new to us, an applet seems to have a init method and a start method. We will look into that in a moment. And we see that the applet gets knowledge of this frame is the applet's stub, or interface, to the outer world (that ain't much to know this time <grin> ). The stub is supposed to communicate with the context, which is the frame itself. Ahem, did I complicate this? I hope you understand scatterbrained me anyway.
At the end we see how the applet is added to the frame's content pane--instead of a panel--and the frame is told to show itself. Hence, the trick is to use an applet instead of a panel. Not much, ahem?
Principally this all you need to build your own applet/application, just alter your class names.
One word about how to make method calls to the applet from this class, if that might be necessary in a future. This time we used the more general JApplet as type of argument to the constructor, and as the member variable's type. The easiest way is to change these class names to the actual applet's class name. That is the type of the variable and the type of argument the constructor expects.
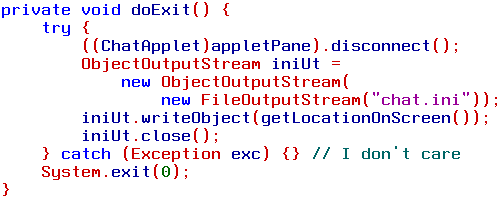
The second way is to cast the appletPane variable from JApplet to whatever class name you use when you make the call. The doExit method, called from the window listener, will do such a cast. Note the third line that casts to our ChatApplet class:
|
Now we are done with the framework. Save this class as a template for future use.
Are there any benefits in this? Why use a frame to wrap an applet? And why make an applet instead of a panel?
There are some benefits:
 To the left
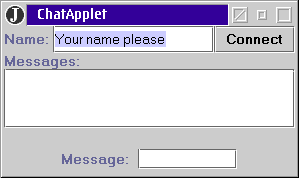
a minimum sized chat applet is shown, that will be our goal.
To the left
a minimum sized chat applet is shown, that will be our goal.
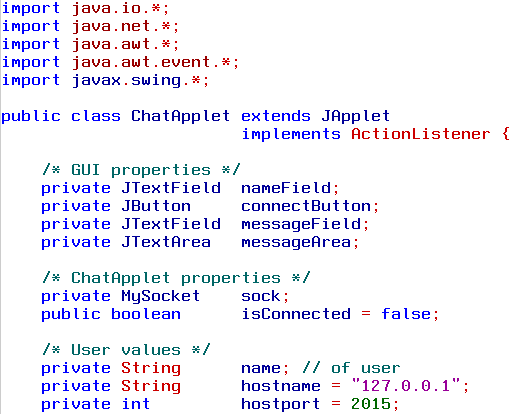
A user name (or nickname) to be used,A lot of the code is GUI related and I present that code without too many comments. Let's start with the class header and its member variables.
a button to go on- and off-line,
an area to show all messages received
and at the bottom line the field to type in your lines (a plain ENTER will send them off).
|
By default this chat client will listen to the chat server that you may run locally at port 2015. That is the one we wrote last month.
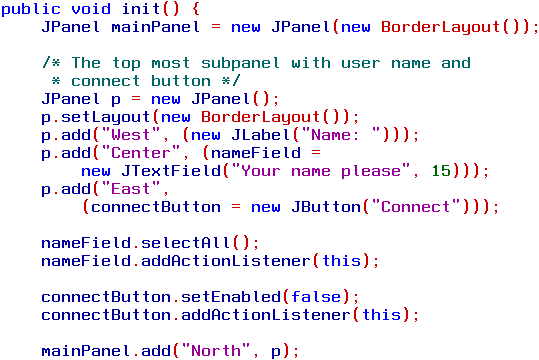
An applet differs from any other class in that it uses the init method instead of it's constructor. Simply omit the constructor and make a method named init. This method is called from the browser to set up the applet.
As the next step the browser will call start, it does that when there is such a method implemented, if not, it calls the empty start method of the java.applet.Applet class.
If a user leaves a page containing an applet the browser calls stop, which you can use to pause an applets work. The stop method does not destroy the applet, the object is still there waiting for the user's return. stop should not be called from the code, it is a browser call. This method is optional for you.
Finally there is the destroy method, also called by the browser. This method needs to be implemented if you have any system resources allocated, such as graphics or memory you got through the default toolkit, or resources that you are supposed to deallocate yourself.
We will only implement init and the start methods, since this applet neither does CPU intensive work, nor allocates system resources.
|
The main panel will hold three sub panels, here we start with the topmost one that finally
is added to the main panel. We use a new method on the text field, selectAll, to mark that
a user shall type his/her name or nickname followed by an ENTER. We deselect the button since
we first need a user's name.
|
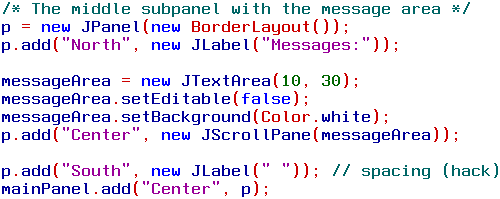
There is not much about the middle message area, except it shall not be editable, no one is supposed to enter text there but the socket listening to the chat server. Note that we can recycle the p variable if we like to. The main panel adds a copy of the reference to a panel to itself, after that the variable is free of use for another referenced panel.
|
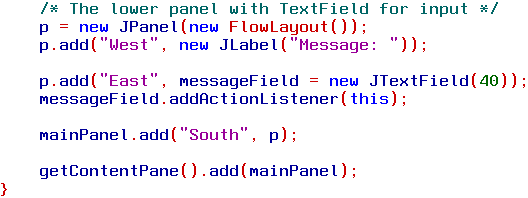
This code doesn't need much explanation. We add another sub panel, the bottom one, to the main panel. In turn, the main panel is added to the applet itself. As an extra exercise you may add some tool tips to the name field and the message field, perhaps that a user shall end input with an ENTER.
With this the "constructor" is done. The object now waits for the browser to say 'start' so let's do that method. The start method will simply put the focus at the namefield.
|
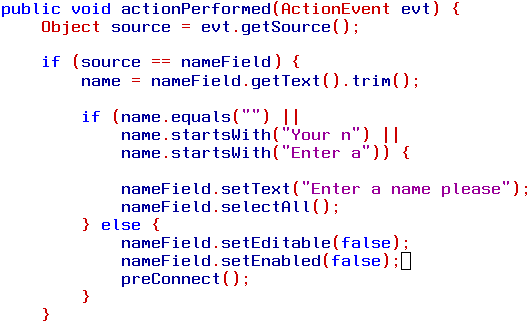
Let us continue with the natural point of the user flow, the name input field. Entering a name triggers an action that is caught by the method actionPerformed.
|
Since a user name is required--how else would other users know who said what?--we need to test for that. This routine simply asks the user to supply a name. If a so called valid name is given the user should not be able to change name as long as the connection is up. Finally we call preConnect that does some work, we will come to that in a moment.
Now we will continue with the actionPerfomed method.
|
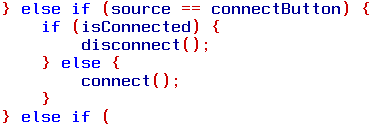
The next natural stop of user flow is the connect button. After that pre connection work is done the user will press the "Connect" button. And either the chatterbox is connected, or not connected. Imagine the applet got connected, then the next stop will be the message input field.
|
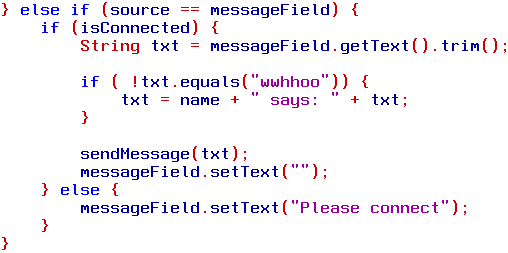
If and only if the chat client is on-line, message input will be handled. Further, there is one line that we must handle separately, the wwhhoo question. Since that is a request to the server to see who is logged on, we cannot append the user name. Otherwise we append the user name and 'says:' to one message and send that text. Finally we erase the input field.
As you may have noted I have violated my own advice that the most often used block in a
row of if/else if clauses should come first. This time I broke the rule because of the
user flow, but please set the message input block to be the first one since it is most often used.
Now we are done with the actionPerfomed method. But we have piled up a few to implement,
first the preConnect method.
|
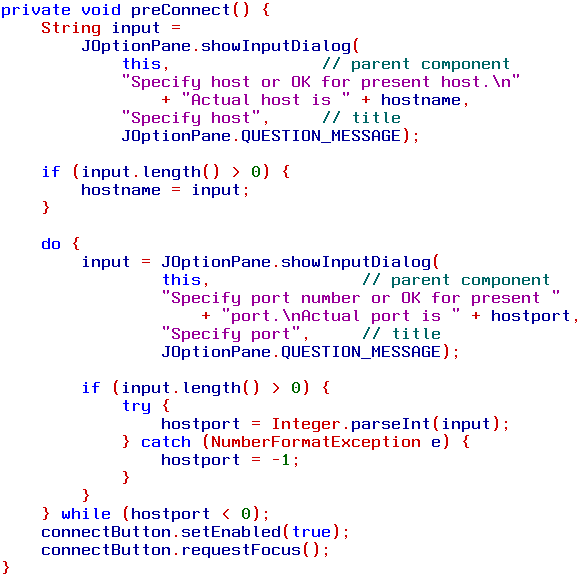
This method gathers some information used by the socket. Since we have a default host name and a default port number we simply ask if they are acceptable this time, else the user may use the input field of the dialog boxes. As I have implemented this simple chat client the only way to come here is by hitting ENTER within the name input field. But you are free to add for example a menu to the application if you like.
Note the input check at the port number, only numbers will pass this check. But still, neither the host name nor the port number is checked at this time, invalid input will raise an exception at connection time. Finally we enable the connection button, which leads us to the connect method.
|
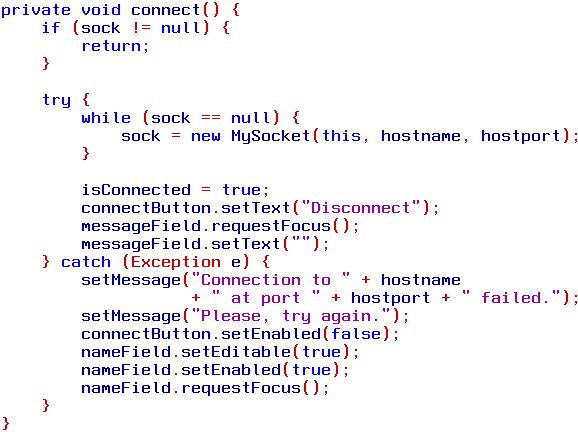
First a sanity check, we should never arrive into this method with a valid socket. But I prefer both suspenders and belt on these issues. Next we try to instantiate a new socket, and as you will see soon, we will let the socket constructor throw exceptions if it is has an error. Otherwise there are a few natural statements run.
The exception block both notifies the user and clears everything to the initial state. Recall that if an exception is thrown, this time from the socket instantiating, no remaining code in that try-block will be run, hence the isConnected variable will stay false , as will the button's text.
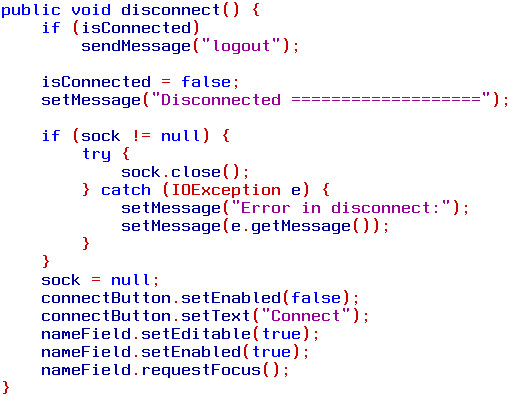
Let us look at the counterpart, the disconnect method.
|
The disconnect method may be called from the frame, and if so it may happen that we are not connected. The frame does not know such things, hence the first check before sending the logout command. Then, rapidly set the boolean isConnected to false to prevent other errors. Continue with closing the socket. After that, set the applet to its initial state.
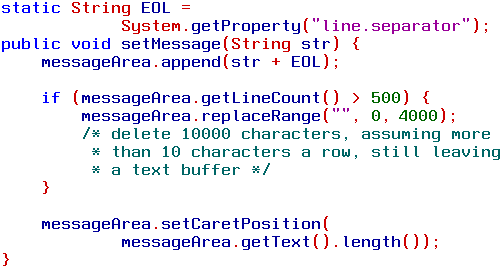
Let us move on to the setMessage method that we have touched upon.
|
As we are used to we get an end-of-line character that is system dependent. This is the only place we use this class variable, that is why I declare it here and not with the other member variables. Sometimes it is better having helper variables close to the method that uses them for clarity of the code.
Further, if you stay connected a long time you'd better dispose of older messages. Hence a simple removing if-block. Finally we see to it that the last message is put at the end of the message area by getting the cursor to the very end.
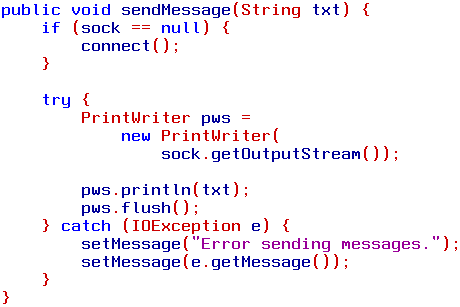
This method will mostly be called from the socket we are to implement. The next method uses the socket to send messages to the server.
|
You never know, maybe the socket just got weird, so we try to reconnect. Otherwise we try to send our message through the socket's output stream. Do not close the output stream, you'll need it the next time. But leave the PrintWriter to self-destruct.
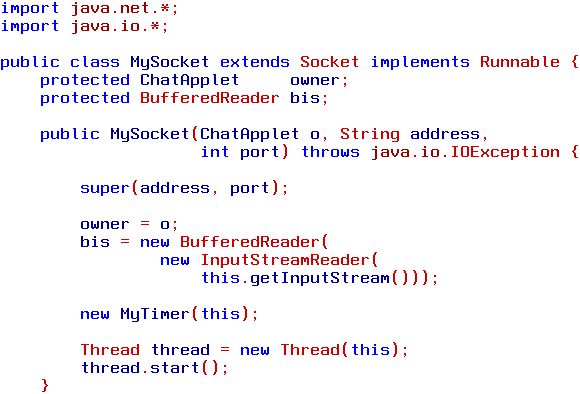
So far we are done with the ChatApplet class, only the MySocket class remains so let's do that one too.
|
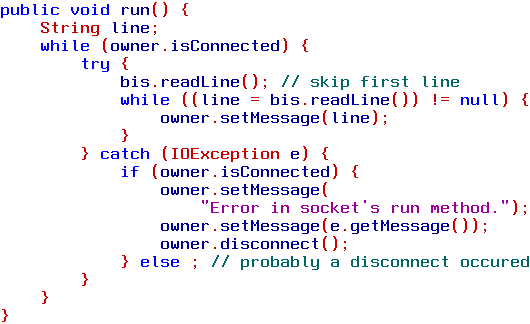
This class is both a socket and a thread on its own. Note that the constructor throws an exception if anything goes wrong, that is caught by the try/catch block in the connect method of the ChatApplet class. This class also wraps a tiny timer, we will get to it soon. Finally it creates its thread and starts that. A call to a thread's start method makes the JVM call run, hence let us implement the run method.
|
We have seen this type of method before, an eternal loop waiting for new messages. The only difference is that the while clause also checks to see if it is supposed to continue. Some error handling is added. Plain and simple. Let us finally look at that tiny timer.
|
This timer is set up as an inner class so it has full access to MySocket's variables and methods. The timer merely sleeps for ten minutes and then sends a tiny alert to the server not to be timed out. The timer runs as long as the socket is on-line.
Now we have the three necessary classes, not counting the inner class. We have a humble chat client ready for use. For testing purposes you can run the server at your localhost. But it would be nice to have a OS/2-only chat server running somewhere.
Since this is the last IntoJava installment I will thank you for your patience with me.
The installments now total 23, spanning more than 2 ½ years. I hope some of you
have enjoyed the ride and that some of my babble has been of value to you. Thanks!
The complete IntoJava archive
(updated a few days after each new issue is published.)
As a final convenience here is the full source code of the message server and the chat client.
Further, for on-line browsing you will find links to the complete IntoJava series.
Again, thanks for the time being.
Simon
|
||||||||||||||||||||||||||
Server.java (http://www.os2ezine.com/20011216/Server.java)
ServerDaemon.java (http://www.os2ezine.com/20011216/ServerDaemon.java)
MyServerSocket.java (http://www.os2ezine.com/20011216/MyServerSocket.java)
The Chat Client:
ChatFrame.java (http://www.os2ezine.com/20011216/ChatFrame.java)
ChatApplet.java (http://www.os2ezine.com/20011216/ChatApplet.java)
MyChatSocket.java (http://www.os2ezine.com/20011216/MyChatSocket.java)
 Simon Gronlund (http://www.d.kth.se/~d97-sgr/index_e.html) is earning his Master of Science in Computer Science at the Royal Institute of Technology, Sweden,
as an adult student. He also teaches Java and computer-related courses at the college. When he isn't tampering
with his Warp 4 PC, he spends his spare time with his two boys and his wife.
Simon Gronlund (http://www.d.kth.se/~d97-sgr/index_e.html) is earning his Master of Science in Computer Science at the Royal Institute of Technology, Sweden,
as an adult student. He also teaches Java and computer-related courses at the college. When he isn't tampering
with his Warp 4 PC, he spends his spare time with his two boys and his wife.
This article is courtesy of www.os2ezine.com. You can view it online at http://www.os2ezine.com/20011216/page_11.html.